ISY Portal Node Server Occupancy & Locative app Instructions
Prerequisites
1) This solution requires the iOS app Locative, thus information on this page only is useful to iOS users. (Locative is no longer in development for Android users)
2) The user must be subscribed to the UDI Portal service, and approve the portal in ISY's Admin console.
3) The user must have configured the node server in the UDI Portal.
Android users can try the UDI Mobile app.
ISY Portal Node Server Occupancy Instructions
1) Log into the ISY Portal using valid login credentials at "https://my.isy.io/".
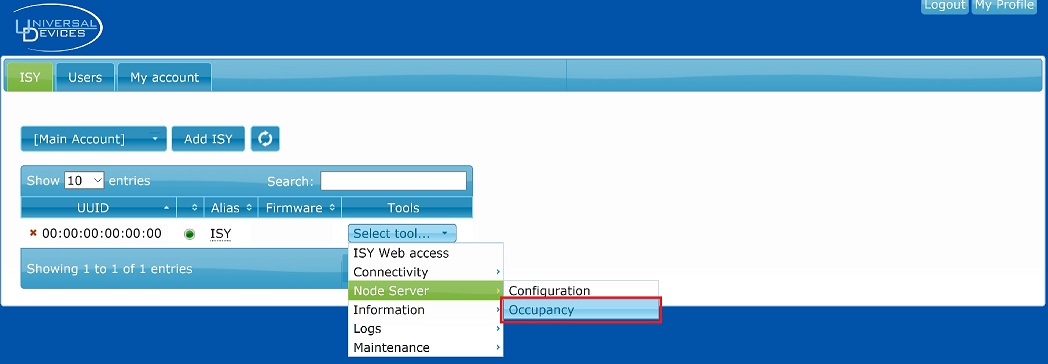
2) Select "Occupancy" by selecting "Select tool..." then "Node Server" then "Occupancy".
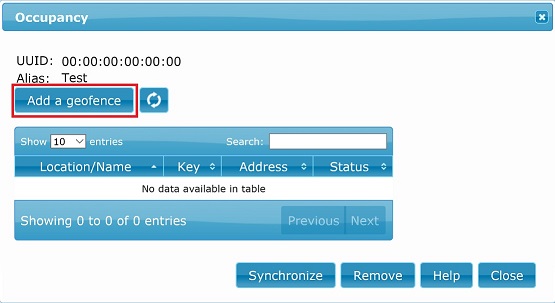
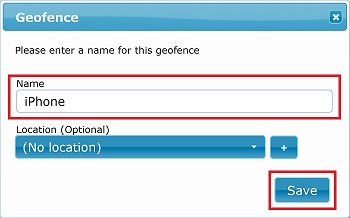
3) Select "Add a geofence", please enter a name for this geofence, such as "iPhone" and select "Save".
4) Location (recommended). The user may also enter a location (or locations). To add a location, select the "+" button to the right of the "Location" dropdown, enter a location name (such as "Home") and select "Save". Adding a location provides a global status node, which means that the location is considered occupied (true) if any of the location members are occupied (true).
- Note: Locations may be added later, and devices may be assigned or reassigned to locations anytime.
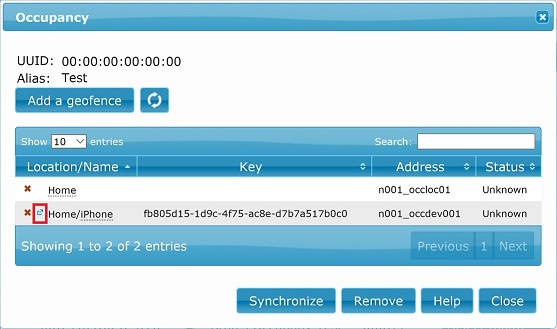
5) Once locations and geofences are saved, your "Occupancy" window should look like this:
6) Location nodes and geofence nodes should now be present in the admin console UI for consumption in programs.
7) In order to change the status of these nodes, the user must implement a mechanism for sending "GET" requests. The Mobile application "Locative" supports this functionality. Before Locative is configured, the user must obtain two unique URLs from the portal for each device/geofence they wish to change the status of. (one URL for IN, and one URL for OUT) These URLs can be obtained by selecting the blue arrow to the left of the device name in the "Occupancy" window.
Troubleshooting
- If a geofence has accidentally been deleted in the admin console, or if there is an extra geofence that does not exist on the portal (such as restoring ISY to a backup that has more geofences) the user may select "Synchronize", then "Yes" to the dialog box, then "OK" to the dialog box to synchronize geofences between ISY and the portal.
Locative Application Instructions
1) Download and install Locative by Bearologics UG (Marcus Kida)
2) Launch the application and select "+" to add a geofence.
3) Enter in a location, set the radius to the maximum, and select "POST / GET" to "GET". "Trigger on Arrival" and "Trigger on Departure" should be enabled. The User may enter a custom location ID such as "Home".
- Note: setting geofence to maximum avoids issues with Locative trying to send GET requests over weak but connected Wi-Fi.
4) Log into the portal on the mobile device's browser, navigate to the "Occupancy" window by selecting "Select tool..." then "Node Server" then "Occupancy". Select the blue arrow to the left of the device name and copy both URLs presented in the dialog box one at a time. (one URL for IN, one URL for out)
- Note: For this step, it is recommended that user access the portal via the mobile device they are setting up, so the user may copy and paste the URLs into Locative.
5) Paste the "IN" URL obtained in the previous step into the field "Trigger on Arrival".
6) Paste the "OUT" URL into the field "Trigger on Departure"
Locative is now configured with a geofence and able to send GET requests which change the status of device nodes in ISY.
- Note: the user can test this functionality by leaving the geofence or by sending a test request in Locative's settings page.


