UD Mobile
Installation
Notes
UD Mobile works with firmware 5.0.16 and greater. Firmware versions lower than 5.0.16 may work but not officially supported and have known issues which are only fixed by firmware update. The latest 5.x firmware now requires a 500 series Z-Wave board. If upgrading from 4.x to 5.x be sure to select firmware which is compatible with your system. Some information contained on this page may be specific to iOS or Android.
Quick Start Guides
Existing Portal Users
Upon Installation the app will prompt to setup using ISY Portal. Select Yes.
The app will prompt for ISY Portal login. Select Yes. If app prompts for Portal credentials enter your credentials and save. App may also show a dialog with existing Portal accounts. If this is initial installation select Add New Portal Account.
App will then show a list of ISYs on your portal account or a list of ISY Portal accounts. If a list of Portal Accounts is presented select the Portal account which contains the desired ISY. Select the desired ISY.
Select SAVE at the top right. Then select YES when prompted to synchronize. Wait for synchronization to complete. After synchronization the app will be ready to use on remote connections.
Adding Another ISY (Existing Portal Users)
These instructions assume the ISY is already linked to ISY Portal.
Select Settings-Tab > Systems > Add (top right).
The app will prompt for ISY Portal login. Select Yes. If the ISY is using the same Portal Account as your previously linked ISY(s) select the existing Portal Account from the list. If the ISY is using a different Portal account select Add New Portal Account.
After Portal Account has been selected the app will show a list of available ISYs. Select the desired ISY to add to the app.
Select SAVE at the top right. Then select YES when prompted to synchronize. Wait for synchronization to complete. After synchronization the app will be ready to use on remote connections.
Remote Connections
Remote connection on UD Mobile can be achieved in 3 scenarios.
First is our managed method using ISY Portal. ISY Portal has competitive prices of $24 for 1 year or $39 for 2 years (prices current as of 02/18/2024). If your ISY has not been associated with the ISY Portal in the past we offer a 30 day free trial*. ISY Portal Installation instructions can be found here https://wiki.universal-devices.com/index.php?title=ISY_Portal_Installation_Instructions[ * ISY994 hardware must have purchased and installed the Portal Module Prior to June 2023 as our Module purchase server is no longer active.]
Second is an unmanaged direct connection. The unmanaged method requires a Trusted CA Signed SSL Certificate. The Trusted SSL CERT is required for reasons stated below in App Transport Security. Instructions on adding a CERT to your ISY can be found here: https://docs.universal-devices.com/production/ISY994%20Series%20Network%20Security%20Guide.pdf . There are methods to add a Self Signed CERT to the Trusted Key Store on Android, however it is beyond the scope of our support and may require root on some devices.
Finally a local connection can be established on a remote network if running a VPN Server on the same local network as the ISY. To use this method select "Only use Local Connection" in the local connection settings. Setting this option will instruct the App to ignore remote connection settings and only use the local network.
App Transport Security (ATS) iOS
App Transport Security (ATS) is disabled by iOS for local loads (1), for this reason Local Connections do not need a Trusted CERT, ATS requires a Trusted CERT for Remote Connections. While it is possible for the apps to disable ATS it would make all connections less secure and we would have to meet the exception requirements (2) during app review which we likely do not meet.
(1) https://developer.apple.com/documentation/bundleresources/information_property_list/nsapptransportsecurity/nsallowslocalnetworking " ATS doesn’t block local loads by default in newer versions of the OS"
(2) https://developer.apple.com/documentation/security/preventing_insecure_network_connections#3138036
"The app must connect to a server managed by another entity that doesn’t support secure connections." Portals provided by UDI and Third parties support secure connections, and UDI controls the firmware. So, this does not apply. Apple has also mentioned this will be removed in the future.
"The app must support connecting to devices that cannot be upgraded to use secure connections, and that must be accessed using public host names.". ISY firmware does support secure connections, so this exception does not apply.
Local Connections and Local VPN
Local connection on UD Mobile can be achieved in 2 scenarios, (1) Combined Local and Remote Connections and (2) Local Only or VPN. Credentials for local connections are below Remote Connection Settings in the System Settings Screen (Settings Tab > Systems > Your System).
Combine Local and Remote Connections
Use Local Connection along with a Remote Connection for the same system. Before starting verify you are connected to the same WiFi network as your UD Hardware.
Go to Settings Tab > Systems > your-system-name, where your-system-name is the name of your Universal Devices Equipment.
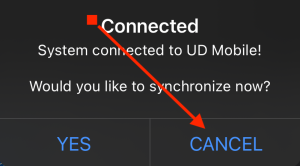
If prompted to Synchronize press CANCEL. (note: if your mobile device, or UD Hardware cannot connect to Portal, or there is an outage please disregard any error messages.)
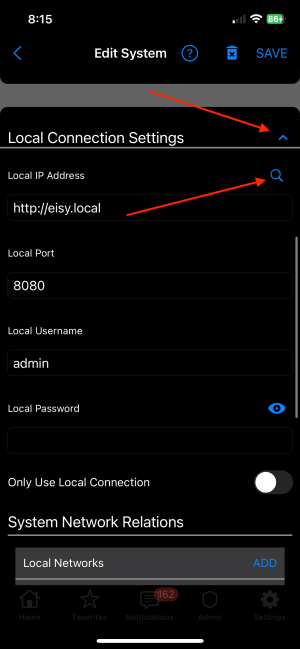
Scroll down to Local Connection Settings then press the Expand "⌄" button next to the Local Connection Settings
Press the Search (magnifying glass) icon. If your system is found the Local IP Address will be populated. If it is not found select your system from the List. If no systems are found verify you are connected to WiFi and system is connected to the same network. NOTE: WHEN USING A NUMERICAL IP ADDRESS, THE ADDRESS MUST BE RESERVED IN YOUR ROUTER OR UPON SYSTEM/ROUTER REBOOT THE SYSTEM MAY BE ASSIGNED A DIFFERENT IP ADDRESS WHICH WILL CAUSE ERRORS IN UD MOBILE. IF USING EISY OR POLISY, IT MAY BE POSSIBLE TO USE http://eisy.local or http://polisy.local IF YOUR MOBILE DEVICE AND ROUTER SUPPORT .local ADDRESSES. THE .local ADDRESSES WILL NOT WORK IF YOU HAVE MORE THAN ONE EISY/POLISY ON THE SAME NETWORK.
Enter your Local Username and Password
Only Use Local Connection switch MUST BE OFF.
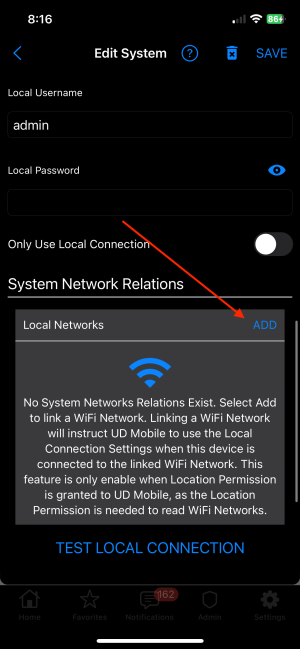
Scroll down to System Network Relations then press "Add" Next to the Local Networks Heading. Note that you may be asked for location permission, this is needed to read WiFi networks.
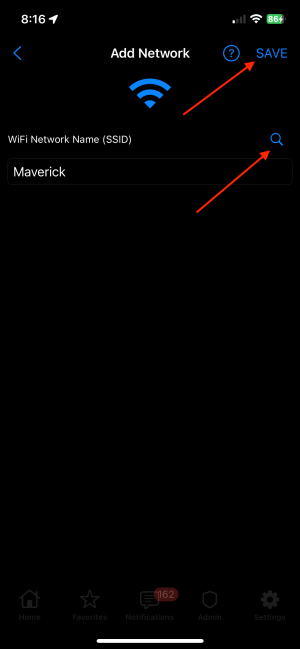
If this is the first time entering a WiFi network into UD Mobile, then UD Mobile will ask to identify a new WiFi Network. If this is not the first time entering a WiFi network you are presented with a list of previously entered WiFi Networks, select Add New Wifi Network if needed.
Press the search icon to populate with your current WiFi network. Alternatively manually enter the WiFi Network SSID. Then press save.
When returning to the System Settings disregard any error messages or requests to synchronize.
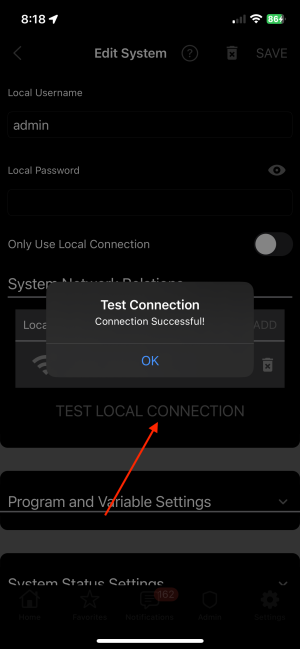
Press the Test Local Connection Button. If there is a successful message you can now use Local Connection Settings along with Remote Connection Settings. Whenever UD Mobile is on a Related WiFi network it will use Local Connection Settings.
If you have multiple SSIDs (i.e. 2.4 GHz and 5 GHz SSIDs named differently), be sure to add both Network SSIDs into System Network Relations.
Notes: Wifi Linking is required to make UD Mobile as fast and secure as possible. Linking a WiFi Network will instruct UD Mobile to use the Local Connection Settings when your device is connected to a linked network. Setting the WiFi network relations is needed as the app will usually connect to Portal before finding you system when searching the local network, thus resulting in a Remote Connection. When the app does not need to search for the local IP Address a local connection has lower latency. The Local IP Address should be reserved in your router so that it remains the same after power cycle. Note that this feature requires location access to read WiFi networks. If the WiFi information is not populated, after accepting permissions prompt, or is populated with "<unknown ssid>" then location permissions are missing or location has been turned off at the device level. Enable location at the device level by going to the settings page for the Android device then selecting Location. Enable permissions at the app level by long clicking the app icon then selecting App Info > Permissions > Location, Use precise location must be enabled along with "Allow only while using the app" or "Always". "Always" must be selected if using Geofencing.
Local Only and VPN
This forces UD Mobile to only use Local Connections Settings. This will require that "Only use Local Connection" setting is switched on. The app will now only connect using the Local Connection Settings, this is intended for users who have a local VPN or users who do not setup a remote connection.
Note that the Local IP Address must be fully qualified starting with "http://", also be sure there is no "/" at the end of the address.
WiFi Connections without internet
Results may vary depending on OS/Device and where the internet outage occurred. If Mobile internet (5G/etc.) is down and WiFi is not then UD Mobile's local connection settings will allow local access. If Portal is down and WiFi has internet then UD Mobile's local connection settings will allow local access. If WiFi does not have internet access then it is dependent on your mobile operating system.
Most Android devices can join WiFi networks without internet access as long as user accepts a popup prompt allowing the connection. Android devices will also route network traffic to the WiFi network.
iOS devices may be able to join WiFi networks without internet access but iOS will not route traffic to this network. There are a few ways to force this behavior programmatically. However forcing this behavior causes other issues such as preventing iOS from routing to mobile network when the WiFi network connection is poor, and will not work for VPN. Some apple devices such as WiFi only iPads, do not route any traffic to WiFi connections without internet.
Local Connections troubleshooting
Local Connection Settings override default settings in UD Mobile. For most users only remote connections settings need to be implemented.
Go to Settings Tab > Systems > Your System > Local Connection Settings.
Note the local IP Address, then press the magnifying glass icon next to the Local IP Address. Does your system show in the Finder list? If the system is not found UD Mobile cannot locate the system on your local network, check your router to verify the system is connected.
If the system is found but the Local IP Address has changed an IP Reservation is required in your home WiFi router to use Local Connection Settings or the IP Address may change on system or router power cycle/reboot. If you prefer to use the default app settings please uncheck "Only use local connection" and remove any WiFi Relations.
Finally press the Test Local Connection button at the bottom of local connection settings which will attempt to diagnose any other issues.
Synchronization
UD Mobile will request many files from your System during synchronization which allow the app to perform many operations locally. This results in a faster experience while using the app. UD Mobile may prompt to backup after synchronization if files no longer appear to be needed. This may occur after System updates or removing nodes. After backup has been completed it is safe to delete the unused values. If any of your favorites or customizations were removed the backup can be restored.
There is a low probability the deletion queue was caused by a corrupted file or network communications. If there are dozens of files queued for deletion please select cancel, reboot UD equipment, then try synchronization again. If prompted to backup, backup then allow UD Mobile to delete unused database entries.
The first synchronization after migration may also cause a large number of files queued for deletion. Please backup if prompted then allow UD Mobile to delete unused database entries.
Migration
Migration from ISY994 to Polisy/eisy or from Polisy to eisy.
Migration will involve multiple steps. Before starting the migration process please setup your new system through UD Mobile from Settings-Tab > Systems then select the Add button at the top right and follow on screen prompts.
After the new system is connected to the Universal Devices Portal, please migrate your backup to the new system.
https://wiki.universal-devices.com/index.php?title=Eisy:User_Guide#Migrating_from_994/Polisy_to_eisy
After system is migrated please migrate any portal services such as Google Assistant/Alexa.
https://wiki.universal-devices.com/index.php?title=ISY_Portal_Migrate_configurations_to_a_new_ISY
Finally migrate your favorites and settings in UD Mobile. First backup UD Mobile from Settings-Tab > Backup in case of errors this way Favorites and User Preferences will not be lost.
Go to Settings-Tab > Systems. If you have 2 systems here please first click the new system, disregard/cancel any dialog messages, then press delete (top right) to delete the new system. Select the system you would like to migrate.
Dismiss/Cancel any popup dialogs.
Scroll to the bottom of the page and click Clear UUID. Disregard/Cancel any popup dialogs.
Expand Local Connection Settings. If there is a Local IP Address press the search icon next to the Local IP address to find the new system's address or enter manually. Note this only needs to be done if you had Local Connection Settings for the old system.
Click the delete (trash) icon next to the Portal Account in the Remote Connection Settings.
Click login.
Click the existing portal Account (Assuming you used the same portal account for both the existing and new systems)
Click the new System. If you receive a duplicate systems warning please disregard, but be sure to delete the duplicated system after this migration. This is caused by not deleting the new system as instructed in the first part of UD Mobile migration
Synchronize .
When synchronization is complete, UD Mobile may ask if you want to remove unused values. Select Remove Unused Values. This only affects the UD Mobile database not your system.
Your system is now migrated, however you may now have 2 instances for your system in the app. Go to Settings-Tab > Systems and delete the reference to the new system (not the reference to the migrated system).
eisy WiFi Configuration
NOTE: WIFI ONLY IPADS OR MAC M1 CAN NOT CONFIGURE EISY'S WIFI ADAPTER
New Installation
If this is a new install of UD Mobile follow prompts to login to your Universal Devices account then select eisy from the device selection menu. Upon selection select WiFi and follow prompts to setup eisy's WiFi adapter. See setup below for detailed prompt flow.
If this is an existing installation of UD Mobile users can add another system from the Bottom Settings-Tab > Systems > Add (top right). Then follow prompts to login to, or select existing, Universal Devices Account. When prompted to select your system click "Add New System" at the bottom of the Select System dialog. Select eisy from the device selection menu. Upon selection select WiFi and follow prompts to setup eisy's WiFi adapter. See setup below for detailed prompt flow.
Existing Installation
If your eisy hardware is already connected to UD Mobile via a wired connection the user would like to configure eisy's WiFi adapter go to the bottom Settings-Tab > WiFi-Configuration then follow prompts to configure eisy's WiFi adapter. See setup below for detailed prompt flow.
Setup
Check out our videos for a walk through of WiFi setup:
https://youtu.be/-0P9uxZ61ik?si=4hlAJZVKtw8HMCPX
Troubleshooting
Most issues with eisy WiFi configuration are related to eisy not being in WiFi Setup Mode, denied mobile device permissions, or eisy's WiFi network was entered manually into the Mobile device.
Verify eisy is in WiFi Setup Mode by opening your mobile device WiFi settings and verify a network prefixed with "eisy" is available. DO NOT CONNECT TO THIS NETWORK or the app will not be able to complete configuration. If this network is saved by your mobile device please forget the network before attempting setup.
If you have denied permissions to the app you will need to grant them manually from your mobile device settings. Required permissions are camera, location, local-network (iOS). Camera permission is needed to scan eisy's barcode. Location permission is needed to read the currently connected WiFi Network to both automatically populate your home WiFi network SSID and to verify the app is connected to eisy's WiFi network. Local-Network (iOS) permission is needed to find eisy on your home network after it has connected to your home WiFi network.
If eisy's WiFi Adapter is saved in your mobile device's saved networks UD Mobile will not be able to connect or set the password due to OS security measures. These measures are in place to prevent apps from changing your saved network passwords and connecting to saved networks without your consent. If your mobile device's saved networks include eisy's WiFi network you must forget the network before configuring WiFi from UD Mobile.
If all the above does not work you can manually connect to eisy when in WiFi configuration mode although some mobile devices, specifically iOS devices, will connect to a network without internet but will not route requests to this network. So this should be done from a non-iOS Devices. First put eisy in WiFi configuration mode by double pressing the front power button. Then connect to eisy's WiFi network, the password is the text under eisy's QR Code if there is no number under the QR Code the numerical value of the Serial Number (SN) should be used. Finally send the following command in a browser http://172.26.18.3:60018/setwifi/SSID/Passphrase where SSID is replaced by your home WiFi SSID and Passphrase is replaced with your home WiFi password. So if your SSID (WiFi network name) is "MyHomeNetwork" and your password is "MyPassword" the URL to set your credentials will be http://172.26.18.3:60018/setwifi/MyHomeNetwork/MyPassword.
Damaged QR Code
If your eisy QR code becomes damaged it is possible to generate a new QR code using various websites which create WiFi QR Codes, such as https://qifi.org/. The SSID is "eisy.setup.xxxxx" where xxxxx is the last 5 digits of your MAC address (UUID). So if your mac address is MAC:0021c9025d78 or your UUID is 00:21:c9:02:5d:78 then the SSID is eisy.setup.25d78. The password/key is the device serial number (S/N). So if the serial number is S/N:99145838860729 then the password/key is 99145838860729. Encryption type is WPA. The MAC and S/N can be found on stickers on the bottom of eisy or on the back of the original packaging.
Geofencing
Beta geofencing added to UD Mobile for iOS in version 1.0.22 and Android version 1.0.30.
Video Examples
https://www.youtube.com/watch?v=Xw3tXbSo97E
Permissions iOS
UD Mobile requires ALWAYS location permission or iOS will not allow the app to run geofencing functions when the app is not in the foreground. If ALWAYS Location permission was not allowed or another selection was made users must enable these settings manually in iOS Settings > UD Mobile > Location.
Geofences
Geofences are located in UD Mobile > Settings-Tab > Geofencing.
Add Geofence
From the Geofences screen select the "+" button at the top of the screen.
Modify Geofence
Click the map to modify the geofence location and radius. Minimum radius is 200 meters, Maximum radius is determined by the device hardware.
Enter Commands
Add a new Enter command by clicking the "ADD" button next to the Enter Commands Header.
Exit Commands
Add a new Exit command by clicking the "ADD" button next to the Exit Commands Header.
Backups iOS
Geofence locations are saved in app backups but the enabled status is not. If a backup is imported onto another device then the geofence may need to be enabled if a geofence of the same name was not enabled before backup import. Any geofences enabled before import which do not have the same name as imported geofences will be automatically created when opening the Geofence settings in the app. If geofence radius or center coordinate is different from the imported backup then the location may not be changed until the geofence is re-saved or disabled then re-enabled.
If the geofence commands on enter or exit will be different on different devices then name them differently and create all on the device where the backup will be exported. Then enable/disable as needed after import. Enabled status should persist if the geofence name is the same after import.
Backups Android
Android system does not allow apps to view existing Geofences, so enabled status is saved in the apps backup file. After import please reboot Android device. If Android device is not rebooted then old Geofence data may still exist and enabled Geofences may not actually be enabled.
UD Mobile Location Services
Android Only.
Geofencing provided by Google Play Services is broken and acknowledged by Google. Play Services Geofencing will not trigger Geofences until an App or Operating System request an update to location using Play Services APIs. If no apps are running which request location, your Geofences will not trigger. To get around this issue UD Mobile on Android implements a optional Location Foreground Service.
UD Mobile Location Services are services to assist with Geofencing and will consume battery. UD Mobile Location Services are NOT required for Geofencing however Android may not update your geofences until another app or the Android system requests location. If you are in your vehicle with Android-Auto/Google-Maps running then UD Mobile Location Services should not be required as these types of apps will update the Android System Location. UD Mobile Location Services will run in the foreground and will be shown as actively running in Notifications and Android Settings.
Polling interval for UD Mobile Location Services can be updated manually or by any Geofence Enter/Exit commands. This will allow users to set larger Geofences to increase polling interval as the user gets closer to a desired smaller radius Geofence and decrease polling interval as they get farther from desired smaller radius Geofence.
Polling intervals:
- Negative Number - When Polling Interval is a negative number UD Mobile will only request location when the mobile device connects or disconnects from WiFi. Currently the App waits 2 minutes after WiFi disconnect before checking location. Location is checked immediately after WiFi connection. This setting consumes the least amount of battery but geofences may be missed.
- Zero - When Polling Interval is set to Zero UD Mobile is in continuous location monitoring mode. Location will be updated every minute or when the device moves 50 meters. This setting consumes the most battery and should only be used for short periods.
- Positive Number - When Polling Interval is set to a positive number UD Mobile will request location at the specified interval and whenever the mobile device connects or disconnects from WiFi. Currently the App waits 2 minutes after WiFi disconnect before checking location. The higher the polling interval the less battery consumed.
Geofence Logs
UD Mobile keeps a limited amount of Geofencing log. Access logs from the Geofence Screen (screen which shows your list of Geofences) click the Document button at the top of the screen to view Geofence Logs. Logs include UDM Location Services logs.
Occupancy v2.0 Node Server
The Occupancy V2.0 Node Server is no longer required when using UD Mobile as UD Mobile will issue direct commands to your system on Fence crossings. However the Occupancy v2.0 Node Server may make tracking a locations occupancy easier if there are multiple users.
Setup
Notes: Occupancy V2.0 Node Server requires ISY/Polisy/eisy UUID is linked to a portal account with a valid license (remote access license)
Go to your Portal Account the press "Select tool" next to the UUID of your system. Go to Occupancy Node Server > Configuration. Press Configure Connection > Yes. Press Upload Node Definitions, this will reboot your system so please be on site before doing this operation. Also note that reboot may take some time if there are any pending updates which required reboot. Wait for the system to come back on line on portal, there should be a Green dot next to the systems UUID, Gray is not connected.
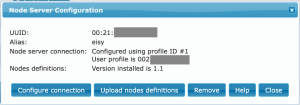
After System is connected to Portal, verify the Occupancy Node Server Configuration by going to "Select tool" > Occupancy Node Server > Configuration. The "Node Server Connection" and "Node Definitions" should be configured.
Troubleshooting Tip: If Node Definitions remain "Not Installed" after system is back online, then try removing (Remove button) the connection, then "Configure Connection" and "Upload Node Definitions" again.
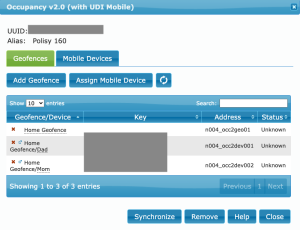
Go to "Select Tool" > Occupancy v2.0. Click Add Geofence, in this example I use "Home Geofence", then save. Now go to the Mobile Devices tab > Add Mobile Device. In this example I've added 2 devices "Dad" and "Mom". Click the Geofences Tab then click Assign Mobile Devices. Select the Geofence (i.e Home Geofence) and the Mobile Device (i.e. "Dad") then save. Do the same for the other Devices (i.e. "Mom").
Your setup should now look similar to the following:
Finally press Synchronize > Yes.
Open the Admin Console (restart if left open during this process) and you should see the Geofence with grouped Devices in the Node Tree. Note that these nodes may be grouped in the root directory which may need to be expanded, i.e. click the right chevron ">" one the left side of the system (IoX) which will show root nodes.
The Parent Node (i.e. Home Geofence) will show the grouped status for all devices. On initial install the Occupied Status for the Device (Dad/Mom) is empty, so set the current occupied status by pressing the "On"/"OFF" buttons for the Device (Dad/Mom). You should now see the Parent (i.e Home Geofence) Occupied Status is only equal to False when both Devices (Dad/Mom) have Occupied Status equal to false. The Parent Node (i.e Home Geofence) can now be used in programs.
If using UD Mobile please synchronize or the app will not be aware of the new Nodes. Then go to your Geofence and set the commands to trigger the Device (Dad or Mom) depending on who carries the device.
Forum Posts for similar request:
https://forum.universal-devices.com/topic/41776-network-resource-for-occupancy-nodeserver/
Backup and Restore
Android and iOS backups are not compatible. Backing up the UD Mobile App will save all App Systems, Favorites, and Customizations.
Restore
iOS Restore
iOS will allow backup to local storage and iCloud.
See "All Platforms" below for more information.
Android Restore
Android (Only Google's variant tested) will allow backup and restore from local storage and cloud providers such as Google Drive. Android cloud providers can be accessed by clicking the menu in the System File picker, the System file picker should show registered cloud providers.
See "All Platforms" below for more information.
All Platforms
If restoring over a configured app setup go to Settings-Tab > Backup.
If restoring to a new device or new installation select Restore Backup on the Add System Screen when prompted to login.
Local, Remote, and Portal passwords may need to be reset after import, passwords may persist if backup is imported on the same device but is dependent on the device secure key store. If having trouble with Remote Portal connections please logout all ISY Portal Accounts (Settings-Tab > ISY Portals Accounts) then re-enter the Portal Account in for each System (Settings-Tab > Systems). Currently iOS and Android backups are not compatible with the other platform. Amazon Android and Google Android backups are compatible with each other.
Backup
Backing up the UD Mobile App will save all App Systems, Favorites, and Customizations. Backups can be saved from Settings-Tab > Backup. See platform specific backup instructions below.
iOS Backup
iOS will allow backup to both local storage and iCloud (See "Restore: above for iCloud backup restorations). After selecting "Backup" navigate to the desired directory then select "Move" on the top right of the screen.
Android Backup
Android (Only Google's variant tested) will allow backup to local storage and cloud providers (i.e. Google Drive). Android cloud providers can be accessed by clicking the menu in the System File picker, the System file picker should show registered cloud providers.
Home Tab
The initial home tab screen will show a list of the users ISYs. Clicking an ISY will show the “Devices and Scenes”, “Network Resources, “Variables” and “My Programs” folders.
Clicking on a folders will show the folder contents, clicking on a node will show the Node’s Dashboard (see Node Dashboard). There may be additional options which are selectable on the right side of a Node list item, see the Node Type below for descriptions and actions. Some Node Types have an Action Indicator displayed at the top left of a Node’s icon (left side), see the Node Type below for descriptions and actions.
All nodes including ISYs and folders can be show/hidden by clicking the edit icon (pencil) at the top of the screen then clicking the add/remove icon to the left of the list item. Note that some Node Types have additional edit functions, see the Node Type below for edit functionality.
Devices and Scenes
Clicking on the “Devices and Scenes” folder will show the user the file structure as shown in the Admin Console (AC). The file structure can be change by the user from UD Mobile or the AC. If changes to file structure are made from the Admin Console, then users will have to synchronize UD Mobile from the “Devices and Scenes” folder by pressing the synchronize icon at the top right of the screen.
Edit a Node by clicking the edit icon then clicking the node in the list. The Edit dialog will be presented with edit options if they exist. Currently not all options are available from UD Mobile, please use the Admin Console for access to all available edits.
Grouped Nodes can be shown by clicking the expand icon on the right side for a node item. The expand icon will only be presented for nodes which have grouped children. If a node has grouped children but all child nodes have been hidden, the user must unhide the child nodes by clicking the edit icon to view children.
The Node Toggle Indicator (Action Indicator) is a filled or empty circle at the top left of the Node’s icon. The Toggle Indicator will only show for nodes which accept on/off (DON/DOF) commands. If UD Mobile has NOT received status for the node from the ISY then the Toggle Indicator will not be show until the node’s status is received. Node status is needed to determine if an on or off command should be sent. If UD Mobile does not have the node’s status clicking on the node’s icon will open the Node’s Dashboard (see Node Dashboard).
Clicking on a Node will show the Node’s Dashboard (see Node Dashboard).
Network Resources
Clicking the “Network Resources” folder will show an alphabetical list of Network Resources. Clicking on a Network Resource will show the Network Resources’ Dashboard (see Node Dashboard).
Clicking on the Network Resources’ icon (left side) will execute the Network Resource. An Action Indicator is shown next to the Network Resources’ icon to indicate it is actionable.
Network Resource Edits are currently not available from UD Mobile, please use the Admin Console then synchronize UD Mobile with ISY.
Variables
Clicking the “Variables” folder will show the “Integer Variables” and “State Variables” folders. Clicking on either variable-type folder will show an alphabetical list of the variable-type. Clicking on a variable will show the Variable’s Dashboard (see Node Dashboard)
Variable Edits are currently not available from UD Mobile, please use the Admin Console then synchronize UD Mobile with ISY.
Programs (My Programs)
Program folders contain a menu (3 dots) on the right side of the list item. Clicking the Program Folder menu will open the Program Folder’s dashboard which shows folder status (see Node Dashboard).
The Program Toggle Indicator (Action Indicator) is a filled or empty circle at the top left of the Program’s icon. The Toggle Indicator will show if the program is running or stopped, clicking the Program’s icon will toggle this action. The Toggle Indicator will only show if UD Mobile has the Program’s status. UD Mobile does not request Program status on app launch by default. To request Program status on app launch, go to Settings-Tab > Systems > Your-System-Name > Advanced-Settings > Program-and-Variable-Settings then toggle Request-Status-of-all-Programs. Please see Favorite Examples for custom program toggle (i.e. run if/else)
Some Program Edits are available from UD Mobile, please use the Admin Console then synchronize UD Mobile for all other Program Edits.
Edit Program
Notes: Some features are still in development on iOS, some features are only available from the Admin Console. When there is a Condition or Action not supported by UD Mobile the app will show an error message in place of the given Action/Condition. UD Mobile can not save any program with Actions/Conditions which are not supported. There are 2 methods to access program edits. The first is from the Home Tab, the second is from the Program Dashboard.
From the Home tab list of Programs click the Edit Button (pencil icon) at the top of the screen. Then click the Program in the list which will show edit options such as Rename, Delete, Move to Folder, and Edit Program.
From the Program Dashboard (Screen shown after clicking a Program in the list) click the program icon at the top.
Add Condition or Action
Add Condition/Action by clicking the "ADD" button at the top of the Condition (IF) or Action (Then/Else) Section.
Edit Conditions or Actions
Conditions/Actions can be edited by clicking the Condition/Action, this will open the edit screen.
Delete Conditions or Actions
Conditions/Actions can be deleted by clicking the Condition/Action then selecting the delete button (trash icon) at the top right of the edit screen.
Move Condition or Action
To move a Condition (IF) or Action (Then/Else) up or down, long press the Action/Condition until it becomes highlighted, then drag to desired position. Note that Actions/Conditions can only be moved in the same section.
Favorites
Show Favorites at launch
Setting the default launch preference to the Favorites Tab is dependent on platform.
iOS / Mac M1
Go to Settings-Tab > Global User Preferences > Launch Preference
Android
Long press the app icon on the mobile device home screen, then long press "Favorites", then drag to the home screen. Note some third party launchers may not show "Favorites" with long press and may require another method to obtain the shortcut. If the "Favorites" shortcut is not available search/ask for "dynamic shortcuts" from the launcher creator.
Add New Favorite
Add
Favorites can be added from 3 locations in UD Mobile.
(1) Go to the Favorites Tab. Select add ("+") at the top of the screen. This will open the Favorites Editor Screen.
(2) From the node list on the Home Tab, click the edit button (top right), then click the node, then click Add to Favorites.
(3) From the Node's Dashboard (screen shown when clicking on a node) click the settings button (top right), then click Add to Favorites.
Custom Name (optional)
Adding a Custom Name will override the Display Node name if available.
Type
Favorites Type allows the user to choose click actions for a favorite item.
- Default (Node) Type will display an ISY Node and requires the user to select a Display Node (below). Favorites of Type Node have 2 Interaction Types; Toggle and Open-Dashboard. Interaction Types can not be defined by the user. See Toggle Indicators below. For custom toggle please use Command Type along with an ISY Program which has your toggle preferences in the IF section, then select IF as the command (program may need to be disabled in ISY to prevent IF trigger).
- Folder Type will act as a folder allowing the user to add additional favorites inside. Favorites of Type folder also allow for an optional display node which inherits toggle ability from Node Type (above).
- Command. This Type will allows users to specify any number of Node Commands. Pressing a Favorite of Type Command will execute the defined commands. Favorites of Type Command also allow from an optional Display Node, the display node does not inherit toggle ability. The Display Node does not have to match Command Nodes. See Commands below.
- Status. Favorites of Type Status do not have clickable actions.
- Empty. Favorites of Type Empty will create an invisible tile. Empty tiles will be shown in Edit Mode for editability.
Icon
Optional Icon.
If not set default will be used. If the Display Node (below) is set and the Display Status (below) has an Individual Status Mappings (see Individual Status Mappings) the Favorites Icon has lower priority to Individual Status Mappings with icons.
Download Image (URL)
Allows input of a url for an image. Example URL: https://images.ctfassets.net/4cd45et68cgf/Rx83JoRDMkYNlMC9MKzcB/2b14d5a59fc3937afd3f03191e19502d/Netflix-Symbol.png
Span
Available for UD Mobile Versions iOS > 0.9.3 and Android version > 0.165.
The number of cells this favorite occupies. Default is the default value for the Favorite Type. The default span (number of cells in row) can be changed in Global User Preferences. Each Favorites folder (or main) can have a different Span value. Span for each folder is determined by highest value. Span values are User Preference or highest individual Span in the folder.
Color
Optional Icon Color (Currently Android only). If the Display Node (below) is set and the Display Status (below) has an Individual Status Mappings (see Individual Status Mappings) the Favorites Color has lower priority to Individual Status Mappings with color values. Hex color is 6 character hex prefixed by "#" (i.e. #808080). Eight character hex codes may be accepted with the first 2 characters representing alpha. Alpha color may show the original icon color under the user input color.
Display Node
The node which will be displayed. During Display Node selection an expand (downward chevron) icon next to a node indicates that the node has grouped children (grouped nodes), to see the children press the expand Icon. The Display Node can be cleared by pressing the delete (trash icon) during Display Node selection.
Display Status
After a node has been selected the Display Status will be shown (i.e. Status, On-Level, Ramp-Rate, ect.). This will allow users to change the default display status.
Node Toggle Indicator
The Node toggle indicator will only show for Favorites which have (#1) "Status" selected as the Display Status, and (#2) the selected node must accept on/off commands. Also (#3) if the App has NOT received a status for the node from the ISY the toggle indicator will not be show until the node's status has been received. Node status is needed to determine if an on or off command should be sent to the node. If the App has NOT received a status for the node, clicking the Favorite item will open the Node's Dashboard which shows all status values and controls for the selected node.
Program Toggle Indicator
The Program toggle indicator will only show for Favorites which have (#1) "Status" selected as the Display Status. Also (#2) if the App has NOT received a status for the program from the ISY the toggle indicator will not be show until the program's status has been received. Program status is needed to determine if the Run or Stop command should be sent to the program. If the App has NOT received a status for the program, clicking the Favorite item will open the Program's (Node's) Dashboard which shows all status values and controls for the selected program. To receive program status values on App startup go to Settings-Tab > Systems > Your-System-Name > Advanced-Settings > Program-and-Variable-Settings then toggle Request-Status-of-all-Programs.
Commands
This will be shown if Command is selected as the Favorite Type. To add a command select the add (plus) icon next the the Commands header. Note that to preserve database integrity, the app will prompt to save for new favorites, if the app does not automatically open the Command Selection dialog press the add icon again. Select a node (similar to Display Node above). After a node has been selected the command dialog will show a list of available commands. Note that a menu (three dots) next to a command indicate that the command supports no-parameter and parameter execution (i.e. ON or ON-to-50%). If a command requires parameters or if the parameter option (menu) was selected the Parameters dialog will be show. After entering any parameter adjustments select save. Currently commands support deletion not editing.
Save Favorite
Select Save at the top of the screen.
Edit Favorite
Go to the Favorites Tab. Select Edit (pencil icon) at the top of screen, then click the Favorite item for Edit Options. When edits are finished click the edit (pencil icon) at the top to finish editing.
Delete Favorite
Go to the Favorites Tab. Select edit (pencil icon) at the top of the screen. Click the Favorite item. Select "Remove from Favorites".
Move Favorite
Go to the Favorites Tab. Select edit (pencil icon) at the top of the screen. Click Move or Move-to-Folder. For Move-To-Folder select Paste when in the desired directory, the first screen is the home directory. To move position in the current directory long press the favorite item then drag to position.
Customizations
Mapped Colors
Icon Colors can be changed at the Global, Individual, and Favorites levels. Global and Individual Color mappings can be set to match node status values. Hex color is 6 character hex prefixed by "#" (i.e. #808080). Eight character hex codes may be accepted with the first 2 characters representing alpha. Alpha color may show the original icon color under the user input color. For installers setting colors for users please follow WCAG Guidelines. Generate WCAG colors at http://colorsafe.co/ with a off white (#fffdff) background.
Favorites Colors
Change favorite colors by clicking edit at the top of the favorites screen then click the desired node and select Edit. Favorites Colors have the lowest color priority and is intended for favorites folders which will not have a status value.
Global Colors
Change global colors based on node values (Null/Zero/Positive) from Settings-Tab > Global-User-Preferences. Global Mapped Colors have a lower priority than Individual Mapped Colors and have a higher priority to Favorites Mapped Colors.
Individual Colors
Change Individual Colors from the home/favorites screen by clicking the edit button at the top, then click the desired node, then click Configure Colors/Values/Icons. Select Add at the top of the Mapped Values screen to create a new mapped value. Mapped Values have the highest priority of all mapped colors (Global/Favorites). See Individual Status Mappings for details.
Individual Status Mappings
Change Individual Status Mappings from the Home/Favorites screen. Click the edit button, then click the desired node, then click Configure Colors/Values/Icons.
Individual Status Mappings can change a node icon, color, value, value-prefix, and value suffix based on the status value.
Comparison
Value comparisons include Null, Equal-to, Greater-than-or-equal-to, Less-than-or-equal-to, and Not-Equal-to. The app will only return one mapped value even if multiple mappings overlap. Value mappings are evaluated in the following order with the first matched being returned. Value Mapping order: Equal, Greater-than-or-equal-to (descending value order; highest comparison value will be matched), Less-than-or-equal-to (ascending value order; lowest comparison value will be matched), Null, Not-Equal-To (descending value order; highest comparison value will be matched).
Icon
(optional) If not set the default will be used. If set this will override Favorite icons.
Icon Color
(optional) hex color code. This will change color for both defined and default icons. This has the highest priority of all color settings (Global/Favorites)
Formatted Value
(optional) Sets a name for a status value. i.e. if value equals 0 (0%) show as the word OFF.
Prefix
(optional) Set a prefix in front of a value. i.e. put $ in front of a variable value.
Suffix
(optional) Set a suffix behind a value. i.e. put % behind a variable which is used to track lights or the degrees sign behind a variable used to track temperature.
Widgets
Widgets are only available on iOS version > 0.9.0 and Android version > 0.162. Widgets can be changed on the Node Dashboard screen
Node Dashboard Status Command Widgets
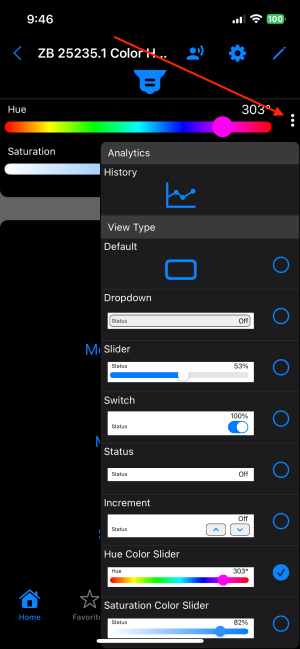
The Node Dashboard allows changing the widget type for Status values which are linked to a Command (i.e. are selectable). To Change the widget, put the screen in edit mode by clicking the pencil icon at the top of the screen. Click the node Status value then select the widget type from the dialog picker.
Widget Types
Note that all widget types may be selectable but may not be fully functional for all status types.
- default (System default. Has a chevron icon on the left.)
- Picker (List of selectable values or raw input for commands with over 200 values. Button instead of chevron icon.)
- Slider (Sliding seekbar. Variable value/init min = 0 max = 100.)
- Switch with Picker (On/off switch. Variables value/init off = 0 on = 100. Status click opens selection dialog.)
- Increment with Picker (Increment and Decrement Buttons. Variables value/init off = 0 on = 100. Status click opens selection dialog.)
- Status Only (Removes selectability.)
Missing Widget
A widget requires both a status value and a command linked to a status value. Not all commands are linked to a status value by default, however users may be able to change a command parameter within UD Mobile to allow widgets.
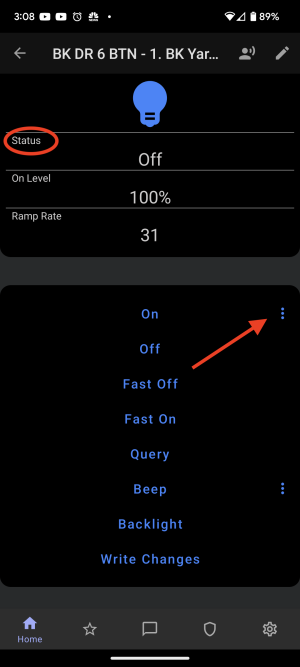
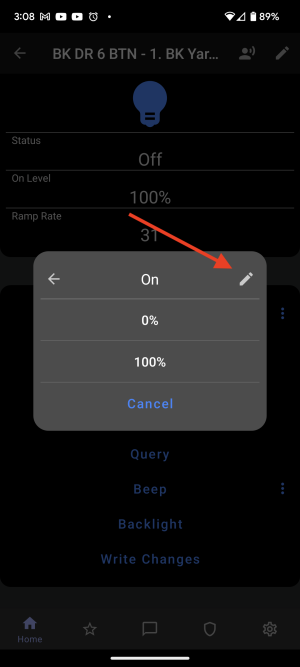
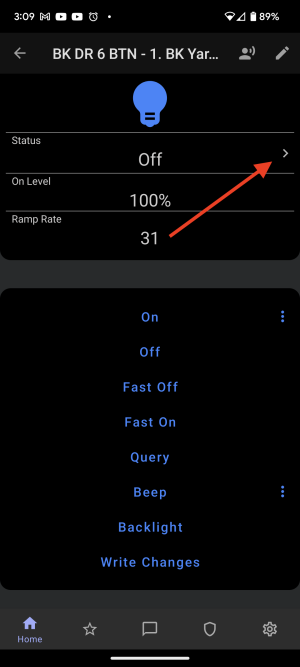
Open the Node's Dashboard and locate the status and command which should be linked. In the image below the "Status" value is not clickable, but we want it to be linked to the "On" command. If the command has 3 dots to the right of the command select the 3 dots, if not select the command. Note that the command must accept a range of value (i.e. 0 - 100) to be linked to a status.
Click the edit (pencil) icon at the top of the Editor Range Dialog.
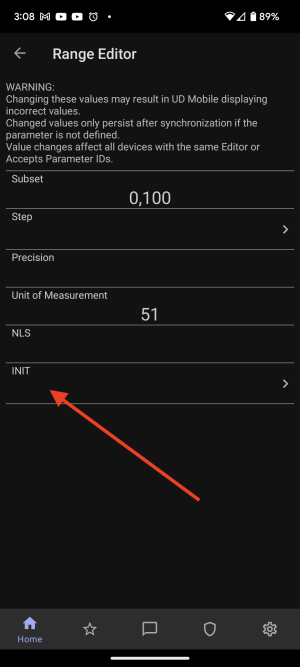
If the "INIT" (initialize) value is missing click the "INIT" section. Note that if this value is not empty synchronizing UD Mobile will return this value to its default state, if the value is empty the new value will persist during synchronization.
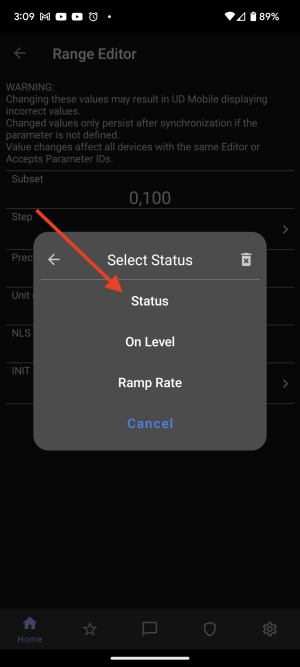
Click the Status value which should be linked to the selected command. In the screenshot below the Status value is named "Status".
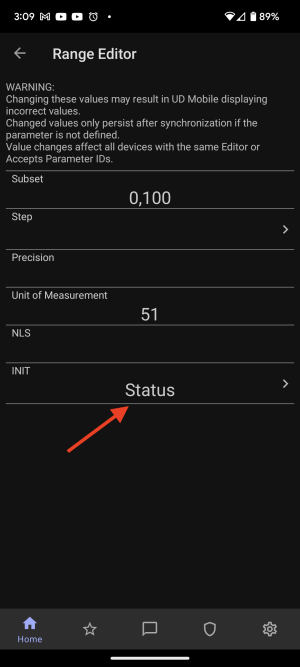
The "INIT" value should now show the selected Status Value.
Backout to the Node's Dashboard. The status value is now clickable and will accept Widgets.
Custom Views
Beta Feature, in production on iOS, Android Beta version 1.1.50
Custom Views are views which differ from the Standard Node Dashboard and Favorite views. Custom views may be shown in Default configuration if the Node Type or Node Hint conforms to one of the custom values supported by UD Mobile. If the Node does not conform to one of the Types listed below users can manually change the view type in UD Mobile from the Node's Dashboard (view which shows all status and command values). Manually change the View Type from the Node's Dashboard by clicking the Setting (gear icon) button at the top then selecting Dashboard View.
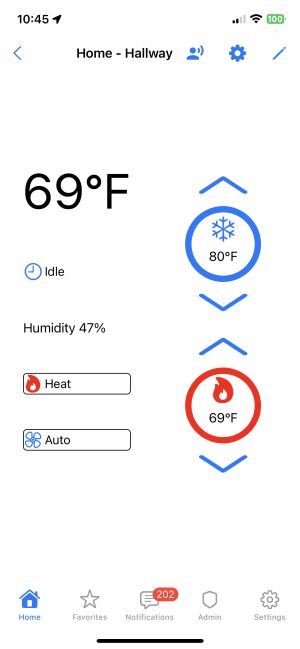
Thermostat
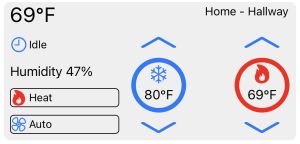
Custom Thermostat View in Favorites:
Custom Thermostat View in Node Dashboard
Edit Locks
Lock all top bar action items, Admin Tab Items and Settings Tab Items. Only the Global User Preferences item will be active on the Settings Tab and only the Lock Edits available to change with password.
Lock
To lock settings go to Setting Tab > Global User Preferences. Add a pin in Edit Lock Pin (Note: this is NOT an encrypted pin and will persist backup/restore), then click Lock Edit and set to true.
Unlock
To Unlock settings go to Setting Tab > Global User Preferences then click Lock Edit, enter pin, then set to false.
Favorite Examples
Favorite Custom Toggle
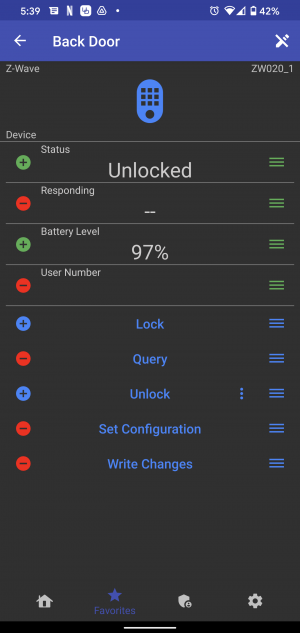
The following is an example of adding a custom toggle for a door lock, but the process is similar for all nodes/programs/variables. A door lock is used in this example as it does not support On or Off commands, so the app will not show a toggle indicator and will only open to the Node's Dashboard when clicked on the Favorites Screen.
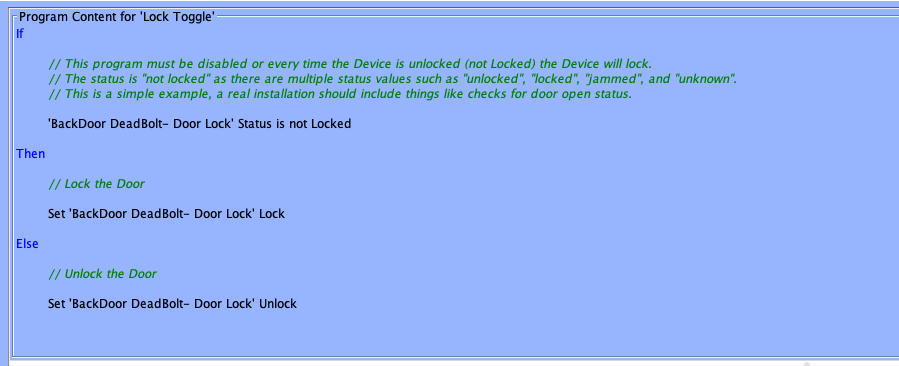
First we must create a Program in the Admin Console (Programs can also be created in UD Mobile). See Program Notes in program image. The program must be disabled to prevent unintended behavior.
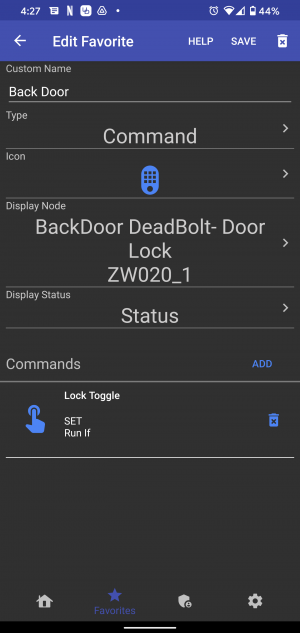
In UD Mobile create a new favorite. Change the Type to Command, and set the Door Lock as the Display Node. Add The program created above as a Command Node and select "Run If" as the Command. Note this Favorite was given the Custom Name "Back Door" which will override the original Node Name.
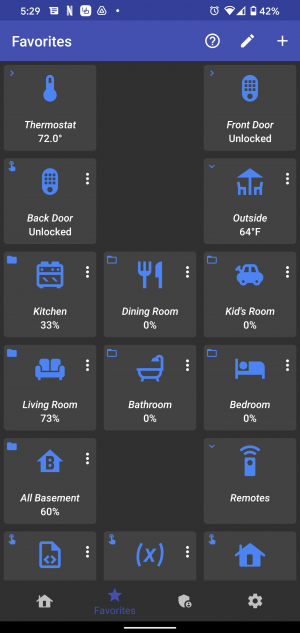
We now have a Favorite item which can toggle the "Back Door" lock. Also because we have a Display Node there is a menu (three dots) which will open the Node's Dashboard, which can be great if the lock is jammed and we must use the unlock control as the toggle will always try to lock in the program created above.
Node Dashboard
Show/Hide Status and Commands
From the Node's Dashboard click the edit icon (pencil on top). Now press the add/hide (+/-) buttons to the left of the status or button.
Move Status and Commands
From the Node's Dashboard click the edit icon (pencil on top). Now long press the move icon (three lines) on the left side of the status or button. Note that status and buttons are grouped and can only be moved within the same group.
Scene Estimated Status
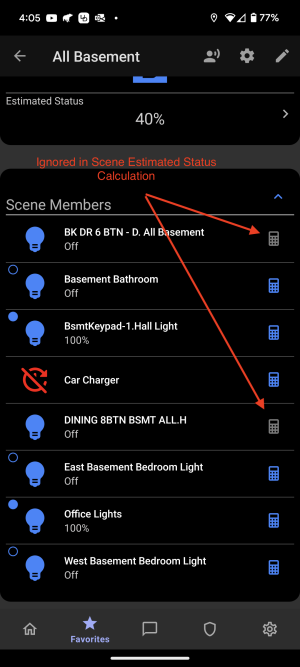
Scene Status is Estimated as Scenes do not report status. If UD Mobile's estimate is not correct it may help to disable calculations for certain types of devices. To disable/enable calculation for a Scene Member open the Node's Dashboard for the Scene then press the calculator icon next to the Scene Member. Grey Calculator icon indicates the Scene Members Status is ignored the Estimated calculation. Changes may not be shown in the Scenes Estimated Status until the next time a non-ignored Scene Member's status changes or App is swiped from recents then opened again.
Devices such as Key Pad Link Buttons, and Battery Powered Devices may need to be removed from Scene calculations.
Known Issues
Estimated Status:
Scenes do not have a status value, so UD Mobile calculates the Scene's Estimated Status by adding the current value Percentage Value of each device then dividing by the number of devices. While this may work well in some situations other situations may require ignoring a device, or all devices.
KPL Buttons:
Non-Load bearing Keypad link buttons can not be controlled by UD Mobile's Scene Dimmer. This is due to an Insteon Limitation, KPL Buttons can not be turned on or off via direct command, but only via Scene. UD Mobile's Scene Dimmer works by bypassing the Scene ON and OFF commands by sending a percentage status to each device in the scene, however Non-Load bearing KPL buttons do not accept this command, so UD Mobile can not change the KPL Status. If UD Mobile where to send the ON or OFF command to the scene to control the KPL button then the scene would go to its specified on or off value not the dim level.
Status History
Status History is alpha in firmware version 5.8.0 but will likely be enabled by default in future firmware. As of firmware 5.8.0 this information is for users wanting to test Status History.
UD Mobile iOS version: 1.1.52
UD Mobile Android version: To be determined
Known Issues
- Left Y Axis Labels may be raw values not representative of the actual status.
- Status with no changes in timeframe show an empty chart. Fixed in UD Mobile iOS version 1.1.53.
Enable/Disable Status History
Enable:
/rest/history/node/properties/recording/on
Disable:
/rest/history/node/properties/recording/off
View History
To view status history from the Device's Dashboard. Click on the menu to the right of the status, then select history
Admin Tab
Firmware
Firmware upgrade will show available firmware upgrades and allow upgrade with progress from within UD Mobile. The upgrade command is the same as the Admin Console with the addition of upgrade progress. The firmware upgrade screen must remain open to track upgrade status, the app will attempt to keep the screen on, however if user navigates away from this screen the app will no longer track upgrade progress. If navigating away from the firmware screen please allow 30 minutes for upgrade to complete.
If UD Mobile believes firmware can be upgraded an "Update Firmware" button will be shown. If UD Mobile believes the firmware is up to date then "Force Upgrade" button will be shown. Force upgrade will force an upgrade to the latest version. Forced upgrades may upgraded to a version higher than the known available highest version.
Known Issues
Some Android devices may stop routing to eisy.local address, this will require restart of Android device.
PGC Node Server (depreciated)
Add PGC Node Server
Add a new Node Server from the Polyglot Cloud Store. The PGC Store can be accessed from the Polyglot Cloud Screen by clicking the add (plus) icon at the top right.
Clicking on a Node Server in the PGC Store will take the user to the Node Server’s Store Dashboard. Add the Node Server by clicking “install” at the bottom of the screen. Note that a Node Server must be removed from the Node Servers Dashboard page (see Edit a PGC Node Server). Once the Node Server is added the user may need to add or edit parameters and start the Node Server. Parameter Edits and Start/Stop functions can be found on the Node Servers Dashboard Page. When starting a PGC Node Server please allow a few minutes for the Node Server to initialize after pressing the start button.
Edit PGC Node Server
Status indicators for PGC Node Servers will show Red for Stopped, Green for Started, and Yellow if Started with Notices.
Edit a PGC Node Server by clicking the Node Server in the list. This will present the Node Server Dashboard which has Start, Stop, Update and Delete Functions.
Clicking on Configuration will take the user to the Node Server Configuration Screen. The Configuration Screen allows users to add, edit, or remove parameters.
Edit a parameter by clicking the parameter in the list, then update the value, then press save.
Remove a parameter by clicking the parameter in the list then clicking the delete icon (trash) at the top right of the Edit Parameter dialog.
Add a parameter by clicking the “Add Parameter” button at the bottom of Custom Configurations list on iOS or by clicking the add button at the top right of the screen on Android.
Alexa
Note: Anytime spokens are added or updated you must ask alexa to "Discover Devices".
Linking / Unlinking
Link or unlink Alexa from the bottom Admin-Tab > Alexa. If there is more than one portal account (unlikely) linked to UD Mobile there will be prompted to select a portal account. There may be a prompt to select a System from your portal account, select the System to link with Alexa. Note that the selected System must also be linked to UD Mobile.
If your System is not linked to Alexa, click Allow. If your system is linked to Alexa select Spoken Settings to see a list of linked devices. Click any linked device to edit spoken settings.
Spoken Settings
Add or edit your Alexa Spoken configuration from Admin Tab > Alexa or from the Node Dashboard by clicking the voice icon at the top of the screen.
Settings Tab
Systems
Clicking Systems on the Settings Tab will show all linked ISY/Polisy/eisy Systems
Edit/Add System
Clicking on a System in the Systems List will open the System Edit Screen for the selected ISY/Polisy/eisy. Clicking on the add "+" icon on the top right will open the Add System screen.
System Name
Required System name. System Name must be unique from any other system names in the App. System Name is populated automatically if your ISY is selected from ISY Portal. System name will show as a list item on the Home Tab. Changing System Name in Settings requires synchronization for Home Tab name change.
Remote Connection Settings
See Quick Start Guides above.
Local Connection Settings
See Quick Start Guides above.
Program And Variable Settings
Enabling any item in the section will request status for the selection when the app is started. Requesting the status of all Programs and/or Variable may cause a longer delay in status population when opening the app.
System Status
Disabling this setting will instruct UD Mobile to not start a subscription with the ISY, so no status values will be requested when the app is opened. This is intended for developers with multiple Systems and the user would like to disable the System when not testing.
Global Settings
Currently Android Only. Global Subscription Duration affects all systems for UD Mobile. This sets the duration in minutes of the subscription to your ISYs. The app will not close the subscription until the Subscription Duration time has passed or when the operating system requests resource, whichever comes first. Setting this number to \"0\" will close the subscription as soon as UD Mobile is paused and the subscription will have to be reestablished to get node status values. Setting this to a negative number will leave the subscription open until the operating system is low on resources. Please note that the longer the subscription duration the more data and battery consumed by UD Mobile, a shorter duration may cause longer delays for status values when the app loses focus. While the subscription is active UD Mobile will show a notification and may show an app icon badge. Android requires developers to notify users with a notification when an app is using resources in the background, most android devices will allow users to ignore notifications based on type.
Notifications Tab
Setup
Notifications can be sent via network resources or from Node Servers. Node Server developers who wish to integrate notifications to UD Mobile can open a ticket to request the full API.
Node server will use existing email/notification framework available in ISY Admin Console and UD Mobile, however this feature is only available on IoP (ISY on Polisy). Network Resource method available to all ISY users on 5.x with an ISY Portal Account.
Network resource variable evaluation is on a seperate thread and is evaluate when run. So if the resource is triggered by a program and the variable changes before evaluation the new value will be shown. This is not the case when using the Node Servers which support notification framework.
Known Node Servers which support notifications to UD Mobile:
- Notification Node Server
PG3 Node Server Setup
Check out our example video for simple setup.
Requirements: Polisy or eisy hardware with PG3x.
Notification Plugin Installation
Please refer to our setup video for automatic Plugin installation demonstration. UD Mobile may prompt for System Upgrade, PG3 upgrade, and/or Node Server Upgrade. Please see instructions below for assistance with any upgrade issues. Please direct all other questions to our User Forum or open a ticket.
View Notification Programs Linked to a Device
Go to the Device's Dashboard which is accessible after clicking the Devices Name on the Home Tab. From the Device's Dashboard click Settings (gear icon) > Notifications. This will launch the Plugin verification screen and if all is functional user will then be directed to a Notification Programs List screen. The Notification Plugin List screen shows all notifications for the Device from the Device's Dashboard.
Simple Notification Setup
Go to the Device's Dashboard which is accessible after clicking the Devices Name on the Home Tab. From the Device's Dashboard click Settings (gear icon) > Notifications. This will launch the Plugin verification screen and if all is functional user will then be directed to a Notification Programs List screen. The Notification Plugin List screen shows all notifications for the Device from the Device's Dashboard. Add a new notification by clicking the Add button at the top right of the screen. Edit Notification Programs by clicking the program in the list.
View All Notification Programs
Go to the UD Mobile Home Tab. If you have more than one system click the system. Click "My Notifications". This will launch the Plugin verification screen and if all is functional user will then be directed to a Notification Programs List screen.
Notification Templates
Notification Templates (Notification Customizations) are shared between programs. UD Mobile creates a generic Template with variable substitution. If users would like customized notifications it is recommended they create a new Template.
Groups
UD Mobile Notification Groups are used to send notifications to a single device or group of devices. Groups can be created or edited from UD Mobile > Notification Tab > Settings (gear icon) > Groups. eisy restart is required after group creation to populate new groups. If using Admin Console restart required (close window). If using UD Mobile synchronization required.
- Single Mobile Device: A group can be used to send messages to a single mobile device by adding a single mobile device in the group. This will assist when replcing your mobile device as you simply need to add the new mobile device to the group then delete/remove the old device from the group.
- Multiple Mobile Devices: A group can be used to send messages to multiple mobile devices instead of all mobile devices.
Variable Substitution
System variables can be substituted in Notification Templates (Notification Customizations).
Substitution variables can be found here. See the Notification Template created by UD Mobile for and example (see setup video).
Notification Plugin Errors
API Key Mismatch
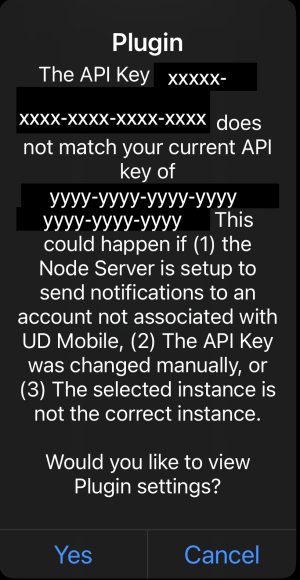
An API Key mismatch can happen in two scenarios, this may not be an error for users with multiple Portal Accounts.
- API Key Reset
- Multiple Portal Accounts
API Key Reset
The user reset the Notification API Key after configuring the Notification Plugin causing an API Key mismatch. If the user reset the Notification API Key then the Notification Plugin (Node Server) needs to be updated with the new API Key. If the Portal Account linked to eisy in UD Mobile is the user's only Portal Account then follow instructions below to update the Notification Plugin with the users new API Key. If user has multiple Portal accounts then check Multiple Accounts below. If the user is unsure if the API Key was reset then check the created date when viewing the API Key (below).
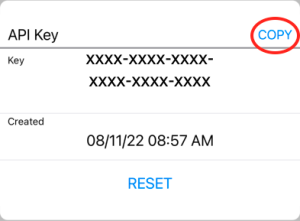
API Key can be viewed, copied, or reset from UD Mobile > Notification Tab (bottom) > Settings (gear icon) then select copy next to API Key.
After the API key is copied go back to the API Key Mismatch error message and click "Yes" when asked "Would you like to view Plugin Settings?"
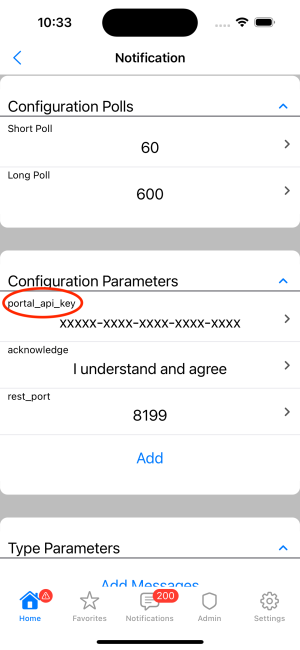
Scroll Down to Configuration Parameters then click the "portal_api_key" parameter. If the error is no longer available go to UD Mobile Home Tab (bottom) > My Notifications.
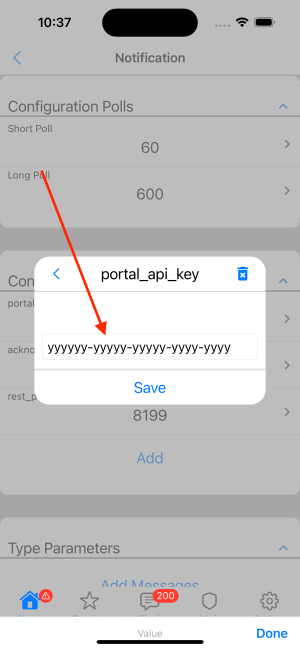
Paste the API Key copied from Notification Settings, then press save.
The Node Server should now work with your new API Key. In some cases will need to be restarted. Scroll to the bottom of the screen for restart if needed
Multiple Portal Accounts
If the user has multiple Portal Accounts then they may be logged into UD Mobile with an account which is not linked to the Notification Plugin, so the API Key is different. User can install multiple Notification Plugins if there is a need to send notifications to multiple Portal Accounts.
Updating System Firmware
If updating system Firmware from UD Mobile please wait 30 minutes after upgrade is started then Reboot and wait 5 minutes for system to be fully functional. The system may come back online before 30 minutes in UD Mobile but this does not signify that the update is complete.
Notes:
PG3 Web UI may need catch cleared. Chrome > Settings (3 dots) > Settings > Privacy and security > Clear browsing data > Clear data. If there are still issues please try a hard power cycle by removing power, waiting a few seconds, then connecting power, and wait 5 minutes for system to be fully functional.
PG3 to PG3x Migration
see: https://wiki.universal-devices.com/index.php?title=Polisy:User_Guide#Upgrading_to_PG3x
After following the instructions above please wait 30 minutes, then reboot, then wait 5 minutes for system to be fully functional.
Notes:
PG3 Web UI may need catch cleared. Chrome > Settings (3 dots) > Settings > Privacy and security > Clear browsing data > Clear data. If there are still issues please try a hard power cycle by removing power, waiting a few seconds, then connecting power, and wait 5 minutes for system to be fully functional.
PG3x Remote Provisioning
PG3x (Plugin Software) requires remote provisioning the first time it establishes a remote connection. The System must already be linked to a Portal Account.
If there is a provisioning error please wait 5 minutes, as the System may installing updates. After 5 minutes reboot and allow 5 minutes for system to be fully functional.
Network Resources Setup
Network Resource Method is deprecated and should only be used by ISY994.
Basic Setup
Note: Network Resource creation is currently not available in UD Mobile, so the Admin Console must be used.
Video: See our setup video on YouTube https://www.youtube.com/watch?v=9w-_8AZy4iQ
1) Click the bottom Notifications Tab in UD Mobile.
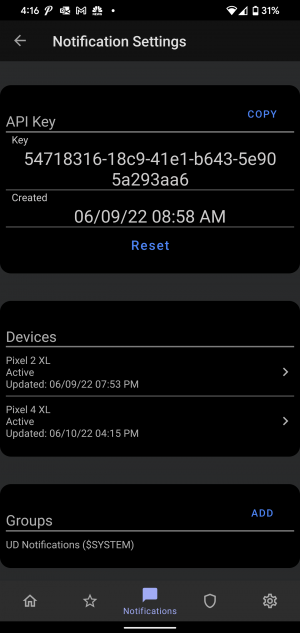
2) Click the settings (gear icon) at the top of the Notifications Tab main screen. If there is more than one ISY Portal account available (unlikely for most users) a prompt is displayed to select an ISY Portal Account. The screenshot below shows notification settings.
3) Use the COPY button to copy your API key. Then send a copy of the key to your PC (i.e. email to yourself).
4) Now open the Admin Console and go to the Network Resources Tab (Click Configuration-Tab -> Networking-Tab -> Network-Resources-Tab)
5) Follow instructions #6, #7 and #8 for automatic import of example resources. Skip #6, #7 and #8 for manual setup.
6) Download the Network Resources Push examples zip file to your computer (https://github.com/UniversalDevicesInc/UD-Mobile-iOS/raw/main/ISY-NetRules-Push-Notification-Examples.zip), DO NOT UNZIP. Click the Import button at the bottom of the Network Resources Window, then select the downloaded file.
7) Click on the URL column for the first example resource, then click the row "x-api-key: ADD_YOUR_API_KEY_HERE" in the Details > Header section, then the "Edit" button at the bottom of the Headers section. Delete "ADD_YOUR_API_KEY_HERE in the Value section then paste your API Key (from #3) in the Value section, then click the OK Button. Click the Save button at the bottom of the Resource Editor Window. Click the Save button at the Bottom of the Network Resources Tab. Replace ADD_YOUR_API_KEY_HERE for the other examples following the same process. Finally click the name of one of the Example Resources and then press the "Test" button at the bottom.
8) Now that the test notifications are working you can copy the example by clicking the the Example Resource Name, then click the copy button at the bottom. Click the copied resource URL column then in the Body Section replace "My Test Title" with your desired notification title and "My Test Body" with your desired notification Body.
Notes: The save button on BOTH the Resource Editor and at the bottom of the list of network resources must be pressed before testing. The "&" and "=" characters can not be used when replacing "My Test Title" or "My Test Body".
This is the end of instructions for automatic import. If you would like a more detailed explanation of using Network Resources with UD Mobile push notifications see manual instructions (#9).
9) From the Admin Console Click Configuration-Tab -> Networking-Tab -> Network-Resources-Tab. Then Add a new Network Resource.
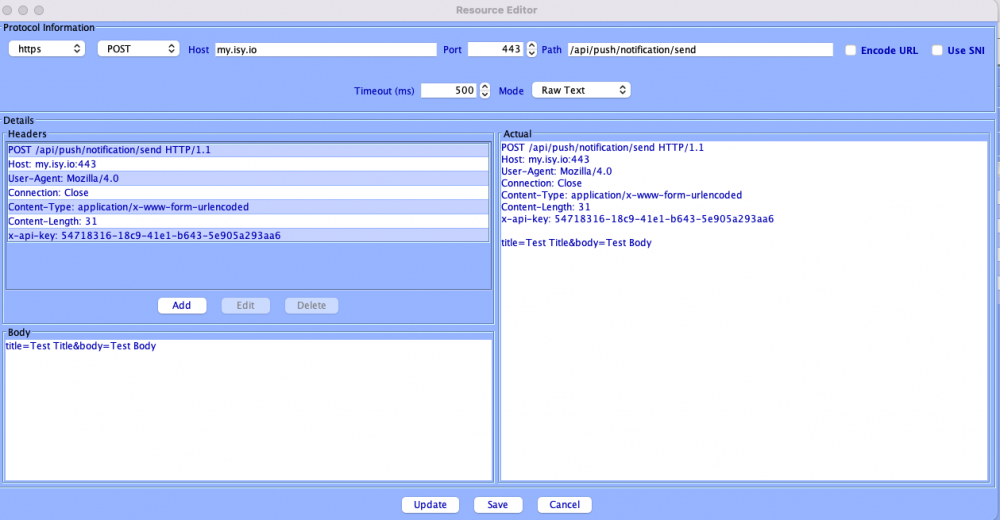
- Protocol: https | POST | Host = my.isy.io | Port = 443 | Path = /api/push/notification/send | Mode = Raw Text
Header: Add x-api-key with the value as your API Key copied from UD Mobile. This is a manual entry not available from the dropdown menu.
*Body: title=message_title&body=message_body where message_title and message_body are replaced by your desired title and body values.
- Click update then save, then save all network resources. Finally press TEST to send the notification.
The network resource should look similar to the image below, with required replacements. NOTE: TIMEOUT IS TOO LOW IN THE SCREENSHOT. PLEASE USE AT LEAST 5000 TO PREVENT ERRORS.
Group Setup
UD Mobile Notification Groups are used to send notifications to a single device or group of devices. To send to a single device only enable the the device which should receive the notification in the group. A group is used for single devices to make device replacement easier. When replacing your mobile device enable the new device in the group, there is no need to edit network resources.
1) Follow instructions above to create a notification.
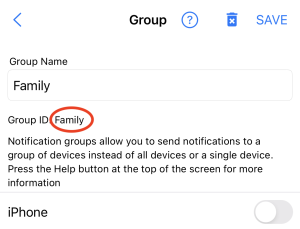
2) From the Notification-Settings in UD Mobile click ADD next to groups and create a new group. After saving the group the Group ID will be shown.
3) Add devices to the group from the Device or Group screen. From the Device Screen click any device in the Devices section then enable the group in the Group Membership section. From the Group screen click the group then enabled devices.
4) Write down the Group Id from UD Mobile. The group ID is under the group name in UD Mobile when clicking a group from the list. The group name and id may be the same.
5) In the Admin Console add "&groupid=group_name" to the body of the network resource, where group_name is replaced with the group ID.
6) Save the network resource, then save all network resources, then test.
Sound Setup
Add the sound parameter to the body with the sound file name. i.e title=Test Title&Body=Test Body&sound=sms_notification.wav
See sounds for sounds included in UD Mobile.
Variable Substitution
System variables can be substituted in Network resources and Email/Notification framework. Network resource variable evaluation is on a seperate thread and is evaluated when run. So if the resource is triggered by a program and the variable changes before evaluation the new value will be shown. This is not the case when using the Node Servers which support notification framework.
Substitution variables can be found here. The following is an example of the Network Resource body with variable replacement.
title=Test Title&body=Test Body ${sys.time}
Sounds
Note: Sounds are available in iOS version greater than 0.8.0 and Android version greater than 0.154.
- default (system default)
- clock_radio_alarm.wav
- sms_notification.wav
- dog_bark.wav
- small_resonant_alarm.wav
- software_start_positive.wav
- ui_notification_13.wav
- alarm_burglar.wav
- rooster_crowing.wav
- hawk.wav
Custom Notification Sounds
Android
UD Mobile exposes each of the sounds listed above as a Notification Type. Most Android devices allow users to map their own sounds to an app's Notification Type.
To map your own sounds, first send a notification to UD Mobile. Upon receipt of the notification long click the notification displayed by Android, this will show Android Notification Settings. Press settings (gear icon). Then click on any of the notification types (sound names), then click Sounds, now select a sound from your device.
iOS
iOS does not allow custom sound mapping. Sounds are limited to the sounds listed above.
iOS does appear to have a feature which may allow UD Mobile to play custom sounds. Investigation of this feature is on our to-do list https://github.com/UniversalDevicesInc/UD-Mobile-iOS/issues/94
Notes
If your API key is compromised, the RESET button will invalidate the current API key and return a new key. The Devices section will list all mobile devices linked to the Portal Account. Clicking on a Device will allow users to enable/disable/delete the mobile device, enable/disable device membership in groups, and send test notifications. Clicking on a group will allow group deletion. The instructions above will send notifications to all Active devices.
The "UD Notifications" group can not be deleted from UD Mobile and is intended for sending notifications from UD, such as notifying the user when their ISY is no longer communicating with ISY Portal. UD Notifications have not been implemented as of 06/10/22.
When a Device is deleted from ISY Portal and has an active UD Mobile installation the device will be re-added automatically. This feature is intended to delete old devices, to exclude a device from receiving notifications please click the device in Notification Settings then disable.
The UD Mobile Notification-Tab must be clicked once before the device is available to ISY Portal, so please instruct all family members to click this tab after updating to a version supporting this feature.
Video Streams
Beta Feature. Video Streams can be added directly in UD Mobile or from Plugins (PG3 Node Servers). Node Server integration may allow additional controls such as PTZ (Pan/Tilt/Zoom) and authentication services.
Video Plugin (PG3) integrations
Coming Soon! Node Server Developers can implement video streams such as RTSP and MP4. PG3 plugin integrations are prefered over "in app integration" as they allow Node Servers to specify commands (i.e. next, previous), update urls for credential changes (i.e. oAuth), and create urls for multiple cameras (i.e. DVR systems).
Camera Systems (in app integration)
Beta feature. Please see YouTube Video for setup instructions.
- Add New Camera System - In UD Mobile go to Settings-Tab > Cameras. The Cameras section displays a list of linked Camera Systems (DVR/location). Add a new Camera system by clicking the ADD button at the top of the screen.
- Add Video Feed - After creating a camera system, click "ADD" in the Cameras Section. Enter a camera Name in "Camera Name" then enter a URL in "URL". UD Mobile supports urls for RTSP and MP4 files. For remote access URL must be publicly accessible.
Public URL for testing verified working as of 07/06/2023:
http://commondatastorage.googleapis.com/gtv-videos-bucket/sample/BigBuckBunny.mp4
http://camera.buffalotrace.com/mjpg/video.mjpg
Example of an RTSP (Real Time Streaming Protocol) URL
rtsp://userName:password@ipAddress:port/path where userName, password, ipAddress, port, and path are replaced with your camera/DVR/Feed values.
i.e. rtsp://myUserName:myPassword@97.111.111.111:554/cam/realmonitor?channel=1&subtype=1
Errors
Note: Node Server developers should check Node Server functionality with UD Mobile prior to release. UD Mobile has error checking which may be different than the Admin Console. Below are a few common errors and error messages.
Is UD Mobile crashing on your device? Please open a ticket and and include the "crashes and spins" folder from your iOS sysdiagnose file. See https://it-training.apple.com/tutorials/support/sup075 for information on generating a sysdiagnose file. This file should be generated shortly after the crash.


