ISY-994i Series INSTEON:ELK Security Module

Install
To purchase this module, please to to Admin Console | Help | Purchase Modules.
The Basic Idea of this Module
This module is designed to expose ELK Security commands and events to ISY's Programming environment.
Please note that since ISY uses the unsecure port for M1XEP, you must ensure that your WiFi network uses encryption
Requirements
- ELK M1 Gold (4) with firmware 4.6.4 or above
- ELK M1 Gold (5) with firmware 5.2.4 or above
- ELK M1XEP with firmware 1.3.28 or above
- ISY99/994 Series with firmware 3.1.13 or above
Configuring Elk
Overview
- 1) You need an Elk M1 user configured with a 4 or 6 digit access code that is allowed to Arm, Disarm and Bypass the alarm
- 2) You need to enable non-secure communications on the Elk so that the ISY can communicate with it
Configuring an Elk User with an access code to use from the ISY
- Go to Users
- Select the user that you want to use for the ISY connection
- Ensure the user has a 4 or 6 digit access code defined
- Select the following checkboxes:
- Arm
- Disarm
- Bypass
- Make sure the following are not selected:
- Access
- Click the [Send To Control] Button
- Go to Globals
- Select the G29-G42 tab
- Select all six Serial Port 0 checkboxes
- Click [Send to Control] button (you may need to connect first)
- Select Save (under the main menu bar)
Enabling Non-Secure Communications on the Elk
Launch the Elk RP2 application and do the following
- Enable the non-secure port for M1XEP
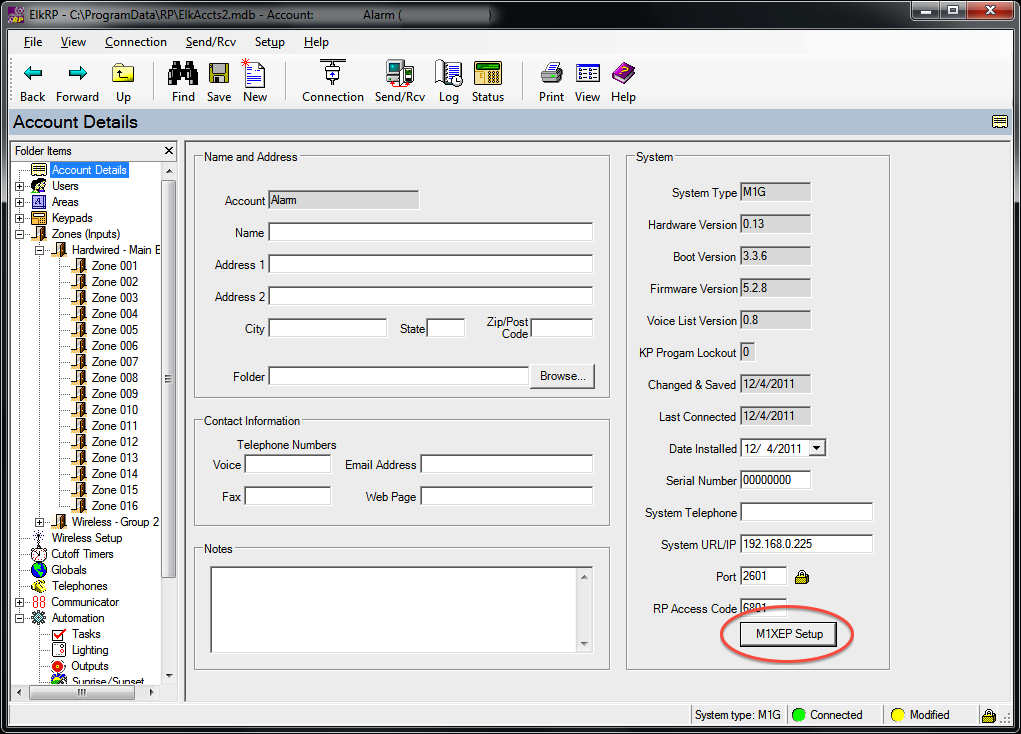
- Go to Account Details, click the [M1XEP setup] button
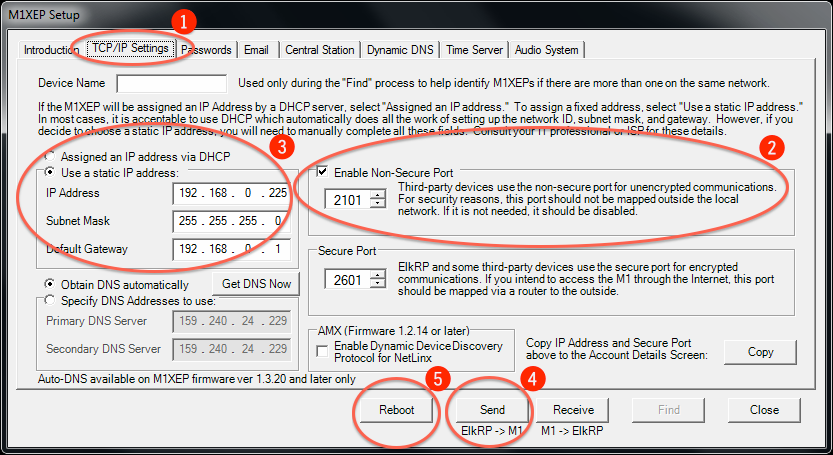
- In the M1XEP Setup Window...
- Perform the following steps:
- (1) choose the TCP/IP Settings tab
- (2) Select the Enable non-secure port Checkbox
- (3) If you are using a static IP address for the M1XEP (this is recommended) then verify that the IP settings are still correct
- (4) Click the [Send] button to update the M1XEP with your changes
- (5) If you have changed your IP address config, you may need to reboot the M1XEP--Click the [Reboot] button to reboot the M1XEP
- Close the M1XEP setup window
- Test the connection to M1XEP via a non-secure socket (This is how the ISY will talk to the Elk, so let's make sure it is working correctly)
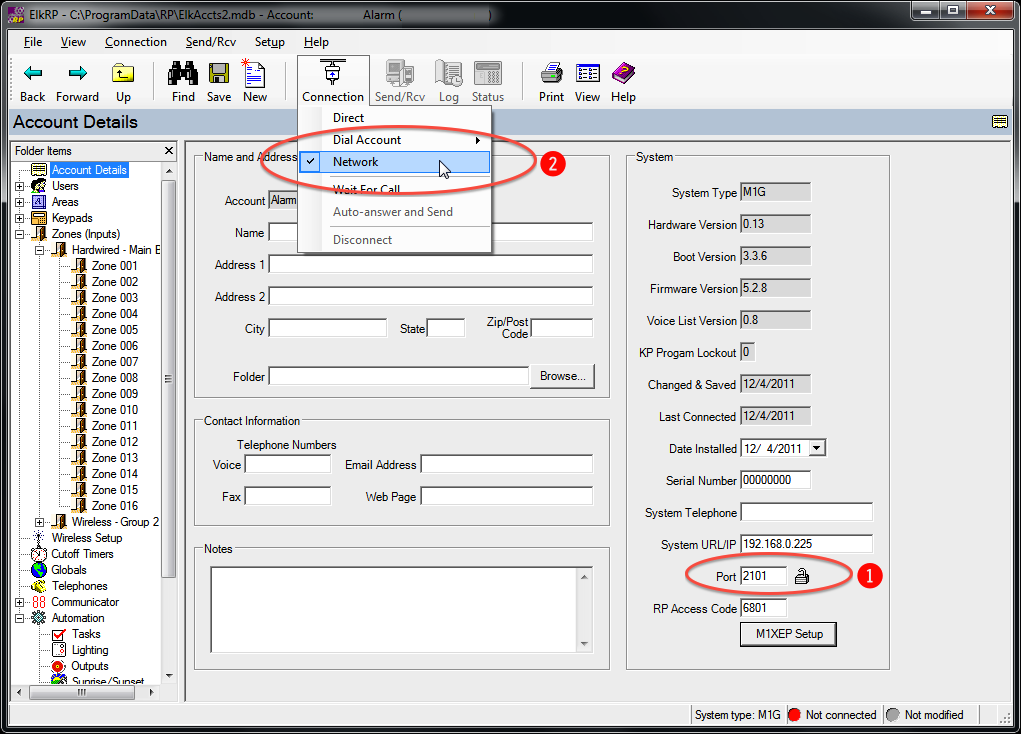
- (1) In Account Details, change the port to the non-secure port (e.g. 2101)
- (2) Try to connect to the Elk (Connection -> Network)
- If that works, you should see the indicator in the lower left corner of the ElkRP2 window change from Red to Green, and indicated that the M1g is "Connected"
- Now go back to the 'Account Details' in the ElkRP2 software and change the port back to the secure port for Elk RP2 (2601 by default)
- Go to M1XEP TCP/IP Settings page if you forgot the secure port number
- Now go back to the 'Account Details' in the ElkRP2 software and change the port back to the secure port for Elk RP2 (2601 by default)
Configuring ISY to Communicate with ELK
Bring up the admin console for the ISY-99i and do the following
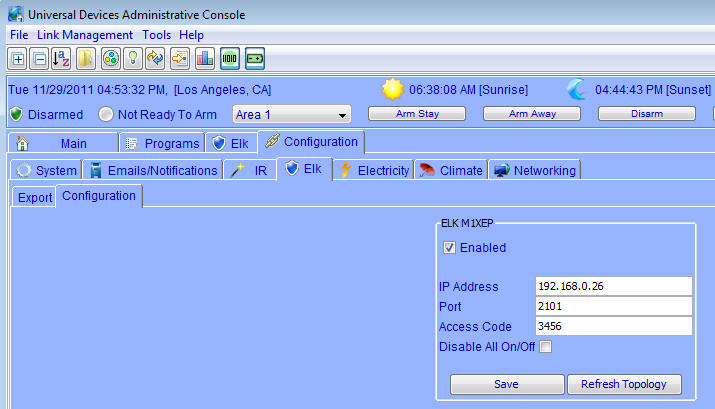
- Click on the Configuration tab
- Click on the Elk sub tab
- Enter the IP address of the M1XEP
- Set the port to non-secure port of 2101 (ELK does not support TLS)
- Enter the access code you have for the user in ELK RP2 (either 4 or 6 digits)
- Enable the ISY connection to the ELK M1XEP by clicking the "Enabled" checkbox
- Click the [Save] button
- Click the [Refresh Topology] button to load the topology (e.g. areas, zones, etc. from Elk)
- After you make any changes to Elk, for example renaming a zone, you must refresh the topology for the ISY to see these changes.
Export Lighting Devices to Elk
From the ISY Admin Console
- Click on the Configuration tab
- Click on the Elk sub tab
- Click on the Export sub tab
- Add devices to be to exported to Elk by selecting them from the Available column and pressing the [Add to Export List] button
- An ID is automatically assigned to each entry, but you may customize it by double clicking the value and entering any valid, unused X10 id. (e.g. B12)
- Click the [Save] button
- Click the [Export] button
- This will save an export file on your computer, please note the location.
- Add devices to be to exported to Elk by selecting them from the Available column and pressing the [Add to Export List] button
From Elk RP2
- Go to Automation, right+click on Lighting, and select Import Lighting Data ...
- Enter the name of the export file.
- Select Universal Devices ISY export for an Insteon network
- Click the [Import] button
- Click [Send to Control] button (you may need to connect first)
- Click the Save icon below the main menu bar
Troubleshooting
Symptom
- If the Elk is configured, the ISY-99i Admin Console is slow and unresponsive
- The ElkRP software does not connect/transfer data reliably
- The data about the ELK is not loaded into the ISY-99i (you don't see the zone and area topology)
Solution
- You most likely have the ELK Module in the ISY-99i configured with the secure port on the ELK M1XEP (e.g. 2601), and the result is that the ISY-99i apparently floods the network trying repeatedly to connect to the secure socket, even though it requires a non-secure socket.
Symptom
- Not receiving updates from Elk although ISY is connect to Elk
Solution
- You most likely do not have the Serial Checkboxes in Elk Globals G29-42 selected (see Configuring Elk above for details)
Symptom
- Arm/Disarm does not work from the Admin Console
Solution
- The RP Access Code is strictly the code that will allow a connection to be made between ELK-RP and the ELK-M1. It can’t be used to arm/disarm the M1. And please note that a User Code and the RP Access Code should not be programmed with a matching code
- Please confirm that your ELK system doesn’t have the “Access” attribute (box) checked for the User Code that is associated with the ISY system. The “Access” attribute is intended to be used as a special flag for the ELK Rules. For example you may want a rule to trigger an output (magnetic door strike) when a certain user code has been entered. If the Arm, Disarm, and the Access attributes are enabled, then the first use of the user code will set the access flag. In this circumstance, an additional pressing of the exit key or entry of the code is required to arm the system
- Reset power to both systems (ELK and ISY) including the M1XEP after changes (especially #2) is made
- Make sure Globals -> Serial Port 0 Transmit Options boxes is checked? Typically all but the Event Log need to be checked.
- Make sure ELK-RP is disconnected from the ELK-M1 control? If not, please disconnect. The 3rd party commands will conflict with RP commands
Program Examples
- Trigger when the system is armed away AFTER the exit delay ends
The Elk system itself sends events Armed Away, Armed Fully, Armed with Exit Timer, and Armed Fully in that order. We are uncertain as to why ELK sends the first Armed Fully. The workaround is to put a 2 or 3 second wait at the start of your program e.g.
If
        Elk Area 'Apt 1102' 'Arm Up State' is Armed Fully
    And Elk Area 'Apt 1102' 'Armed State' is Armed Away

Then
        Wait  3 seconds
        Send Notification to 'Default'

Else
   - No Actions - (To add one, press 'Action')
- Send notification if either Zone 1,2, or 3 is violated while the Lobby is Armed Fully
If
        Elk Area 'Lobby' 'Arm Up State' is Armed Fully
    And (
             Elk Zone 'Zone 001' is Violated
          Or Elk Zone 'Zone 002' is Violated
          Or Elk Zone 'Zone 003' is Violated
        )

Then
        Send Notification to 'me' content 'Zone Status'

Else
   - No Actions - (To add one, press 'Action')

Content of 'Zone Status' Email

Lobby : ${elk.zone.#.name} : ${elk.zone.#.status}
ISY-26 INSTEON / ISY-99i Series INSTEON : How-To Guide
Phone Apps
There are some third party apps that take advantage of the integration between ISY and Elk to provide for a better control experience.
On Android, the 'Home Alarm' app allows you to remotely arm and disarm your Elk when linked to your ISY. See this thread for more information, and get the app from the Google Play store.
On IOS, Mobilinc and the optional ELK module allow you to remotely monitor and control your Elk when linked to your ISY. See this thread for more information, and get this app from the Apple Appstore.


