ISY-99i/ISY-26 INSTEON:Remotely Connect to Your ISY
Introduction
In order to access your ISY remotely, you have two choices:
- Free: You will need to create port forwarding rules in your router to point to ISY's web server
- Fee Based: For a very low fee, You can use ISY Portal Service which does not require any router configurations, continues to work even if your ISP's IP address changes, and comes with a whole host of other features such as integration with Amazon Alexa, Google Home, IFTTT, and may other cloud based services
This article details the procedures for option 1. For option 2, please refer to ISY Portal Service.
Configuring ISY Remote Access
In order to access and control your ISY unit from the Internet (away from home) you will need to enable Internet access on your ISY and make sure your router configured to forward the ISY port. This process allows the ISY to get a real IP address from your Cable/DLS modem which is seen across the Internet. Many routers can auto-configure directly with the UPnP protocol and others will need to have it done manually. If you need to configure your router manually please see the below section On a Non-UPnP Router.
Please Note: If you're using a Portal enabled service to connect to your ISY remotely, in most cases you do not need to port-forward your ISY. Some products that have NOT been setup with the Portal service still however do need port forwarded and in that case please follow the steps below. Also note the Portal is a safe automatic connection that bypasses your router's standard NAT firewall.
- Configuring a UPnP Router
- Check the auto-configure Supported Remote Access Routers list, if not see On a Non-UPnP Router below
- Make sure you have enabled UPnP within your router so the ISY can auto-configure your router
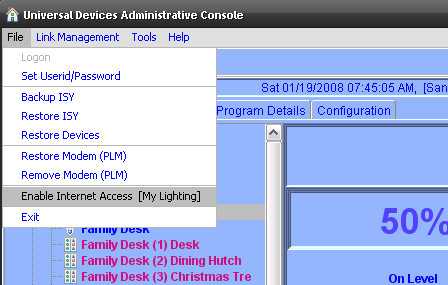
- In your ISY click on File --> Enable Internet Access to enable the ISY internet access. This will negotiate the port through the router and out to the Internet
- Verify your ISY IP address in the popup window, it should NOT be from your local network (a local IP would look like: 192.168.1.101)
- https://your.isp.add.ress - an example might be https://10.88.24.15
- Using the address assigned by your ISP or a domain name from a dynamic DNS service you are now ready to access your ISY software from the Internet!
- Configuring a Non-UPnP Router
- Make sure you do NOT use File | Enable Internet Access. It's an either/or scenario
- Get your ISY IP address, and write it down. Here is an example of what you might have:
- My URL: http://192.168.1.105
- If your ISY is on a DHCP (default behavior for most routers) then ISY's IP address may change. As such, if you plan to use remote access:
- See Assigning ISY a Static IP Address for ISY, or
- On your router, make ISY's IP lease permanent (DHCP Reservation), or
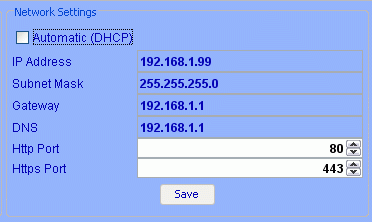
- ISY firmware v2.7.9+ see Network Settings
- Follow the information on Portforward.com to configure your specific router for port forwarding.
- Find and select your router on the initial page
- On the addvertisemnt page locate the "Click here to skip this advertisement..." link and click it to continue.
- Select the program HTTPS on the following page for instructions specific to your router
- Using the address assigned by your ISP or a domain name from a dynamic DNS service you are now ready to access your ISY software from the Internet!
- If you are using port 443 (the default) you can access your ISY using HTTPS which will automatically forward port 443 to the ISY.
- An example might be https://10.88.24.15
- Once port forwarding is configured in the router you DO NOT need to use the ISY Enable Internet Access option
- Verifying your IP Address
- Your ISP address can be found:
- by opening a browser page to Portforward.com, or
- by opening a browser page to WhatIsMyIPaddress.com, or
- by logging into your router and viewing the Status page
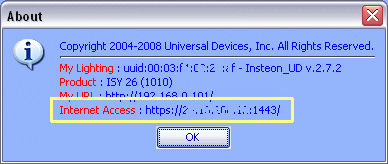
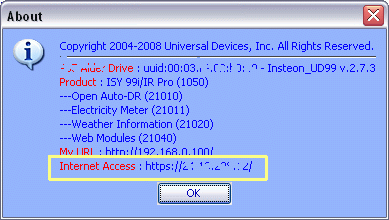
- Menu item Help | About will display the external IP address
- Note the address is preceded with HTTPS as you will be using a secure port.

Instructional Video for Port Forwarding
If you do not have a UPnP router, or if File->Enable Internet Access returns null or fails, then:
Setup Dynamic DNS services
Most Internet Service Providers (ISP) use dynamic ISP addresses, this means that your ISP address can change at any time. It is suggested you use a dynamic DNS service that will give you a static web address to reach your ISY at all times. In order to keep the address static these services either use your router to auto update, or have a small program that runs on your local computer which will update the DNS servers that your IP has changed. Its a good solution when you don't want to obtain a costly static address from your internet provider. There is many providers out there but here is a couple recommendations: DynDNS or tzoDNS.
- Here is a helpful Dynamic DNS setup guide over at DynDNS
Creating an ISY Self Signed Certificate
To eliminate the problem of being warned all the time about the default certificate the first thing that is suggested is to creating a Self Signed Certificate. Other details can be found in the Request & Manage SSL Certificates section.
- You must be on the same local network as the ISY.
- See Internet Explorer SSL Certificate Install for more details about accepting it when using we browsers.
Changing HTTPS Port Number
If your router is complaining about port 443 already being used, it means that you already have another network device (in your LAN) which uses 443 and thus the router will only forward the requests to that device. For reference here is a List of TCP and UDP port numbers from the Wikipedia.
- Change Port via ISY Admin
- Use the "Logon to My INSTEON ISY Now!" weblink, enter your user name and password when prompted to get logged in.
- Click on the Configuration tab, then System tab
- Under the Network Settings area change the HTTPS port, example 1443
- After selecting a new port click the Save button to save the changes, then your ISY will reboot
- Optional reboot your router (Some routers may need reconfiguring if they don't pick up the new IP address)
- Your remote access URL will be https://your.ext.ip.add:new_port
- Change Port via Telnet Interface
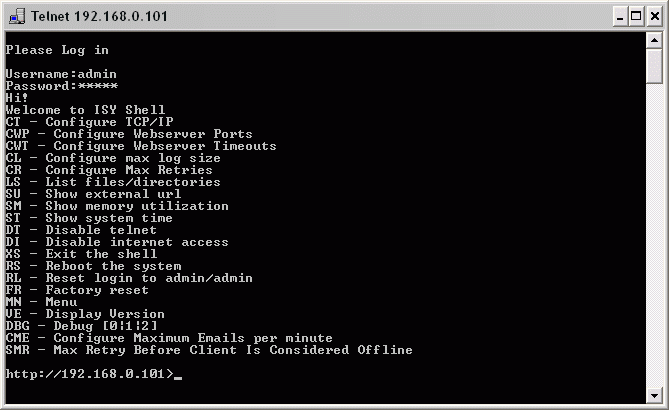
- Telnet To Your ISY
- Issue the CWP command: CWP - Configure Webserver Ports
- Change the HTTPS port to some other number, example 1443. This will reboot the ISY
- Optional reboot your router (Some routers may need reconfiguring if they don't pick up the new IP address)
- Your remote access URL will be https://your.ext.ip.add:new_port
- Verify the new HTTPS Port Number
- Login to the ISY Admin Console
- Verify the external IP address, menu item Help | About
- Note the address is preceded with HTTPS as you will be using a secure port. In the image the Port has been changed to 1443.
ISY firmware v2.7.9+
