ISY Users:V5:ZWave:Getting Started
Getting started with Z-Wave Plus™ for the ISY-994 series
ISY Installation
- Connect one of the included Cat5e cable to ISY’s Network Port and to your network hub. Note: the network must initially be DHCP enabled. If DHCP is not enabled, please configure ISY with a static IP address the instructions for which you will find here.
- If you are using Insteon, connect the second included Cat5e cable to ISY’s Port A and the other end to the PLM. Note: If your PLM is model number 2413S, you do need a power supply (included)
Host Computer Configuration
- If you do not have Java installed, please install the latest for your platform. You may find the latest Java downloads at http://www.java.com/getjava. Please choose the latest JRE for your platform
- Follow these instructions to install ISY Finder/Launcher app on your desktop which should be used here on out.
Start the Admin Console
- Start the ISY Finder/Launcher on your desktop by double clicking it
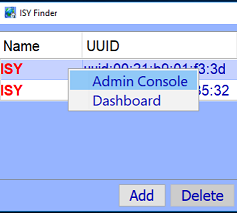
- Click your ISY on the list which brings up the launch menu
- Click on the Admin Console menu item to start the Admin Console
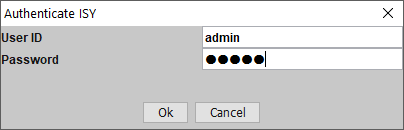
- In a few seconds the Admin Console will start. When prompted to authenticate, enter admin for both username and password
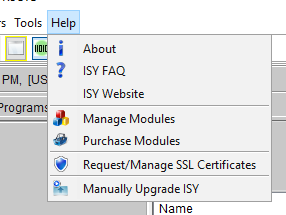
- Choose Help | About from the Admin Console
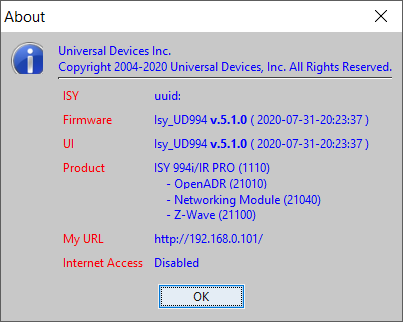
- On the About Dialog, locate My URL and write down the URL. For example, in the following screen shot, the URL is http://192.168.0.101. You may also access your ISY using this URL (as long as your router does not change the address for ISY)
- On Windows machines, you can access ISY by its name: http://isy
- On Windows machines, you can access ISY by its name: http://isy


Choose a Theme
Select File | Themes to change the color scheme and/or default font size used by the Admin Console. The changes will take place the next time you start the Admin Console.
Set Time and Location
Click on the Configuration | System tab and set the Time and the Physical Location for the unit (used for Sunrise/Sunset calculations).
Start Adding Your Devices
Start with the top level Z-Wave menu to begin adding devices to your Z-Wave™ network. We recommend that you first Factory reset the ISY Z-Wave Dongle whenever you start to build a new Z-Wave network.

Create a Program
Click on the Programs | Details tab. In the bottom left corner click on the Add Program button. The example here shows thermostat setpoints being changed when a button is pressed on a switch.

Additional Information
For more comprehensive and in-depth instructions, tutorials, and example, please review our Wiki section on Programs.
Please give our Wiki a look where you will find many resources, including videos, examples, tutorials, and even full user guides in PDF/Word formats.
For our Product and Technical Support Page please visit: https://www.universal-devices.com/udi-support
Don’t forget to register your unit to receive important enhancements, updates and upgrade information: http://www.universal-devices.com/register
ENJOY!