Main Page

Welcome to our Wiki
Universal Devices Inc. is making home automation products as commonplace and affordable as phones, cable/DSL modems, and set-top boxes. The UDI Wiki is the central place for help with our products so please have a look around. With this site being a collaborative effort by UDI and its user base, we need your help! If you're interested in helping the Wiki please register for an an account.
Instructional Videos
- ISY System Configuration
- ISY Device/Scene Configuration
- Adding INSTEON HD Camera to ISY
- Clearing Java Cache and Finding Your ISY on the Network
- ELK Module Integration/Examples
- ELK/ISY Integration Instructional Video
- Using Variables
- Port Forwarding
- Using The ISY Event Viewer as a Diagnostic Tool
- Integration with RTI
- iTach and ISY Integration
Downloadable Documentation
(#top)
Quick Start Guides
Installing the Admin Console Icon on Your Desktop
It's always best to use the Admin Console application which is browser independent. To do this:
- If you don't have Java installed, install Java version 8
- If you already have Java, Clear your java cache
- Use the ISY Launcher to launch the Admin Console. This should put an icon on your desktop once you run the downloaded start.jnlp file.
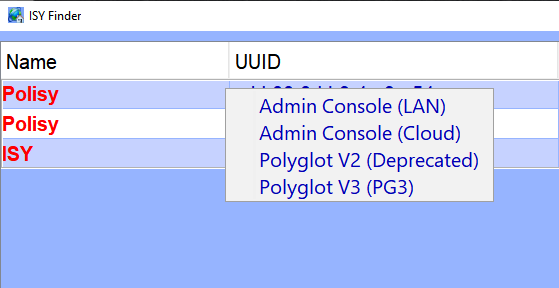
- Click on the discovered 994, Polisy, or eisy and you will see this menu
Admin Console (LAN) This menu item downloads the Admin Console directly from Polisy
Admin Console (Cloud) This menu item downloads the Admin Console from our cloud servers
Regardless of how you get to the Admin Console (Cloud vs. LAN), the results are the same: Admin Console is brought up and connected directly to your Polisy. Admin Console allows you to add/remove/change Z-Wave/INSTEON devices, make programs, and make configuration changes. The best source for what you can do with the Admin Console is our ISY Cookbook .
Polyglot V2 (Deprecated)
This takes you to Polyglot Dashboard page which allows you to add node servers (plugins for other devices) to your IoP. This site is deprecated in the favor or Polyglot V3. Please checkout Polisy User Guide .
Polyglot V3 This takes you to Polyglot V3 Dashboard (PG3). Please checkout Polisy User Guide .
Adding IoX By IP or Address
If IoX Launcher does not find your eisy/polisy, and if you know the address, you can add them manually: Assuming the IP is 1.2.3.4:
- Create a URL from the IP in this form: https://1.2.3.4:8443/desc (replace 1.2.3.4 with the actual IP address).
- Alternatively, if eisy/polisy is on your network, you can find them using their mDNS URL:
eisy: https://eisy.local:8443/desc polisy: https://polisy.local:8443/desc
- Click on the Add button on IoX Launcher and paste the URL.
MAC Users
Java installation
Java's installer for mac is broken in OS Tahoe when using the M seres chip. If users get an error "Failed to install Java OS error code1" they will need to install Rosetta 2 from the command line, then rerun the Java 8 installer.
softwareupdate --install-rosetta --agree-to-license
Launcher Installation
First, download the Start.jnlp app from here.
https://forum.universal-devices.com/topic/24381-iox-launcher/
Then go to your downloads folder. If you don't know how to get there, click on your desktop, go to the GO menu, and choose downloads.
Now run Start.jnlp.
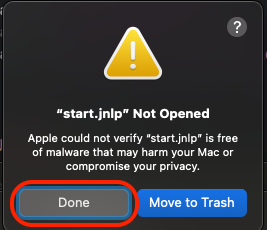
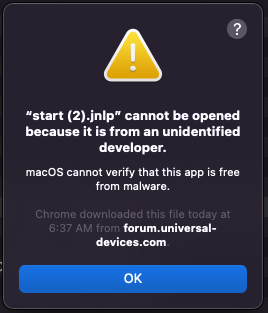
- If you are prompted, be prompted with a dialog warning you that you cannot open this application:
On older Macs-
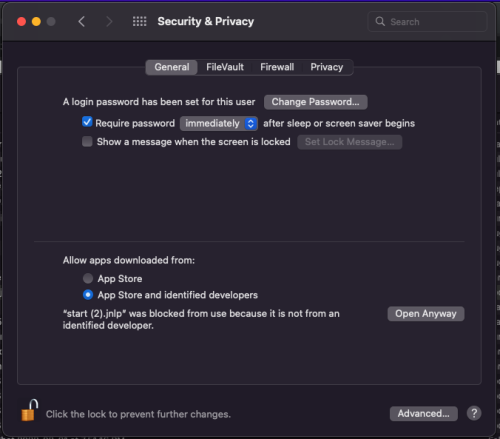
- Go to System Preferences | Security & Privacy | General
- Scroll down to the bottom
- Click on the open anyway button at the bottom
Then try Start.jnlp again.
On newer Macs-
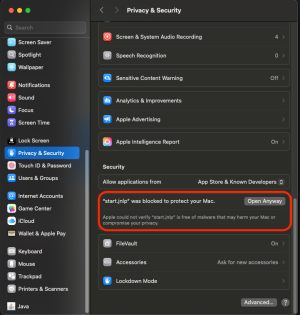
- Go to System Settings | Privacy and Security
- Click on the open anyway button at the bottom (**Sequoia users scroll down and look for something that says Mac OS has blocked an app from running. Click there and allow the app)
Troubleshooting: https://wiki.universal-devices.com/Main_Page#Unidentified_Developer_Blocked
Then try Start.jnlp again.
If that does not work, try right-clicking on the start.jnlp and choosing open from the drop-down menu.
Once start.jnlp opens you should see your EISY. If not, try manually adding it using the format https://*YOUR IP ADDRESS*:8443 (replace *YOUR IP ADDRESS* with the actual IP of your EISY
- If it still does not work and you are using MacOS Sequoia, continue reading. If not, contact UD Tech Support.
- ***MAC OS Sequoia Users Please Read***
If you are using Mac OS Sequoia, and you can not find (even manually adding) your EISY in Admin Console, or it tries to connect and fails, please do the following:
Background-
Apple now has security for Local Networks. We have found that sometimes it lets connections work for a few minutes before security kicks on (probably a grace period).
Once it kicks in, you may not be able to find and/or use AC.
Workaround-
Go to Oracle and download the JAVA uninstaller here:
https://www.java.com/en/download/uninstalltool.jsp
Uninstall JAVA and say yes to deleting the cache.
Run the installer a second time to confirm your JAVA is gone.
Then, immediately reinstall Java using this installer.
https://www.java.com/en/download/
Then download the Start app from Universal Devices here:
https://forum.universal-devices.com/topic/24381-iox-launcher/
Run start.jnlp Say Yes/OK to any prompts.
Another security measure may stop you from loading start. In that case, go to System Settings/Privacy and Security.
In that case,
- Go to System Settings | Privacy and Security
- In that case, look for something that says Mac OS has blocked an app from running.
- Click to allow the app.
Then try Start.jnlp again
Once the admin console is launched, you may not see your ISY. The first time, you might have to add it manually.
Keep trying until you get a prompt popup that says allow _javaws (or IOXLauncher) to access devices on local network. VERY IMPORTANT that you say allow.
Quit Admin Console.
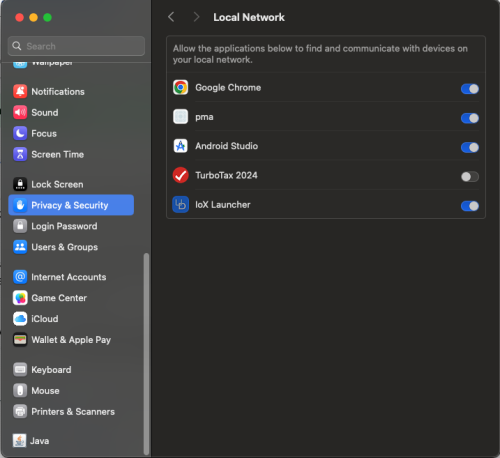
You can now verify that the issue is fixed by going to System Settings/Privacy and Security and scrolling down to Local Network. You should see what you just allowed (either _javaws there or IOX launcher).
We are sorry this may be frustrating, but once you get it in the Local Network settings, it should work every time.
At this point, there is no way to manually add the file to the local network. We have reported the issue to Apple in hopes that they fix it because it's tough to get some local devices to be seen.
UD Mobile
ISY994 Series
Web Interface
- Browser based interface - Supported on all mobile devices
Z-Wave Quick Start Guide
ISY Cookbook
- ISY994i Cookbook - Comprehensive Guide for Anything ISY including example programs.<br<
While the ISY Cookbook was written in the days of ISY994 Firmware v4.x, many fundamentals still apply to ISY/IoX Firmware 5.x+. The major change from 4.x to 5.x is handling of scenes due to adding Z-Wave implementation.
Please review the UD Forums for more information and to get assistance with scene setup and control in ISY/IoX 5.x+.
Complete and Comprehensive User Guides
- ISY994 Series User Guide (4.6.2) (PDF) (MS Word)
- ISY-99/994i PDF User Guide (3.3.10) - Last User Guide for 99 Series
Network Security
- ISY994i Series Network Security Configuration Guide (PDF) (MS Word)
- Certificate Authorities (Root) CACerts.zip
Smart Grid-ISY994 ZS Series
OpenADR
eisy | OpenADR 2.0(a)/(b) Quick Setup Guide
Installing New OpenADR Client Certificate
IMPORTANT To request a production OpenADR certificate, please contact our sales department. Once you receive the certificate, store it in a safe place. Installation instructions will be provided along with the certificate.
Energy Monitoring/ISY994 Z Series
Online Documentation
(#top)
- Everything there is to know about Polisy and how to use it
- Everything there is to know about eisy and how to use it
Z-Wave Plus™ for ISY-994 Series
- Menus, Toolbar, and Panels
- Special devices, scenes, programming, and more. Click on the link above for all topics. More important ones are listed here
IP Network, Web, and Email Notifications
- The default Web Interface that can be used with any browser.
- Customizable web interface for your ISY.
Protocols
Z-Wave
- Ordering/Assembly Instructions
- Z-Wave Plus Instructions
- Z-Wave Instructions (version 4.1.1) - Legacy
- Configuring Aeon Labs Range Extenders and Door Locks
- Configuring Aeon Labs DSB09104-ZWUS Energy Monitor
- Configuring AeoTec Dry Contact Closure Gen 5
- Aeon Labs MultiSensor 6 Configuration Parameters
- Aeon Labs DSB28-ZWUS Configuration Parameters
- Aeotec Device Compatibility Matrix
- All AeoTec Configuration Parameters
- AeoTec Siren Configuration Parameters
- Fortrezz MIMO2+ Parameters
- RemoTec ZXT-120 Configuration
- X10 support information and examples
- Configuration and usage of IR commands with your ISY /IR Series
Framework
- Use substitution variables in emails and network resources
Moving To Your New House
First of all, congratulations on the move.
- The first thing you need to do is to make sure that the previous owner has read and complied with these directions
We do not offer free support and training for existing installations.
- Please start from here so that you can access ISY/Polisy
- the best source for information, tutorials, and examples is our Wiki and the best reading material is our Cookbook
- We'd be delighted to answer any specific questions you might have by submitting a ticket. We also have e a huge and very friendly user community at our Forum wherein you can ask general questions
- If you would like training and remote session support, we offer scheduled remote sessions (training, walkthrough, programming, etc.) at $125/hour
Selling Your Devices
994 is now discontinued Please do not sell your 994 and we will not be supporting it and all tickets will be left all answered.
We do not offer free support for used equipment. So, if you are selling your devices, you must make sure your buyer has enough information to be able to run/configure everything. Here are some resources:
- Make sure you remove your ISY Portal account by contacting sales@universal-devices.com with the UUID and subject "Selling my device". Otherwise, your buyer will never be able to use the ISY Portal account
- Have them to start from here so that they can access the unit
- Let them know that the best source for information, tutorials, and examples is our Wiki and the best reading material is our Cookbook
- We'd be delighted to answer any specific questions they might have by submitting a ticket and we have a huge and very friendly user community at our Forum
- If they would like training and remote session support, we offer scheduled remote sessions (training, walkthrough, programming, etc.) at $125/hour
- Transferring device registration from one account to another is $50.00 and needs to be requested through sales@universal-devices.com
Selling Your House
We do not offer free support and training for existing installations. So, if you are selling your house with an ISY/Polisy installed, you must make sure your buyer has enough information to be able to run/configure everything. Here are some resources:
- Make sure you give them ISY credentials and the latest backup
- If you have an ISY Portal Account, make sure you transfer it first
- Have them to start from here so that they can access ISY/Polisy
- Let them know that the best source for information, tutorials, and examples is our Wiki and the best reading material is our Cookbook
- We'd be delighted to answer any specific questions they might have by submitting a ticket and we have a huge and very friendly user community at our Forum
- If they would like training and remote session support, we offer scheduled remote sessions (training, walkthrough, programming, etc.) at $125/hour
Legacy 26/99
- Getting started tasks
- Computer Configuration - Configuring a computer to interface with the ISY.
Additional options
ISY Portal: Integration with Amazon Echo/Google Home/IFTTT/Remote access
- Subscription Based
- $24 for One Year
ISY Portal enables you to remotely connect to ISY without the need for port forwarding. The subscription is for 2 years and includes:
- Amazon Echo Integration
- IFTTT integration
- Network Module (Requires firmware/UI version 4.4.3+). Optionally, if you already have the Network Module, you can send your UUID (Help | About) to support@universal-devices.com and request for:
- 1 year extension of your ISY Portal Subscription if the Network Module was purchased within 2 years of ISY Portal Module purchase
- 2 year extension of your ISY Portal Subscription if the Network Module was purchased within 1 year of ISY Portal Module purchase
- 4 year extension or refund if the Network Module was purchased within 30 days of ISY Portal Module purchase
- Please Note that your request will cause the Network Module to be Uninstalled and not accessible after the expiration of the ISY Portal Subscription
ISY Portal Google Assistant Integration
Please peruse this link for detailed instructions of setting up Google Assistant to work with ISY Portal
Networking
- $49.00 Flat Fee
- Or $0.00 - Included with ISY Portal with Firmware versions 4.4.3+
Climate
Please use ISY Portal which gives a few options for climate service providers.
A10/X10
- $9.00 Flat Fee
- Enhanced A10/X10
ELK Security
- $99.00 Flat Fee
- ELK Security Module
- ELK/ISY Integration Instructional Video
Electricity
- $49.00 Flat Fee
- Electricity
Upgrade to IR
- $45.00 Flat Fee + Shipping
- Order IR Input Module, when received :
- Open ISY's enclosure
- Take the ISY board out
- Plugin the IR Module on the front of the board
- Once everything is put back together and ISY is rebooted, go to Admin Console / Help / Purchase Modules and choose Upgrade to IR
(#top)
Troubleshooting
(#top)
ISY Launcher cannot find ISY
- Make certain that you are using ISY Launcher. This is a MUST
- If you have VPN software running, Admin Console cannot search for ISY on your computer. Please disable the VPN, find ISY's IP address and then click the Add button and enter it manually
- Make certain that, after reboot, the pattern of lights is as described here
- If you have recently changed your modem/router, please follow these instructions
- If you have any firewall software, make sure it's configured properly
- If all the above have been checked, it's almost a guarantee that that your ISY is not on the same network as your computer. Perhaps at some point you might have configured ISY with a static IP address. Or, that your WiFi network is not connected to the wired network.
Front Panel LEDs/Lights
- Boot up sequence:
- Power, RX&TX, momentary blink of Memory/RX and TX, and then Power only
- Only Power Light Is On:
- Most probably power supply related. You can try any power supply that outputs anywhere between 5 volt and 30 volts,center positive, 2mm barrel connector
- Error light and Memory light blinking simultaneously: ISY is not able to get on the network.Please ensure:
- The Network jack on the back of ISY is connected to your router
- The lights on the Network jack have one steady on and the other one blinking. If not, check cable and connectivity to the router
- Your router provides DHCP
- There are no other devices on the network with the same IP address (IP Conflict)
- If you have configured your ISY to use DHCP, then you will have to search your network for devices that might be in the same DHCP range as your router is providing
- If you have configured your ISY with a static IP address, and as long as you have a good backup, you can Factory Reset your ISY and then restore a good backup (File | Restore ISY). Once prompted to change the network settings, choose No
- Only Error light blinking: ISY cannot communicate with the SD Card. Please ensure:
- The micro SD Card (on the front) is seated properly. Unplug ISY, remove the rubber cap, using a sharp object, push the micro SD Card in so that it pops out. Push it back in so it clicks in. Apply power to ISY
- If reseating the micro SD Card does not work, you probably have a defective SD Card. Please consult Replacing/Formatting SD Card
Changed ISP/Router - Can no longer access ISY
- Make sure you have a good backup
- Factory Reset your ISY
- Log back into the Admin Console using https://isy.universal-devices.com/start.jnlp (icon on your desktop)
- Click on File | Restore ISY
- Point to your good backup
- Important At the end of the process, you will be prompted to change your existing network settings (DHCP) with the one in the backup. Choose No
- ISY reboots and it will be on DHCP
- You can change ISY's network configuration again by going to Admin Console | Configuration | Network
- There are two other more techy alternatives but there are no guaranteed that they will work especially if the SD Card or the PLM are really old:
- Method 1
- Reboot ISY with a different SD Card
- Factory reset ISY (this puts ISY back to DHCP mode)
- Put the original SD card back
- If this works, BACKUP immediately and reboot
- Method 2
- If you are familiar with putty, and serial connections, connect a mini USB cable to the monitor port on ISY and the other end to your computer. You may need these drivers. The serial connection parameters are 115200, 8, 1, None. If you don't know the password, you may have to reset first. Once logged in through the terminal, type CT at the prompt followed by the Return button. For IP address, enter 0. This reverts your network settings to DHCP.
- Method 1
ISY Not Found
If IoX Launcher cannot find your device (ISY994 [EOL], Polisy, eisy):
- Most importantly, you need to reinstall the IoX Launcher
- VPN software is running on your computer or you're on a VPN network
- Unit is not on the same network as your compute. Perhaps you changed routers? If so: follow these instructions
- If not #1, please open your router page and see whether or not you see ISY994-EMS (for ISY994 [EOL]), polisy (for Polisy), or eisy (for eisy) in the list of LAN clients. If you find the IP address, then, in IoX Finder, click on the Add button and enter
- ISY994: http://1.2.3.4/desc (replace 1.2.3.4 with the actual IP of ISY in the router)
- Polisy/eisy: https://1.2.3.4:8443/desc (replace 1.2.3.4 with the actual IP of Polisy/eisy in the router)
- If not #2, then perhaps the unit is not powering on:
- ISY994: Please make sure the LED pattern is as outlined here
- Polisy: Reboot the unit, all 3 LEDs should get lit and then only the left most is lit. Wait for 30-60 seconds. You may hear a beep.
- eisy: Reboot the unit, allow 2-3 minutes for everything to boot and stabilize before attempting to open IoX Launcher
- If not #3, the issue is that you might have firewall/VPN or antivirus software (especially VPN) blocking network communications.
DNS Error
The most likely error is due to ISY having a static IP address and the router blocking DNS from IPs not generated by DHCP server. If you have configured ISY with a static IP address, please consider
- Reverting to DHCP, Or
- Use 8.8.4.4 for the DNS server
In case of using DHCP, you may consider using DHCP Reservation in the router such that ISY is always given the same IP address.
If you have port forwarding rules in your router to ISY, please make sure that only TCP is forwarded (NOT UDP or both).
If you are using DDWRT, PFSense, or any other home grown routers, then please note that DNSMasq will not work.
ISY Cannot Access the Internet
- If the problem is DNS related, please see DNS Error
- If you have configured your ISY with static IP address, please revert to DHCP and use DHCP Reservation instead (in the router)
- If you have any Parental Control or Mac Address Filtering in your router, please make sure ISY is not listed under blocked machines
If you have any port forwarding rules in the router that points to ISY, please remove them
- If you see File | Disable Internet Access in the Admin Console, please click it
ISY Cannot Communicate with ISY Portal
- Make sure you go through ISY Cannot Access the Internet guidelines
- Make sure your HTTPS Client Security Settings are set to TLS 1.2 and Strength of All and Verify is Unchecked by following Network Security Configuration guidelines
MAC OSX
On Big Sur, Admin Console is no longer a separate Window
- System Preference | General | Prefer Tabs - set it to "in full screen" (not "always")
Clicking on Purchase Module does not do anything
You are probably using Safari. What you need to do is to use ISY Admin Console application the instructions for which you will find here
Cannot enter userid/password in the Authenticate dialog
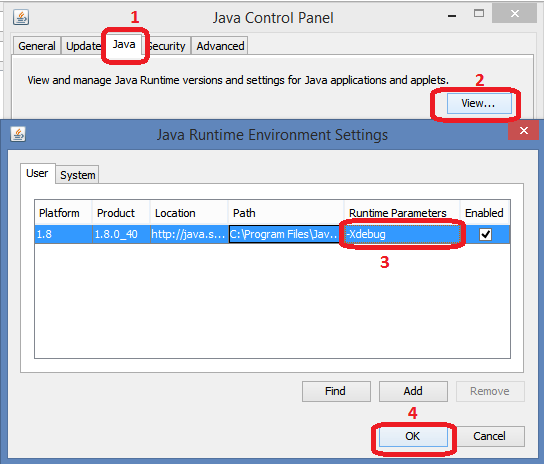
- If you have Yosemite and Java 1.8.40, please:
- Go to System Preferences | Java
- Click on the Java tab
- Enter -Xdebug for Runtime Parameters
Admin Console icon does not appear on the desktop
- Close all your browsers
- Go to System Preferences | Java to get to Java Control Panel
- Click on Delete Files and make sure you check Applications
- Click on the Settings Button
- Make sure Keep temporary files on my computer is checked
- Copy the directory under Location
- Open up Finder and delete the above directory under Location
- Close Java Control Panel
- Open a browser and retry the Admin Console (JNLP) URL
ISY Finder does not find ISY
- Open a terminal window
- Type hostname on the command line and copy the results to the clipboard
- Open /private/etc/hosts and make sure you have right below the first 127.0.0.1 listing:
- 127.0.0.1 whatever-hostname-you-copied-in-step2
Admin Console Hangs
- If you have any of the following modules on your MAC (under System Preferences | Privacy/Security | Accessibility), you may experience Admin Console hang when editing text fields. This is especially the case when you try copy/paste:
- BetterTouch App
- Text Expander App
- PopClip App
- Moom Appp
- Usually disabling these modules will fix the issue. For more information please checkout: https://stackoverflow.com/questions/20116958/java-apps-freeze-mac-os-10-9
Unidentified Developer Blocked
If finder does not open on Mac it may be blocked by your security settings. The following dialog is only shown once, and you only have a limited amount of time to allow this file. If the time frame to allow this file has passed the user may need to uninstall then reinstall Finder in order for "Allow" to be shown again.
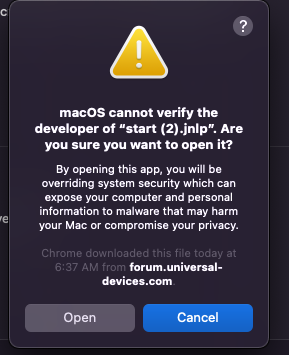
Go to Apple (top right) > System Setting (sometime call preferences) > Security & Privacy. Security & Privacy preferences may require your Mac Admin Password, or you may need to click the Lock at the bottom right to allow editing. You should see a security warning for start.jnlp (note the image below has start (2).jnlp as there were multiple downloads). Click "Open Anyway"
A developer warning may be presented, click "Open"
Mac Local Network
Users must now enable local network access for chrome and Admin Console. The permission dialog is only shown once, so if the user denies/ignores it they will need to manually enable on MAC > System Settings -> Privacy & Security -> Local Network
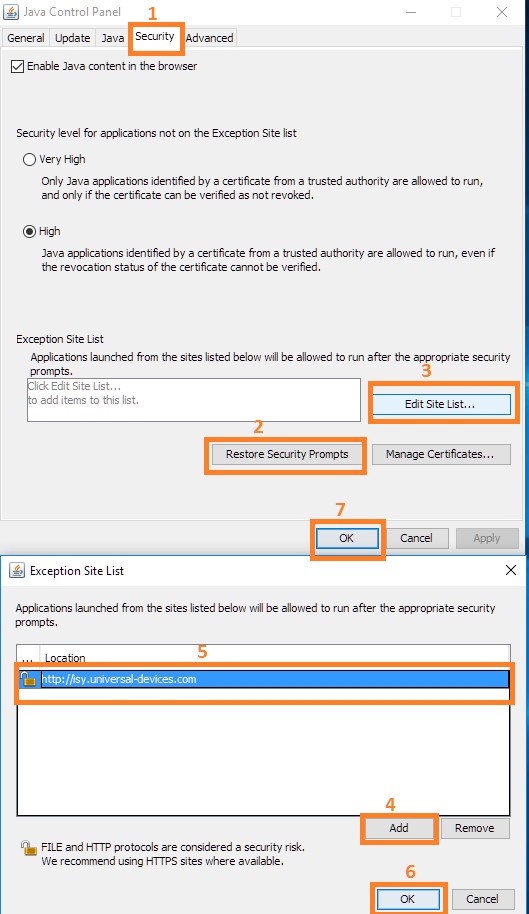
Java applications are blocked by your security settings
- Close all your browsers
- Go to System Preferences | Java to get to Java Control Panel
- Click on Delete Files and make sure you check Applications
- Click on the Settings Button
- Make sure Keep temporary files on my computer is checked
- Click on the Security tab on the top
- Click on Restore Security Prompts and then click on Restore All button on the ensuing dialog
- Click on the Edit Site List
- Click on the Add button
- Enter https://isy.universal-devices.com followed by hitting the Return key on the keyboard. Accept the warning
- Click on the OK button
Resource cannot be downloaded (admin.jnlp)
- 99.9% of the cases, this is due to the installation of the following software:
Relevant Knowledge
Qustodio
Admin Console is very slow or hangs
- If the admin console is slow to respond, it is likely you need to increase the amount of memory allocated to the Java runtime (JRE).
- Open the Java Control Panel, select Java tab, press View button, then add or modify the Runtime Parameter -Xmx to the following:
- -Xmx512m
- Press Ok to close the window, then Press Apply to save the changes
start.jnlp does not start IoX Launcher
- If Java is indeed installed, the reason is that .jnlp file association is broken (it has to point to javaws.exe). Search for javaws.exe in the computer. Right mouse click on start.jnlp, and select "Open with" and point to "javaws.exe" to fix the .jnlp file association.
Cannot find Valid Java Home
This issue usually happens on Windows and when you have had multiple versions of Java installed especially the older version. What you need to do:
- Clear your java cache
- Uninstall all versions of Java using the Control Panel | Add/Remove Programs
- Delete these directories (if they exist):
- C:\Program Files\Java
- C:\Program Files\Oracle
- C:\Program Files(x86)\Java
- C:\Program Files(x86)\Oracle
- C:\Program Files (x86)\Common Files\Java
- C:\Program Files (x86)\Common Files\Oracle
- Delete the following directories (if the exist):
- Open file explorer and click in the tree to reach c:\users\<username>\AppData\
- Search for "java" (note: other windows settings and preferences for your user determine where "Java" folders get created. (generally they appear under "sun" and "oracle" folders.)
- Open Search or click "Windows/Start" button:
- In the search box, type Environment and choose Edit the System environment Variables
- Click Environment Variables
- Under User variables for <username>
- Click on the Path | Edit and then delete all occurrences of Java and Oracle
- If you see JAVA_PATH, click on it and then click the Delete button
- Under System variables
- Click on the Path | Edit and then delete all occurrences of Java and Oracle
- If you see JAVA_PATH, click on it and then click the Delete button
- Click the OK button (3 times to get out of "System Properties")
- Reboot your computer
- Reinstall Java 64bit version
If you were running the 32bit (x86) version of Java you might need these additional steps after reinstalling Java 64bit version:
- Open Search or click "Windows/Start" button:
- In the search box, type Environment and choose Edit the System environment Variables
- Click Environment Variables
- Under "System variables" Click "New..."
- For "Variable name:" type JAVA_HOME
(ALL CAPS) - For "Variable value:" enter the directory for your new Java install
Example: C:\Program Files\Java\jre-#.#
[NOTE: #'s will be current version just installed]
You can click "Browse Directory.." to find the directory or type or paste it in the entry field. - Click OK
- For "Variable name:" type JAVA_HOME
- Find "PATH" (still under System Variables)
- Click "Edit..."
- Click "New"
- Enter: %JAVA_HOME%\bin
Pay attention to CAPS - Click "OK" (total of 3 times to exit "System Properties"
- Reboot your computer
To confirm Java is on the system start Command Prompt or PowerShell and type java -version. You should get a result similar to:
java version "1.8.0_371"
Java(TM) SE Runtime Environment (build 1.8.0_371-b11)
Java HotSpot(TM) 64-Bit Server VM (build 25.371-b11, mixed mode)
IoX Launcher should be able to launch correctly every time now. If you still have issues please file a support ticket.
Windows should update these entries as Java updates, but should you have issues you might need to update the JAVA_HOME directory above.
(#top)
Fonts too Small
- Make sure your Admin Console/UI version is 4.6.2 (or above) using Help | About
- If not,Install the latest UI
- On the Admin Console click on File | Themes | Font size and choose an appropriate font size
- If the font is still too small (especially on 4K monitors/Surface Computers), and for Windows only:
- Right mouse click on Admin Console icon on your desktop
- Select Properties from the menu
- Click on the Compatibility tab
- Check Run the program in compatibility mode for checkbox
- Choose Window Vista (Service Pack 2) or Windows 7
- Choose Override high DPI settings
- Choose Scaling performed by "System"
- Click on the Apply button
Using Java 9 In case you are Ok with installing Java 9:
- Uninstall Java 8
- Install Java 9 JRE from (make sure you download the correct version for your OS)
- Reinstall Admin Console
You can also find this information in our forum.
Userid/Password dialog keeps popping up
This is usually related to firewall software on your computer. Two solutions:
- Use https (instead of http) to connect to your ISY
- Configure Your Firewall Software
Admin Console Closes Automatically
This is usually related to firewall software on your computer and especially with AVAST or AVG (including MAC). Two solutions:
- Use https (instead of http) to connect to your ISY
- Configure Your Firewall Software
Admin Console Minimized/Invisible and Cannot be Restored
This is usually related Admin Console state files not being updated properly and especially in case of multi monitors. All you need to do is to find the following files in Java temp directory (on Windows: c:\Users\[Username]\AppData\Local\Temp) and delete them. Or, you can simply search the computer for udi_*.state or ud_*.state file patterns:
- ud_finder.state
- udi_finder.state
- udi_frame.state
- udi_launcher.state
- udi_pgm.state
- udi_tree.state
INSTEON
Z-Wave
Error Codes
(#top)
Migration
(#top)
- Migrating to Your ISY994i - Moving from ISY-26/99i to 994i
- Migrating from ISY994i to Polisy or eisy - Moving from 994i to Polisy or eisy
Misc
(#top)
- Advanced Configuration Guide - Using the ISY Shell.
- Frequently Asked Questions
Firmware Releases
(#top)
Third Party
(#top)
- Third Party Products
- Mobile Phone Integration with Tasker
- How to get iRule to communicate with your ISY
Developers
(#top)
- Online Documentation/APIs
- ISY Developer Center
- REST Interface - Using the REST Interface
- Polyglot
Legacy ISYs
(#top)
Support
(#top)
- UDI Support - Contact information for support
- UDI Forum - User-to-User support forums
Reviews
(#top)
Home Automation Info
(#top)
New to home automation? Check out:
- Google Glass/ISY
- Home Automation Guru's Blog
- Video illustrating what you can expect from automation
- INSTEON: Smarthomes for Everyone by Matthew Strebe
- The Forta Blog: Home Automation via X-10 by Ben Forta
- The Forta Blog: From X-10 To INSTEON by Ben Forta
- Glossary of home automation terms
Links To the Past
(#top)
(#top)
