ISY-99i/ISY-26 INSTEON:Replacing/Formatting an SD Card

[NOTE: The ISY994i takes a MicroSD card. The max size is 32GB. Please look for a card with the newer A1 rating (A2 also works, but will fallback to A1 because the ISY994 does not provide hardware support required for A2). All other process steps below remain the same.]
The ISY has two different memory storage locations. First is the base memory where the ISY has some of the basic code like its boot loader, SD file system, and networking facilities. The other memory is the SD card which is where upgraded admin firmware and user files are stored. Sometimes the SD card gets corrupted and/or damaged and needs to be reformatted or physically replaced. In either event here is the basic steps to complete in order to get your system back up and running smoothly.
These are some of the main symptoms to look for to know if your SD Card is acting up. In order to further ascertain if your SD card has issues please feel free to ask many of the helpful users on the UDI Forum before taking these steps below. This process is a safe process to perform but may be unnecessary if there is other issues going on with your ISY system.
- Flashing "Error" LED indicates file system problem ("Error" + "Memory" LED flashing indicates network error which this process will not fix)
- Unable to complete restoring a backup from the admin, usually quitting at the same percentage with each attempt
IMPORTANT - Formatting your SD card should only be done after consulting with support!!
It is best to complete this process from a local LAN connection and make sure that all Firewall and Anti-virus software is disabled during it.
- Change the SD Card skip this step if your only formatting the SD card
- ISY99i ONLY
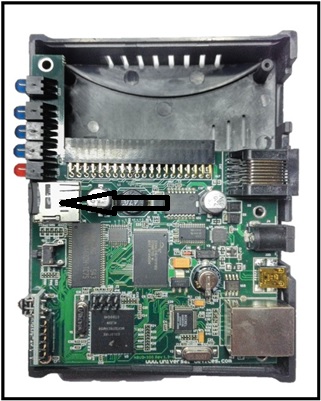
- Remove the four screws that attach the medal lid of the ISY, see figure 1 of ISY without its cover
- Remove the four screws that secure the circuit board inside the case (ISY-99i only)
- Please note: newer ISYs now have access to the SD Card from the outside of the unit so no disassembly is required
- Remove the old SD Card and replace with the new card
- Please note: ISY supports up to a 16GB SD card with 4.2.18 firmware and above, any firmware before this only supports a 512MB SD card
- Reassemble the ISY in the reverse order
- ISY99i ONLY
- SKIP if a new SD Card
- Format the SD Card - you do NOT' have to format the SD Card if it's new
- Telnet To Your ISY
- Login with the admin password
- Issue "FS" to format the SD Card, answer the "Are you sure question" with an upper case "Y"
- Please note: the ISY works with both FAT 16/32, but FS function formats it specifically for use with ISY with some performance improvements so its preferred you use this method.
- You will see the Goodbye prompt confirming that the format is complete and that the has ISY rebooted
- Install the latest firmware
- Download the latest firmware which can be found from the Current Release and Betas section of the Forum.
- Go to http://isy.universal-devices.com/start.jnlp to launch the ISY Launcher
- Please note: using the UDI link supplies the admin code to launch your ISY in its clean state, trying to connect with any other methods will not work until you have reinstalled the latest firmware
- Login with the admin password
- Choose Help | Manually Upgrade My Lighting
- Choose the latest firmware (or beta if you wish) from the location you have downloaded it to
- The ISY will reboot after the install is complete
- Restore your latest good backup
- Login with the admin password
- Choose File | Restore ISY
- Choose your latest good backup
- Please note: If your performing this whole process because of a corrupted SD card, a good backup is considered one that was completed successfully before the SD card got corrupted
- The ISY will reboot after the restore is complete
- Check that all is well
- Login with your password
- Devices and programs should be restored and back to normal