ISY-99i Series INSTEON:Networking:Network Resources:Axis IP Camera
Interfacing the ISY-99i with Axis IP Cameras
Axis network cameras enable remote viewing and recording over Internet or intranet. These cameras have the ability to be set up to record based on "events" or triggers ( eg: video motion detection, sound, etc..), they also support the ability to have events triggered remotely via a published API.
The Follow in an example on how to use a ISY99 forward events to the camera, in this case a X10 PIR motion sensor, other possible uses for integration into an ELK system or just snapping a picture every time the garage door opens. (The full API documentation for ALIX IP cameras is at http://www.axis.com/techsup/cam_servers/dev/cam_http_api_index.php ).
Alternatively one can also configure the opposite, that is have an Axis network camera trigger any INSTEON device ( via the ISY99 ).
Sending commands from ISY to Axis IP Camera
In this example we will set up a ISY99 to to relay events to an Axis camera triggering recording an images to a FTP Server.
You will need:
- An Axis IP Camera ( eg: model 207 M1011 etc.. )
- A Ftp server to upload the images.
- An ISY-99i series device with firmware 2.7.3 or later
- The Networking add-on module for your ISY-99i
Alix Event Server Setup
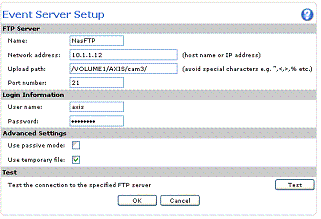
You will need to configure the camera to upload images when it receives a trigger event. To do this you will first need to set up an "Event Server" for FTP go to the system menu "Setup > Event Configuration > Event Servers" and and select the "Add Ftp..." button.
A dialog box should popup for "Event Server Setup"
- Set the "Name" option to be what ever you want
- under "Network address" Enter the FTP server's IP address or host name.
- under "Upload path" Specify the path to the directory where the uploaded images will be stored.
- under "User name/Password" Provide your log-in information for your FTP server
- set "Use passive mode" if there is a firewall between the camera and the target FTP server.
Alix Triggered Event Setup
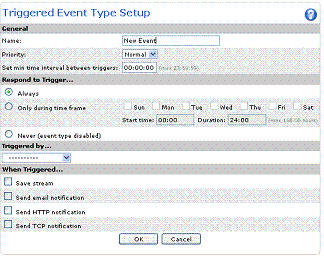
Next you need to set up the Triggering Event, go to the system menu "Triggered Event Type Setup" ( Setup > Event Configuration > Event Types ) and select the "Add triggered.." button.
A dialog box should popup for "Triggered Event Type Setup",
- Set the "Name" option to be what ever you want
- set option "Triggered by..." to "Manual trigger"
- under "When Triggered..." select the checkbox "Save Stream" (more options should appear under the check box)
- set "Image frequency" to two ( you can change this later )
- check "Include pre-trigger buffer" and set it to 5 sec ( this will compensate for any latency in reviving the event )
- set "Select type:" to "FTP" ( again options should appear ).
- under "Primary" Select the name of the "Event Server" you created.
( you can adjust the other options later )
There are a few options in the configuration you can adjust, but for ease of setup you can adjust these later after the base system working.
ISY Network Resource
You will need to set up a Networking Resource on your ISY99 to relay events to your Axis camera, in the following example we will a command event from a X10 Hawkeye Motion sensor configured to operate at "A1" ( the default address ). We'll name this Network Resource "Camera Start".
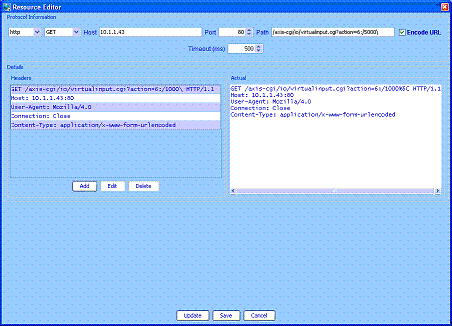
Assuming you have the Networking add-on module installed, go to the menu "Configuration -> Networking -> Network Resources" and click the "Add" button.
- Click on the name field and name the resource "Camera Start"
- Click on the URL field and a "Resource Editor" dialog should appear
- under "Protocol Information" Select "http" and "GET"
- under "host" Enter the Camera's IP address or host name
- under "port" set the value to "80"
- under path set the value to be the following ( no spaces )
/axis-cgi/io/virtualinput.cgi?action=6:/5000\
Now select "Save"
The syntax for above URL is :
http://[camera_ip_addr]/axis-cgi/io/virtualinput.cgi?<argument>=<value>:<a>
this simulates an activation or inactivation of virtual input 6, where <a> is the action character: "/" or "\" ( "/" = active, "\" = inactive ). The "5000" is a ms delay. Thus the
action=6:/5000\
instructs the camera to start recording (by setting the virtualinput port 6 to "active"), waits 5 seconds, then stop recording.
ISY Program Resource
The next step is to set up a "program" (we call "cam_start") on the ISY to relay events.
In the following example we will be receiving a command event from a X10 Hawkeye Motion sensor configured to activate or run when ever the X10 command "A1" ( the default address, you will want to change this later ).
If
       X10 'A1/On (3)' is Received

Then
       Resource 'Camera Start'

Else
  - No Actions - (To add one, press 'Action')
This program simply calls the Resource 'Camera Start' when ever the X10 command "A1 On" is received.
Now if everything has been setup correctly your Network camera should be responding events received by the ISY99.
The motion sensor should send a "A1/On" command that the ISY99 will receive cause the program "cam_start" to run and call the ISY "Network Resource" 'Camera Start'. This in turn send a http command to the Alix camera to start recording.
Alternatively instead of triggering from a Motion sensor you can have it trigger on the garage door opening or a even the kitchen light switch.
Using ISY to preform actions when motion is detected by Axis IP Camera
The Axis IP Camera is capable of video motion detection and preforming multiple actions including sending notifications via HTTP. This feature can be use to send a notification when the camera detects motion to s ringing a chime or turning on a Light.
Some Axis Camera support audio triggers, thus you can use your Axis camera to turn on a light when it hears a noise.
For example, activate a X10 device ( for example the PHH02 X10 chime ) all that is needed is to setup the AXIS camera to send a HTTP notification go ISY99. In the following example we will assume the X10 address for the device you want to activate is "M3"
Alix Triggered Event Setup
To do this you will first need to set up an "Event Server" for HTTP, go to the system menu "Setup > Event Configuration > Event Servers" and and select the "Add Http..." button.
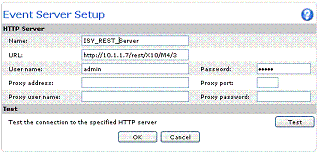
A dialog box should popup for "Event Server Setup"
- Set the "Name" option to be what ever you want
- under "URL" Enter the the following URL (substituting the correct IP address for your ISY unit
http://[ISY_ip_addr]/rest/X10/M3/3
- under "User name/Password" Provide your log-in information for your ISY unit.
NOTE: the above URL can be any valid REST Interface command thus allowing you to activate any INSTEON device, run a program or set variables.
Alix Event Server Setup
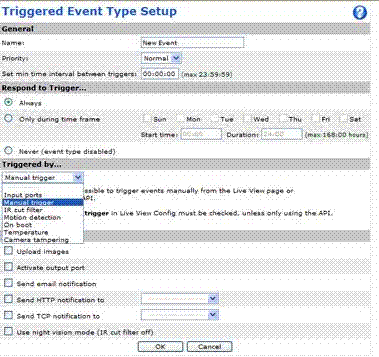
Next you need to set up the Triggering Event, go to the system menu "Triggered Event Type Setup" ( Setup > Event Configuration > Event Types ) and select the "Add triggered.." button.
A dialog box should popup for "Triggered Event Type Setup",
- Set the "Name" option to be what ever you want
- Set the "Triggered by..." option to what ever trigger you plan to use ( Audio trigger", "Motion Detection", "Input port" etc. )
- under "When Triggered..." select the checkbox "Send HTTP notification" (more options should appear near the check box)
- under "Send to" select the Event Server you set up in the previous step.
- Select "OK"
That's all there is to it...
Other Uses
Some Axis Camera support audio and triggers, thus you can use your Axis camera to turn on a light when it hears a noise.
Another feature of some Alix network cameras are integrated digital input and output ports(gpio), which enable connection to external devices, such as doorbells, detectors ( PIR, Glass break detector, etc).
This feature can be easily used to extend inputs and triggers to the an ISY device as well