ISY Developers:Java Web Services Tutorial
How to program/consume UDI web services in Java
This will show you how to use Java API for XML - WebServices (JAX-WS) to parse the UDI web services (and UDI Elk web services) wsdl files and turn them into Java object classes.
JAX-WS has an import tool (wsimport) that reads a W3C compliant wsdl file and turns its "services" into Java objects so all you have to do is call the appropriate Java classes.
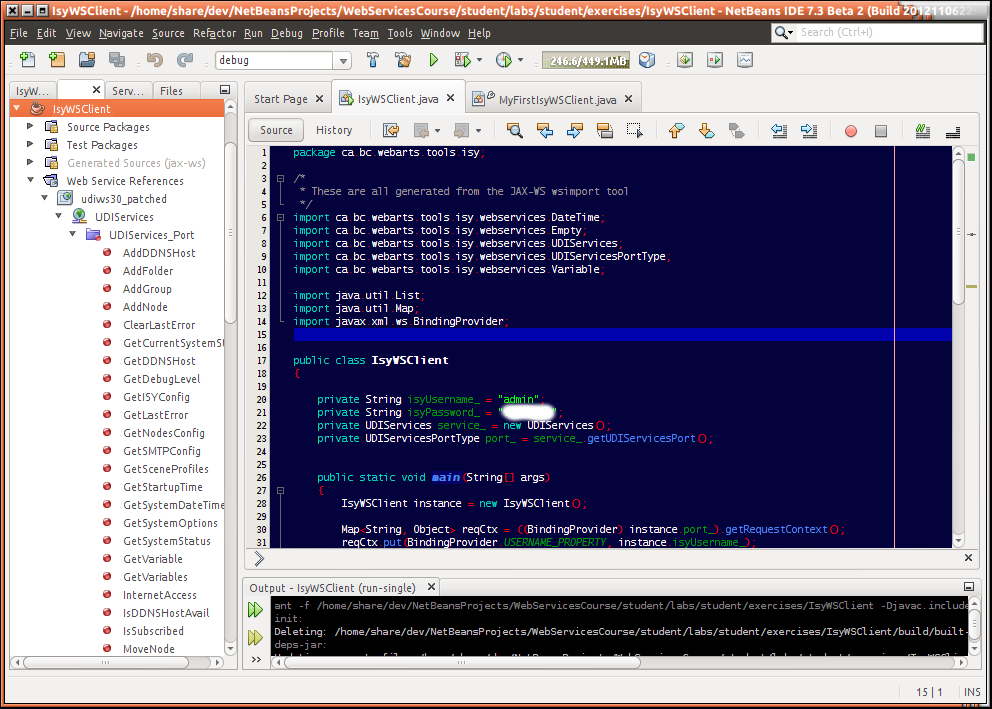
For example; once the processing is complete, you can use a Java class like the following to access the ISY:
  package ca.bc.webarts.tools.isy;

  /*
  * These are all generated from the JAX-WS wsimport tool
  */
  import ca.bc.webarts.tools.isy.webservices.DateTime;
  import ca.bc.webarts.tools.isy.webservices.Empty;
  import ca.bc.webarts.tools.isy.webservices.UDIServices;
  import ca.bc.webarts.tools.isy.webservices.UDIServicesPortType;
  import ca.bc.webarts.tools.isy.webservices.Variable;

  import java.util.List;
  import java.util.Map;
  import javax.xml.ws.BindingProvider;

  public class IsyWSClient
  {
   private String isyUsername_ = "admin";
   private String isyPassword_ = "admin";
   private UDIServices service_ = new UDIServices();
   private UDIServicesPortType port_ = service_.getUDIServicesPort();

     public static void main(String[] args)
     {
       IsyWSClient instance = new IsyWSClient();

         Map<String, Object> reqCtx = ((BindingProvider) instance.port_).getRequestContext();
         reqCtx.put(BindingProvider.USERNAME_PROPERTY, instance.isyUsername_);
         reqCtx.put(BindingProvider.PASSWORD_PROPERTY, instance.isyPassword_);

         DateTime dt = instance.port_.getSystemDateTime(new Empty());
         System.out.println("NTP time=" + dt.getNTP());
     }
  }
Online Documentation
Before I start, here are some references to some good background information and tools, specific to processing Web Services in Java.
- Oracle's Java WebServices Tutorial
- Oracle's example WebServices code
- TCPmon[1]- a TCP monitor (written in Java) to monitor ALL TCP packets (ie http and soap)
- UDI Online WSDK Forum
Requirements
- UDI Webservices Developnment kit (UDI WSDK)
- Use the same version as firmware in your device
- Here is the link to Version 3.2.6
- NetBeans
or
- JAX-WS or J2EE SDK
- JAX-WS Documentation
- JAX-WS implementation and tools
- To build a client, you don't need the full J2EE SDK - just JAX-WS to do the WSDL import processing and API.
I used NetBeans and will document the process using NetBeans.
Process
Basic setup
Download and install NetBeans. http://www.netbeans.org
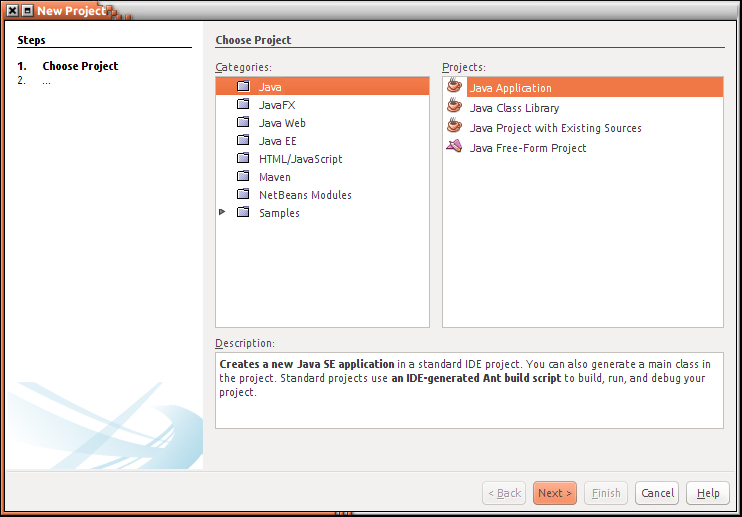
Create a new 'Java Application' Project...
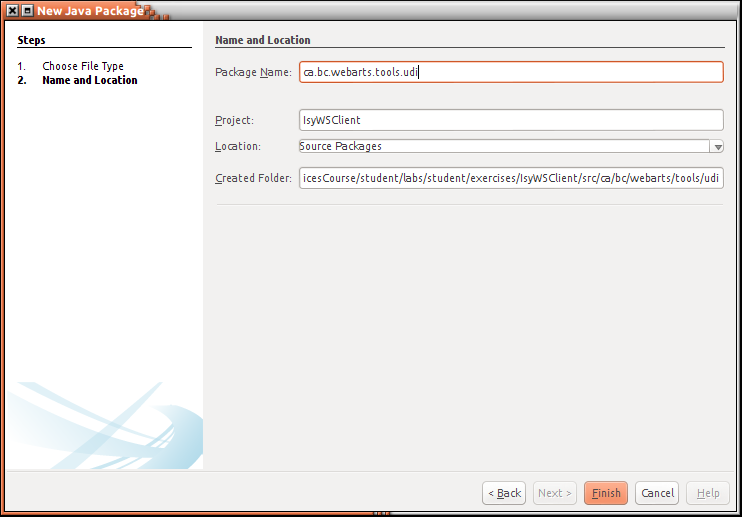
Name Your Project and NEW Class...
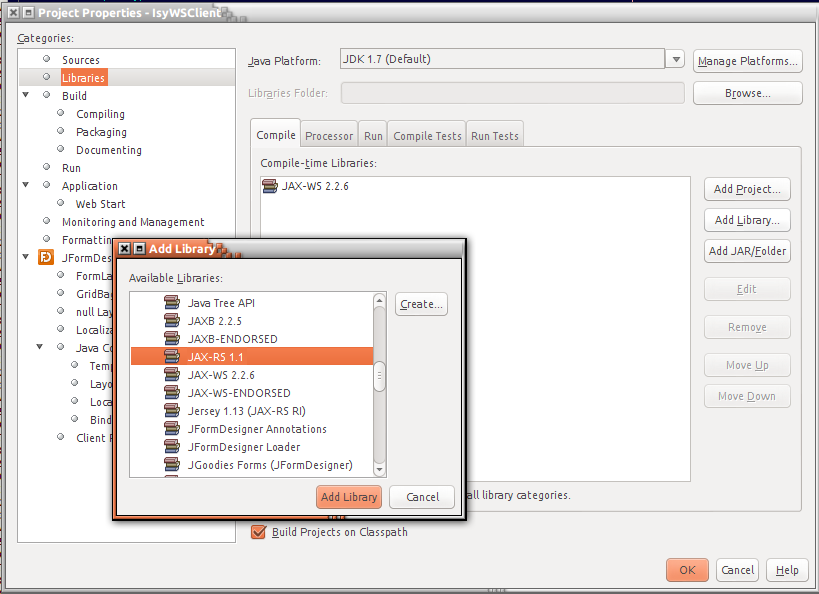
Right-click on the your new project in the projects listed along the left (to bring up the context menu) and
click Properties then select Libraries to Add Library JAX-WS 1.1 ...
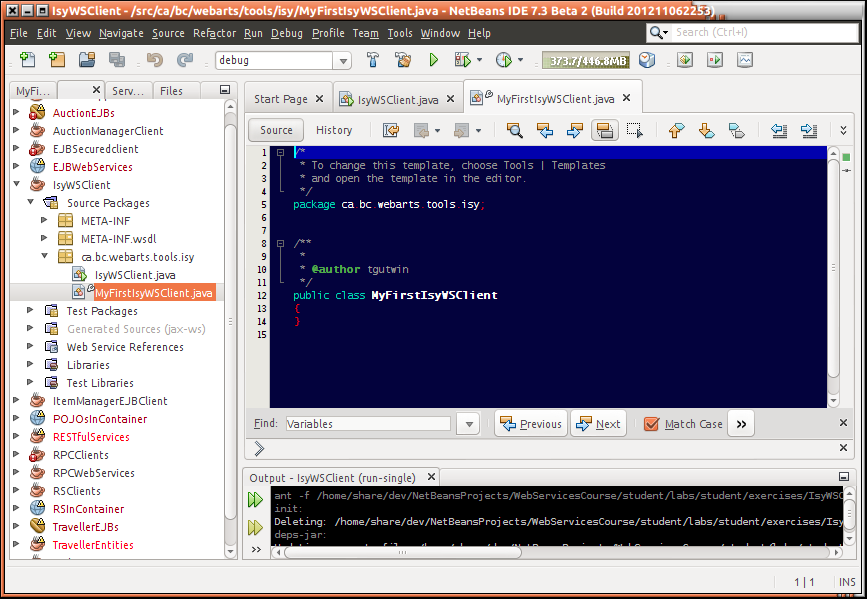
You should now have an template Class (without a main method) in your editing window...
Now before you start writing your Java app, we need to get the UDI Web Services loaded from the wsdl file.
WSDL Import
Changes to the wsdl file
The 1st thing to note is that JAX-WS wsimport tool is very strict and will not process the default UDI wsdl file without a few tweaks. This is because the udi ( http://isy99/services.wsdl ) or the actual wsdl file udiws30.wsdl is not 100% compliant with the W3C specification for WS-I basic profile definition R2204 -A document-literal binding in a DESCRIPTION MUST refer, in each of its soapbind:body element(s), only to wsdl:part element(s) that have been defined using the element attribute. see http://www.ws-i.org/Profiles/BasicProfile-1.1.html#Bindings_and_Parts .
Many of the message parts refer to a 'type' instead of 'element' . For example...
 <wsdl:message name="GetNodesConfigResponse">
   <wsdl:part name="nodes" type="uo:nodes"/>
 </wsdl:message>
This is easily fixed with a small abstraction
<xsd:element name="nodes" type="uo:nodes"/>
and then use that element in the original message part...
 <wsdl:message name="GetNodesConfigResponse">
   <wsdl:part name="nodes" element="u:nodes"/>
 </wsdl:message>
These are simple changes.
There are ~16 times in the file. I went through and updated the udiws30.wsdl file to add the following xsd:elements:
  <!--  RENAMED to add Type with the corresponding element that refers to it below -->
  <xsd:complexType name="UDIDefaultResponseType">
     <xsd:annotation>
         <xsd:documentation>
             Default status info response
         </xsd:documentation>
     </xsd:annotation>

     <xsd:sequence>
         <xsd:element name="status" minOccurs="1" maxOccurs="1" type="xsd:string"/>
         <xsd:element name="info" minOccurs="0" maxOccurs="1" type="xsd:string"/>
     </xsd:sequence>
  </xsd:complexType>

  <!--  RENAMED to add Type with the corresponding element that refers to it below -->
  <xsd:complexType name="UDITimeResponseType">
     <xsd:attribute name="val" type="xsd:dateTime" use="required">
         <xsd:annotation>
             <xsd:documentation>
                 Timestamp in the form of YYYYMMDD HH:MM:SS
             </xsd:documentation>
         </xsd:annotation>
     </xsd:attribute>
  </xsd:complexType>

  <!--  RENAMED to add Type with the corresponding element that refers to it below -->
  <xsd:complexType name="UDIIntResponseType">
     <xsd:attribute name="val" type="xsd:int" use="required">
         <xsd:annotation>
             <xsd:documentation>
                 Return value of type integer. Currently used for IsSubscribed
             </xsd:documentation>
         </xsd:annotation>
     </xsd:attribute>
  </xsd:complexType>

 <!-- PATCH - NEW Entries: Abstract types with the element attribute -->
     <xsd:element name="UDIDefaultResponse" type="u:UDIDefaultResponseType"/>
     <xsd:element name="UDITimeResponse" type="u:UDITimeResponseType"/>
     <xsd:element name="UDIIntResponse" type="u:UDIIntResponseType"/>
     <xsd:element name="nodes" type="uo:nodes"/>
     <xsd:element name="configuration" type="uo:configuration"/>
     <xsd:element name="SysStat" type="uo:SystemStatus"/>
     <xsd:element name="DT" type="uo:DateTime"/>
     <xsd:element name="SystemOptions" type="uo:SystemOptions"/>
     <xsd:element name="SMTPConfig" type="uo:SMTPConfiguration"/>
     <xsd:element name="DBG" type="uo:DBG"/>
     <xsd:element name="SceneProfiles" type="uo:SceneProfiles"/>
     <xsd:element name="SubscriptionResponse" type="uo:Subscription"/>
     <xsd:element name="LastError" type="uo:LastError"/>
     <xsd:element name="DDNSHost" type="uo:DDNSHost"/>
     <xsd:element name="Var" type="uo:Variable"/>
     <xsd:element name="Vars" type="uo:Variables"/>
 <!-- PATCH End: Abstract types with the element attribute -->
Then update the message parts to refer to these new elements= instead of type= .
The following message parts with type attributes were changed:
- <wsdl:part name="response" element="u:UDIDefaultResponse"/>
- <wsdl:part name="timeResponse" element="u:UDITimeResponse"/>
- <wsdl:part name="intResponse" element="u:UDIIntResponse"/>
- <wsdl:part name="nodes" element="u:nodes"/>
- <wsdl:part name="configuration" element="u:configuration"/>
- <wsdl:part name="SysStat" element="u:SysStat"/>
- <wsdl:part name="DT" element="u:DT"/>
- <wsdl:part name="SystemOptions" element="u:SystemOptions"/>
- <wsdl:part name="SMTPConfig" element="u:SMTPConfig"/>
- <wsdl:part name="DBG" element="u:DBG"/>
- <wsdl:part name="SceneProfiles" element="u:SceneProfiles"/>
- <wsdl:part name="SubscriptionResponse" element="u:SubscriptionResponse"/>
- <wsdl:part name="LastError" element="u:LastError"/>
- <wsdl:part name="DDNSHost" element="u:DDNSHost"/>
- <wsdl:part name="Var" element="u:Var"/>
- <wsdl:part name="Vars" element="u:Vars"/>
This process should work on any version of the wsdl http://isy99/services.wsdl . Note: the version of the wsdl that you get from your ISY is a small version that imports the main wsdl and defines the service and port. For ease, I suggest downloading the UDI WSDK and work on the local files contained in it.
- A patched wsdl is attached udiws30_patched.wsdl
- If you want, do a diff between them to be clear what changes were made
Import the updated udiws30_patched.wsdl file
Right click on the NetBeans project and click 'New Web Service Client'
- This will ask you for the location of the wsdl file
- It will also ask for a package to put the resulting code
- I used ca.bc.webarts.tools.isy.webservices
NetBeans will call the wsimport tool and automatically generate a bunch of new classes - one for each UDIServices service. You can then use/call them in your Java application.
See them along the left under Web Services References. See the Grey menu item named Generated Sources (jax-ws) - this is where all the generated Java classes reside.
Import the ELK WSDL file
The Elk web services definition file imports without any of these type/element errors!
Right click on the NetBeans project and click New Web Service Client and point it to the
udielkws1.wsdl
file.
Write your Java Application
Now you can go back and write your code. Click on your Java app file in the Project/Source Packages . It should show an empty class. Create a main method.
Create the Service And Port
All of the services get called from the UDIServices and UDIServicesPortType so I created a class objects for these.
 import ca.bc.webarts.tools.isy.webservices.UDIServices;
 import ca.bc.webarts.tools.isy.webservices.UDIServicesPortType;
 ...
 UDIServices service_ = new UDIServices(); // this classname originally comes from the wsdl file
 UDIServicesPortType port_ = service_.getUDIServicesPort();
Note: your import package names will be different than my example.
HTTP Basic Authentication
The UDI ISY expects BASIC HTTP authentication that gets inserted into the HTTP header. This is easy in Java by getting the session context and adding the username/password to it.
 private String isyUsername_ = "admin";
 private String isyPassword_ = "yourPasswordHere";
 ...
 /* These calls deal with hashing them into Base64 and putting them into the http header */
 Map<String, Object> reqCtx = ((BindingProvider) instance.port_).getRequestContext();
 reqCtx.put(BindingProvider.USERNAME_PROPERTY, instance.isyUsername_);
 reqCtx.put(BindingProvider.PASSWORD_PROPERTY, instance.isyPassword_);
Call Web Services
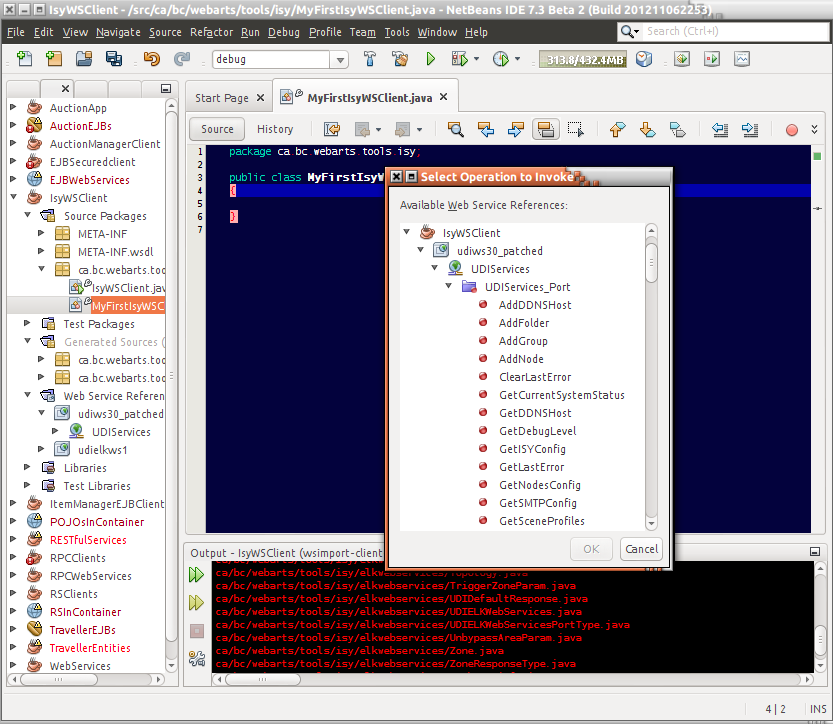
Netbeans has an easy code create feature that automatically creates the code to call your new web services.
In the editor window, right click and then click on Insert Code... and select call web service operation. a list off all the services come up, you choose which one and it will create the code to call it.
Now, the rest is the easy part because all the WebServices have been wrapped in Java methods. For example, to get the ISY Date and Time...
 import ca.bc.webarts.tools.isy.webservices.DateTime;
 import ca.bc.webarts.tools.isy.webservices.Empty;
   ...
 DateTime dt = port_.getSystemDateTime(new Empty());
 System.out.println("NTP time=" + dt.getNTP());
Sample Java App
Here is my full (very simple) UDI/ISY Web Services Client.
  package ca.bc.webarts.tools.isy;

  /* These are all generated from the JAX-WS wsimport tool */
  import ca.bc.webarts.tools.isy.webservices.DateTime;
  import ca.bc.webarts.tools.isy.webservices.Empty;
  import ca.bc.webarts.tools.isy.webservices.UDIServices;
  import ca.bc.webarts.tools.isy.webservices.UDIServicesPortType;
  import ca.bc.webarts.tools.isy.webservices.Variable;

  import java.util.List;
  import java.util.Map;
  import javax.xml.ws.BindingProvider;

  public class IsyWSClient
  {
    private String isyUsername_ = "admin";
    private String isyPassword_ = "admin";
    private UDIServices service_ = new UDIServices();
    private UDIServicesPortType port_ = service_.getUDIServicesPort();

     public static void main(String[] args)
     {
         IsyWSClient instance = new IsyWSClient();

         Map<String, Object> reqCtx = ((BindingProvider) instance.port_).getRequestContext();
         reqCtx.put(BindingProvider.USERNAME_PROPERTY, instance.isyUsername_);
         reqCtx.put(BindingProvider.PASSWORD_PROPERTY, instance.isyPassword_);

         DateTime dt = instance.getSystemDateTime();
         System.out.println("NTP time=" + dt.getNTP());

         //List<Variable> isyVars = instance.getVariables(1);// 1=Integer Variable 2=State Variable
         //for (Variable variable : isyVars)
         //{
        //  System.out.println(variable.getId() + "=" + variable.getVal());
         //}
     }

     /**
      * gets a list of isy variables by type spec'd.
      * @param type 1=IntegerVariable 2=StateVariable
      * @return a list of vars
      */
     private List<Variable> getVariables(int type)
     {
       return port_.getVariables(type);
     }

     /**
      * Gets the ISY DateTime object.
      * @return the ISY DateTime object
      */
     private DateTime getSystemDateTime()
     {
       return port_.getSystemDateTime(new Empty());
   }
  }
Debug SOAP Messages With TCPMon
If you want to watch the SOAP messages that are going-to --> and <--coming-back from your ISY, you can use a small (free) Java program called TCPMon.
It acts as a proxy. You point your Web Services app Endpoint Address at TCPMon and TCPMon echoes it to the screen and redirects it onto your ISY. To change your endpoint address, do either:
- edit the WSDL file to point at the TCPMon localPort such as: http://localhost:8080 and re-import it the WSDL to have it regenerate the code
OR
- Update the existing Service class with a new endpoint address
- URL newServiceURL = new URL("http://localhost:8080/services");
- UDIServices tcpMonService = new UDIServices(newServiceURL);
- UDIServicesPortType tcpMonPort = tcpMonService.getUDIServicesPort();
- see http://stackoverflow.com/questions/2046790/change-webservice-endpoint-address-at-run-time
You can even manually type or edit the SOAP message and send it direct to your ISY.
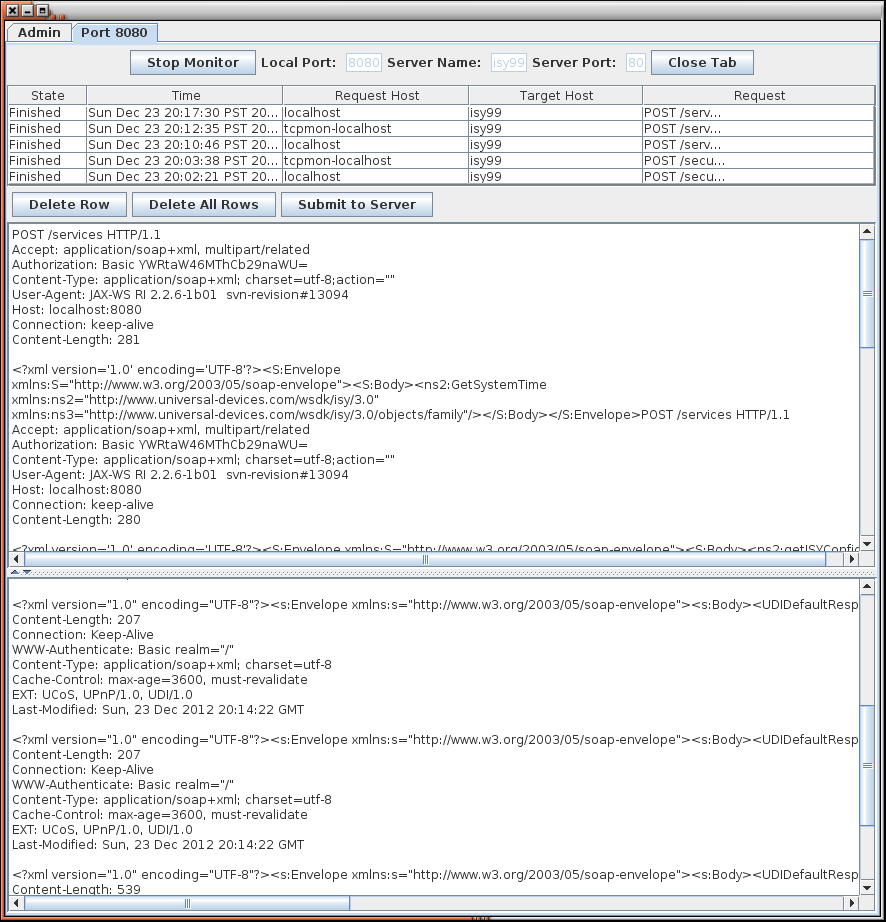
Download it at its Google Code hosted site (http://code.google.com/p/tcpmon).
