Eisy:User Guide
Welcome to our eisy corner: your one place for anything eisy!
Some Definitions!
ISY on Anything (IoX)
IoX is shorthand notation for ISY on Anything. For the old timers, ISY is the code that runs on the 994, now running as an optimized and fast service on eisy and Polisy.
Plugin (formerly Node Servers)
As you might already know, in ISY, everything is represented as a Node. These are things (or devices) that show up in your left navigation bar under ISY. A long time ago, these nodes were limited to INSTEON,X10/A10, Z-Wave, and Zigbee. Basically, protocols for which ISY994 had native support. We designed and developed node servers so that developers could integrate their things into ISY as nodes. And, hence, Node Servers: they serve nodes to ISY. Sadly, many did not buy into the name of Node Server so the term was changed to Plugin for simple use and understanding. Throughout the wiki (and forums) the terms Plungin(s) and/or Node Servers can be used interchangeably.
These nodes can be anything. They represent real devices such as Ring, Tesla, WiFi light bulbs, Ecobee, or they could be virtual such as calendars and climate services. Once a node is represented in ISY, then the whole ISY event based and programming environment are available to it. In short, Plugins allow ISY to support pretty much any device or thing out there.
But, where do these Plugins (formerly node servers) live? Well, you have come this far, so read on ...
Polyglot
Plugins have to run on some computing device. And, forcing each developer to have to come up with his/her own plugin from scratch would be completely detrimental to our quest. So, we designed and developed Polyglot which is a framework that allows developers to develop their plugins with ease and confidence that all the plumbing/security and communications with ISY is handled automatically.
Polyglot version 3 (PG3) is the latest version of Polyglot which includes much enhanced functionality and, most importantly, enables the developers to charge for their plugins. PG3 is only available on eisy and Polisy. Polyglot V2 (originally available on the Polisy) is no longer supported. If your Polisy has not been upgraded to PG3x please follow the directions to upgrade to PG3x in the Polisy User Guide.
eisy | home
eisy is our own beautiful, powerful hardware/OS preconfigured and optimized to run Polyglot (and other things). So, for those of you non-geeks out there, we have taken all the geekiness out of Polyglot and provided you with a ready to run box. So, now that we got you excited, let's continue with setting up and using your eisy.
First Steps
Installation
Installation is quite easy
- You can use UD Mobile which walks you through the setup. If not:
- Connect a Cat5e cable to eisy's Network Port and the other to your network. Note: the network must initially be DHCP auto enabled
- Connect the power supply
Accessing eisy
IoX Launcher is the best method to find and access all of eisy's features
- Install IoX Launcher
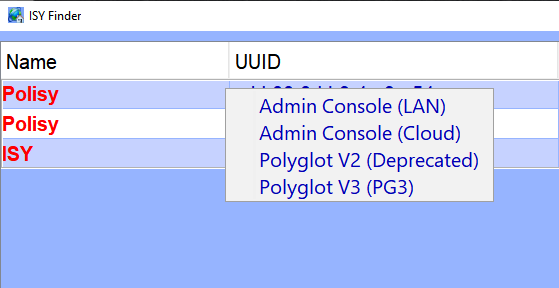
- Click on the row of the discovered eisy and you will see this menu
Admin Console (LAN) This menu item downloads the ISY Admin Console directly from eisy
Admin Console (Cloud) This menu item downloads the ISY Admin Console from the Universal Devices cloud servers
- Regardless of how you get to the ISY Admin Console (Cloud vs. LAN), the results are the same: Admin Console is brought up and connected directly to your eisy. Admin Console allows you to add/remove/change Z-Wave/INSTEON devices, make programs, and make configuration changes. The best source for what you can do with the Admin Console is our ISY (994) Cookbook.
Polyglot V2 (Deprecated) This is not available on eisy
Polyglot V3 (PG3) This takes you to Polyglot V3 (PG3) Dashboard.
Default Username and Password
admin | admin is the default username/password for everything in eisy.
To change your password please see the instructions below.
Setup ISY Portal for Remote Access/Alexa/GoogleHome/IFTTT
- Please use UD Mobile which walks you through the seutp
- If you are migrating from 994, make sure you complete the migration process from 994
Don't forget to check out all the things you can do with ISY Portal.
Mobile App
(#top)
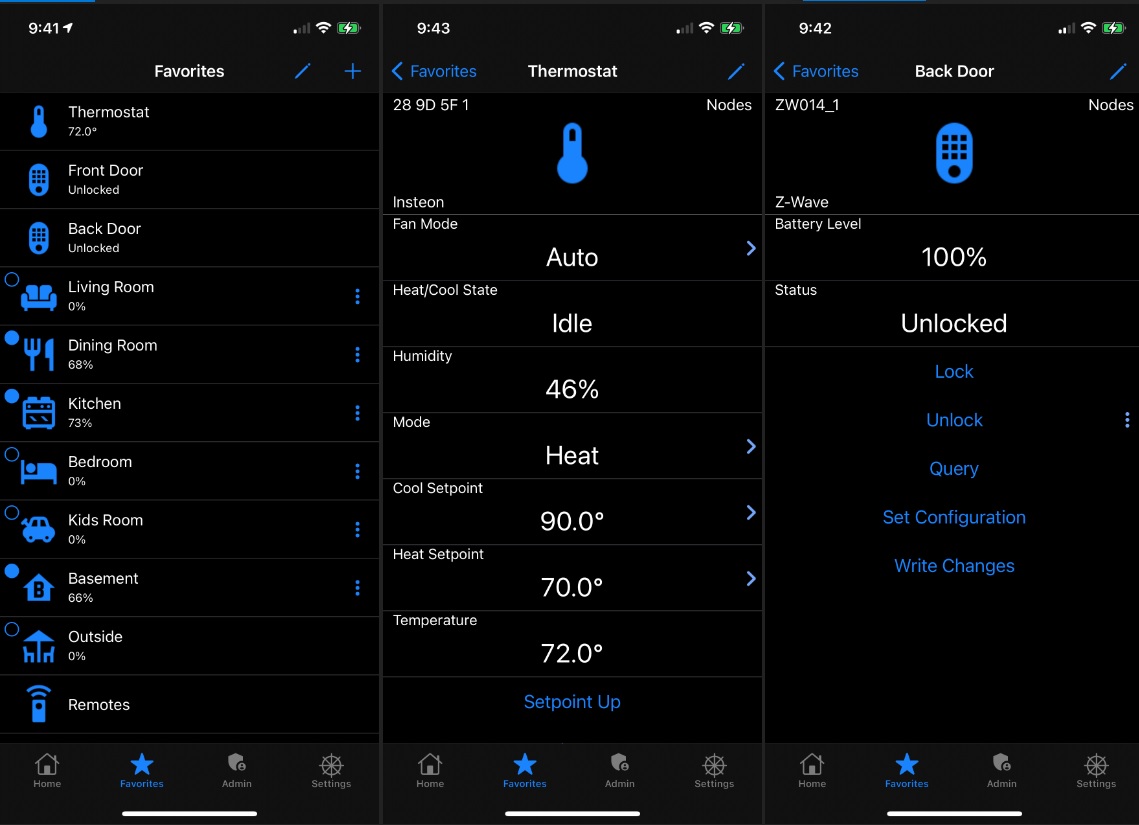
UD Mobile is everything you have ever dreamed of. It lets you control and monitor anything that's commissioned to your eisy, and it's FREE!
UD Mobile is developed by Universal Devices.
Forum support is available for UD Mobile.
eisy-ui
(#top)
eisy-ui is a service that runs on your eisy that provides our next-gen web interface.
More than just a web interface, it is also the direction we are taking to make our technology easier to use.
Background
These are the design goals of eisy-ui:
- Provide a nice and configurable web based dashboard to interact with your home.
- Get rid of our old Java based Admin Console.
- Integrate the plugins system in the same web interface.
- Simplify access to your eisy by using standard http (80) and https (443) ports for everything.
- Simplify access by using only one set of user/password: Your portal username and password.
- Continue to support both local-first operations and still provide cloud capabilities.
eisy-ui is still beta software, and many features will be added in the coming months.
Changes introduced with eisy-ui
eisy-ui is included automatically when you Upgrade packages.
You can access eisy-ui by pointing your browser to http://eisy.local or https://eisy.local. If using https, your browser will give you a warning. You will have to accept the self-signed certificate to continue.
Instead of using eisy.local, you can also use your eisy ip address.
Everything that worked before continues to work the same way:
- IoX will respond to API requests on port 8080/8443 and require the same local username & password
- PG3x/Plugins can still be used using https://eisy.local:3000, using your local username & password
What's different with eisy-ui:
- IoX APIs can now be accessed on port 80/443, but requires your portal username and password.
- PG3x/Plugins can be accessed within eisy ui at https://eisy.local.
- Previously, you sometimes had to click System | Switch Portal Profile.
- This is no longer the case. When logging in to eisy-ui, you are automatically logged in to PG3x/Plugins, and this also provides PG3x with the access to portal.
- Please note that your eisy never stores your portal credentials.
- Portal connectivity: When eisy-ui is installed, connectivity to portal is made by eisy-ui's service. This has no functionnal effects, other than it allows portal to establish multiple connections to Portal and therefore increase the connection speed.
- Portal approvals: There has always been a mecanism in place to approve portal-to-IoX connectivity in the Admin Console (Configuration | Portal).
- If Admin Console is connected to IoX directly, it can no longer approve/revoke access as it no longer controls the portal connection
- If Admin Console is connected to eisy-ui service (No port in IoX Launcher), then approve/revoke works just like before
- However, when logging in to eisy-ui, if the eisy needs approval, the approval process runs automatically.
- Subscriptions: Although most rest API calls are simply proxied to IoX, this is not the case for subscriptions. eisy-ui's implementation of subscriptions allows to have an unlimited number of subscriptions (other than CPU/Memory).
How to customize the Home Page
Configuring Tiles
Concepts
A tile consists of widgets that interacts with one or several nodes.
For example, you may have a thermostat where you want to display the current temperature, Control the Mode, Heat setpoint and Cool setpoint. That would be configured using your thermostat node, and 4 widgets.
Another example would be sprinklers. Typically, each sprinkler zones would be a node. In that case, a good setup would be a single tile with multiple "switches", one per node. Therefore you would configure the tile with all the sprinkler nodes, and one "switch" for each of them.
Getting started
First click on the gear icon on the top right to get into edit mode.
The easiest way to create tiles is to click on Add tiles, then select the nodes for which you want to create tiles. In the "Create as..." column, you will see by default "Default tile". This option creates a tile showing all the properties and all the commands the node has, similar to what you would see in the Admin Console.
If the node is recognized as a thermostat, color bulb or as a regular switch, additional options may appear. For example, if the node is recognized as a color bulb that supports hue and saturation, you will be able to create a tile as a color bulb which will come preconfigured with hue, saturation and level sliders, a color swatch, and on/off buttons.
Whichever type of tile you create, you can always edit the tile later to add, remove or edit widgets.
Another way to create tiles is to go to the Nodes page and Right-Click on a tile. This will allow you to create a tile with that specific node.
Once you have created tiles, you can resize and move them around your page.
In most cases, you will want to at least resize the tile vertically. The quickest way is to open the tile menu (3 dots at the top right of the tile), and click on "Resize tile". That will resize the tile based on the content.
When the page looks like you want, make sure to click "Save Changes" to save your changes and exit edit mode.
Customizing tiles
When in edit mode, you can click on the tile menu and click "Edit tile" to open the Tile Editor. If you don't have a tile yet, you can click "Add custom tile" to start a tile from scratch.
In the top section, you can choose an icon and its color that will be displayed on the top of the tile.
In the "Nodes" section, this is where you tell the tile what Node(s) to interact with. In most cases, that will be a single node. However, if you want to control multiple nodes within the tile, click on "Add Node" to select the relevant Nodes. In the case of a Hue Color bulb for example, you will want to include both the color node, which allows to set the hue and saturation, and the main node, which allows to turn it on/off and set the level.
In the "Widgets" section, this is where you configure what controls you want to display in the tile. As an example, if you want to display properties, you need to add the Properties widget. Then, in the widget, you can select which properties to display.
To edit a widget or see how it is configured, click on the pen icon on the right.
To reorder widgets within the tile, just move them around using drag and drop.
In the "Widgets (Bottom)" section, these are widgets that are displayed at the bottom of the Widget. This is normally used for Buttons.
If you want to change the name shown at the top of the tile, please rename the node in the Nodes section. The name of the tile is the name of the node. If you have multiple nodes, the name of the first node listed is the name of the tile. You can reorder the nodes in the Nodes section if needed.
Configuring pages
If you have too many tiles to display, you can create multiple pages, rename and/or delete them.
To add a new page, when in edit mode, click on "Add page", give it a name and start adding tiles.
If you have existing tiles on another page that you want to move over, edit that page, then use the tile menu and click "Move tile to another page".
You can create bookmarks pages for quick access to specific pages.
Admin Console
IoX Launcher will detect eisy-ui on ports 80/443. If you see a url in IoX Launcher with no port numbers, this is eisy-ui, which means that it will need your portal username and password to log in.
If you forgot your password, go to eisy.local and reset your password. Alternatively, you can go to my.isy.io to reset your password.
If you don't have a portal account yet, please go to my.isy.io to create your account. Then, go to eisy.local and login once.
Please note that to use the admin console, your eisy uuid must be in your portal account, and it must be approved. The easiest way to add your eisy to your portal account and approve it is to login to eisy-ui as this automates the whole process.
You can still Approve/Revoke access in the Admin console, but to do this you have to be connected to eisy-ui's service. The options under Configuration | Portal will not work if connected to IoX directly. Portal connectivity is managed by eisy-ui.
If you want to use the Admin Console with your local username and password, you can use https://eisy.local:8443/desc in IoX Launcher.
Using eisy without connectivity
Although eisy-ui requires your portal username and password, it will work without Internet connectivity.
When you log in;
- If there is connectivity, it will check your credentials against portal.
- If there is no connectivity, it will authenticate you using a cached copy of your credentials.
- The cached copy of your your portal password is encrypted using one-way encryption (It's technically a hash of your password).
In addition, if there is no connectivity, a few features will be disabled, such as:
- The PG3x/Plugins store.
- The PG3x/Plugins purchases page.
Plugins themselves will continue to run, unless they need connectivity.
Should I use Admin console or eisy-ui?
One of the goals of eisy-ui is to replace the Admin Console, but many features are still missing. Also, some features are unique to eisy-ui.
Features of both eisy-ui and Admin Console
These features are available in both eisy-ui and Admin Console:
- Interact with your nodes
- View the properties of your nodes
- Run commands
- Rename or delete nodes
- Programs: Interact with your programs
- See when they last ran
- run them
- Enable/Disable them
- View the actual program (No edit yet)
- Variables: Full variables support
- Set and view the values
- Create/Delete variables
- Portal Authorization
- See the portal approvals
- Approve/Revoke access from an account
Features only in eisy-ui
- The Dashboard (Home page)
- Allows to create and organize tiles into one or more pages
- Tiles allows you to view the nodes you are interested in, with only the properties and controls that are relevant to you.
- Group relevant nodes in the same tile, such as sprinkler zones, or multiple lights from a room.
- Plugins
- Plugins (formerly PG3) have been integrated into eisy-ui.
- Access your plugins using a single login
Features only in Admin Console
Many features still require the admin console, such as:
- Everything related to Insteon, ZWave, Zigbee or Matter
- Scenes
- Create or modify programs
- Backup & restore
- Upgrade packages
- Logs (Error log, event log, etc)
- Everything under Configuration (except Portals)
- OpenADR
Device Support
Z-Wave Support
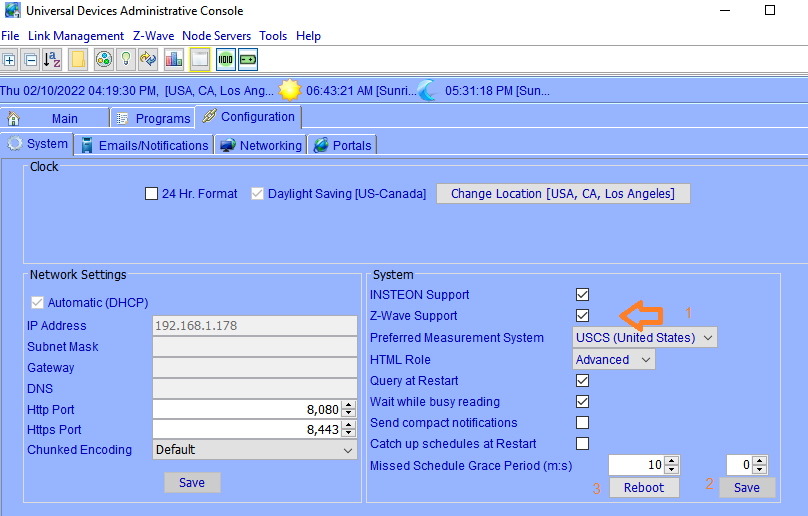
Simply plugin our ZMatter USB dongle (Red = Zigbee // Yellow = Z-Wave) If you don't have Yellow/Red bands, then look for Zigbee and Z-Wave imprints (faint) at the base of the antenna.
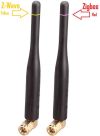
- Go to the Admin Console | Configuration tab
- Check Z-Wave Support Checkbox
- Click the Save button
- Click the Reboot or Restart IoX button.
Node Servers
Pick from anything in the Node Server Store and quench your thirst for integration!
NOTE: Prior to installing or configuring Plugins (formerly Node Servers) please CLOSE IoX Admin Console. Any plugin installation nodes or updates are only read by the Admin Console upon loading the Admin Console. It is often suggested that you only have one system open/active at a time. Since PG3x (Plugin) feeds information to the ISY/IoX system and the Admin Console currently (prior to 2025) only refreshes Plugin nodes and/or data on loading it is best to close the Admin Console while altering any PG3x/Plugin configuration.
INSTEON Support
eisy supports the following PLMs:
- 2412S
- 2413S
- 2413U, and
- 2448A7
If you have the 2412S or 2413S (serial), you will need our Serial PLM Kit
eisy only accepts USB connections for the PLM. (The network port on the eisy ONLY supports a wired network connection.)
- Connect the PLM to any eisy USB port
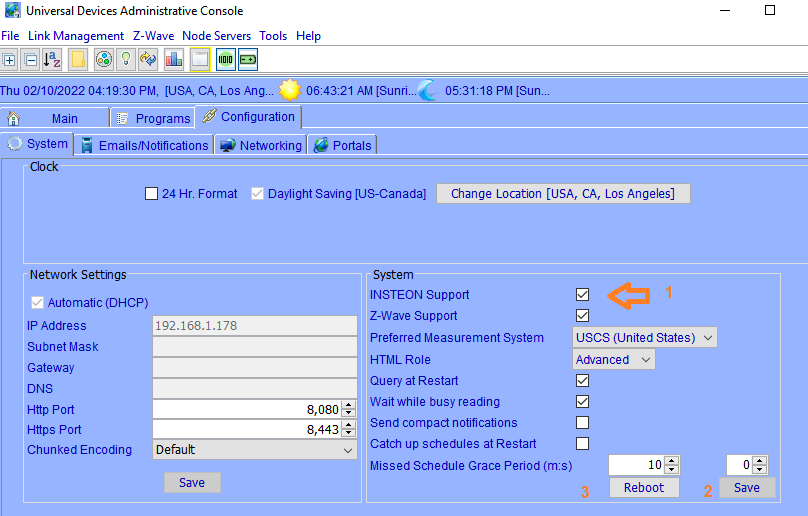
- Use IoX Launcher to access Admin Console | Configuration tab
- Check INSTEON Support Checkbox
- Click the Save button
- Click on the Reboot button. Here's the INSTEON User Guide.
Migration
Warning MobiLinc Connect is NOT supported on eisy.
(#top)
Background
- Insteon
- The Eisy / Polisy implementation of Insteon is a port of the Insteon implementation on the ISY-994. Therefore, you will notice few if any differences.
- Z-Wave
- Our Original Z-Wave implementation is the certified version of Z-Wave on the ISY-994. This code was ported to Eisy / Polisy, but is being deprecated in favor of our new more functional implementation called ZMatter Z-Wave.
- The original implementation on Eisy / Polisy can use generic Z-Wave controllers such as the Zooz stick, or, it can use the ZMatter Z-Wave controller (either board or USB dongle).
- The ZMatter Z-Wave implementation can only use the ZMatter Z-Wave controller (either board or USB dongle).
What to Expect During Migration
- Insteon
- The Insteon network on ISY-994 will be seamlessly transferred to Eisy / Polisy. Your nodes, programs, and scenes using Insteon will remain unchanged.
- Z-Wave
- The Z-Wave network managed by ISY-994 will be migrated to the ZMatter Z-Wave implementation on Eisy / Polisy. The devices in the network will remain the same, but their representation in ISY may change.
- Nodes
- Z-Wave ISY Nodes will be reused whenever possible, but new nodes may be created as well.
- Programs
- Z-Wave ISY nodes in programs will be migrated, however, node actions and conditions may no longer be valid if the node's support for them has changed.
- Scenes
- Z-Wave ISY Nodes in scenes will be migrated, but those using native links (i.e. association) may require updates.
- Programs
- Programs and variables will be transferred seamlessly, but some exceptions may occur if ISY Nodes or their commands and/or status have changed.
- Network Settings
- Starting with Polisy, and due to massive support requests, we have disabled static IP configuration. Please use DHCP reservation in your router instead. The advantage of DHCP reservation is that, in case you change your router, you can still find your eisy/Polisy.
- Important Note If you have devices pointing to your 994, you will have to update their IP and port#s. For both eisy/polisy, you should use the following ports:
- 8443 - secure
- 8080 - unsecure
- Network Resources
- All Network Resources will be migrated seamlessly, however, you will need to open and save each one individually.
- ISY Portal
- See ISY Portal Migrate configurations to a new ISY
- Polyglot / Node Servers
- See Migrating Node Servers to PG3x
Requirements
- If you are migrating Insteon you must have a compatible PLM
- Eisy / Polisy supports these PLMs: 2412S, 2413S, 2413U, and 2448A7
- If you have a 2413S (serial), you will need our Serial PLM Kit
- If you are migrating your Z-Wave Network, you must have our ZMatter Z-Wave USB Dongle
- If you are using Polisy, you can alternatively use our ZMatter Z-Wave Board for Polisy
WARNING: Make sure not to remove your ISY/polisy/eisy from your portal account before you are certain the migration is complete. If you remove your ISY/polisy/eisy from your account, this also removes related portal configuration such as your Amazon Echo spokens.
Preparing for Migration from ISY-994
On your ISY-994
- Make sure the ISY-994 has firmware 4.x or 5.x,
- If you are migrating your Z-Wave network
- You must be using a 500 Series Board in the ISY-994
- Make a backup of your Z-Wave network (Admin Console | Z-Wave | Backup)
- Make a backup of your ISY-994 (Admin Console | File | Backup ISY)
- Power down your ISY-994 (very important). ISY-994 needs to be powered off because when you migrate, both your ISY-994 and Eisy / Polisy will think they are controlling the Z-Wave network.
- If you are not migrating your Z-Wave network
- Make a backup of your ISY-994 (Admin Console | File | Backup ISY)
Preparing for Migration from Eisy / Polisy
You can migrate locally on the same Eisy / Polisy or to another Eisy / Polisy.
On the Eisy / Polisy your are migrating from
- Make sure Eisy / Polisy is up to date
- Go to Admin Console configuration page and select Upgrade Packages
- If you are not migrating your Z-Wave network
- Use (Admin Console | File | Backup ISY) to make a backup of your Eisy / Polisy
- If you are migrating your Z-Wave network
- Leave your current Z-Wave board / dongle connected
- Go to configuration tab in Admin Console and select "Migrate to ZMatter Z-Wave"
- Choose the option that allows you to create a "migration" backup (first option)
- You will see a series of popup windows providing information and asking simple questions
- Once you have your "migration" backup you are ready to migrate
- A migration backup is different than a regular backup.
- When a migration backup is restored it also migrates your Z-Wave network
Migrating
On the Eisy / Polisy you are migrating to
- Do the appropriate preparation step (see above)
- Make sure Eisy / Polisy is up to date
- Go to Admin Console configuration page and select update packages
- If you don't have a current backup, make a backup of your Eisy / Polisy (Admin Console | File | Backup ISY)
- If you are using Insteon, plug in the PLM
- If you are not migrating your Z-Wave network
- Use (Admin Console | File | Restore IoX) to restore either your Eisy / Polisy backup or your ISY-994 backup
- If you are migrating your Z-Wave network
- If you aren't already using it, plug in your ZMatter Z-Wave dongle and unplug any other Z-Wave dongle you may have been using.
- (Polisy only) If you have a ZMatter Z-Wave board then power down Polisy, add it, then power on again.
- Reboot Eisy / Polisy
- Use (Admin Console | File | Restore IoX) to restore your "migration" backup
- If you are migrating from Eisy / Polisy use the migration backup (e.g. "ISY-BackupWithZWaveMigration.v5.5.4__Sat 2023.01.21 09.07.44 AM")
- If you are migrating from ISY-994 use your ISY-994 backup
- When IoX restarts, it automatically does the following:
- Writes you Z-Wave network into the ZMatter Z-Wave controller
- Interviews every Z-Wave device in the Z-Wave nework, creating/updating nodes, programs and scenes.
- This process can take anywhere from a few seconds to a few minutes for each device depending on the complexity of the device.
- The best way to monitor the progress is to open the Admin Console Event Viewer to level 3
- For those who want lots of low-level details, you can also use this from the command line: tail -f /var/isy/FILES/LOG/ZWAY.LOG
- If you don't actually change your Z-Wave network by adding/removing Z-Wave devices after migration, you can back out the migration by connecting whatever Z-Wave dongle you were using before migration and restoring the backup you made prior to migration.
- If you are using Insteon
- Go to the Admin Console configuration tab and make sure INSTEON Support is enabled (default username/pwd = admin/admin)
- If you are using a new PLM, Restore the PLM
- Reconfigure any software utilizing to point to this Eisy / Polisy, restart the other software, if necessary.
- If you have ISY Portal on your 994
- Follow these instructions to migrate your account, license, and Alexa/Google Home settings
- This will also migrate all node server licenses from your Polisy to Eisy / Polisy
- If you are using Polyglot / Node Servers
- If you migrated your Z-Wave Network then make a backup of it (Z-Wave | Backup)
- Make a backup of your newly configured IoX.
Post Migration
- If you migrated your Z-Wave Network
- If you have any Z-Wave nodes with a type of (Placeholder) it means the device has not been migrated yet.
- In most cases they are battery powered devices that were not awake during migration
- To migrate one of these devices, wake it up (see user manual for the device) and then do the following
- right+click on a placeholder node for the device, select Z-Wave | Synchronize | Update with Interview
- When it completes do the same for the next device
Migrating Node Servers to PG3x
Migration is only possible with version 3.1.17 or later of PG3x. The version of PG3x that ships with eisy is currently 3.1.16 which does not support migration. Please upgrade packages first and make sure you are running version 3.1.17 of PG3x before attempting to migrate.
- Backup PG3 on Polisy.
- Restore from PG3 backup on eisy using the "Migrate from PG3 Backup" option.
Cautions:
- Node servers currently installed on eisy will be removed (and possibly replaced).
- Node servers migrated are left in the "stopped" state. You will need to manually start each one after migration.
- If the Polisy was configured to manage node servers on more than one IoX (say both Polisy IoP and i994) only one IoX will be migrated and you can't choose which one it will migrate.
- Node servers installed on the Polisy from the local node server store will likely fail to install on the eisy.
- Node server licenses should be migrated as part of the Portal migration step.
UD Mobile
See https://wiki.universal-devices.com/index.php?title=UD_Mobile#Migration
eisy (PG3) Dashboard
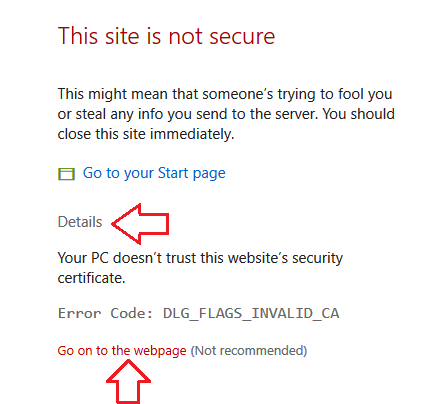
You will be prompted with a security warning by your browser because eisy uses a self-signed certificate. Please ignore the warning.
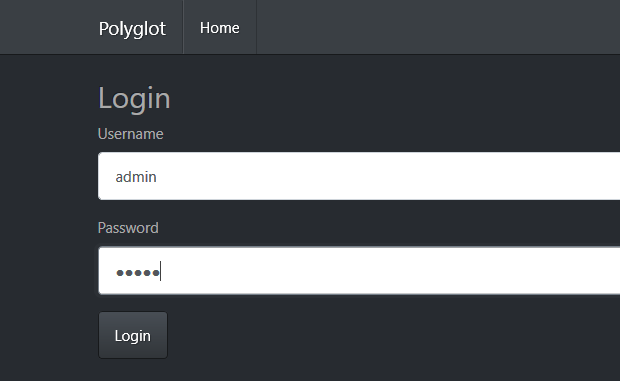
You are then presented with the login screen. The default username is admin and default password is admin. Please make sure you change your default username/password once you login.
Once you have successfully logged into eisy, you will get the eisy Dashboard which is designed to be simple and functional.
Change Password
Starting with the eisy the password is managed through the Admin Console user/pass settings. Changing the admin password in Admin Console (via IoX Launcher) will update PG3x login and will keep the ISY on eisy in sync. It is no longer necessary to change the password in multiple places.
ISYs
The eisy should automatically add the ISY running as localhost (or at IP 127.0.0.1) on the eisy. You can confirm this by clicking on "ISYs". It should show an ISY UUID with a checkmark next to it. Then click on "Edit Current ISY" to review/confirm information.
You can add/remove ISYs or IoXs through this menu.
- Click on the Add New ISY menu
- Fill out the entries as shown in the picture below
- Make sure you use HTTP and not HTTPS
Plugins Store Menu
NOTE: Prior to installing or configuring Plugins (formerly Node Servers) please CLOSE IoX Admin Console. Any plugin installation nodes or updates are only read by the Admin Console upon loading the Admin Console. It is often suggested that you only have one system open/active at a time. Since PG3x (Plugin) feeds information to the ISY/IoX system and the Admin Console currently (prior to 2025) only refreshes Plugin nodes and/or data on loading it is best to close the Admin Console while altering any PG3x/Plugin configuration.
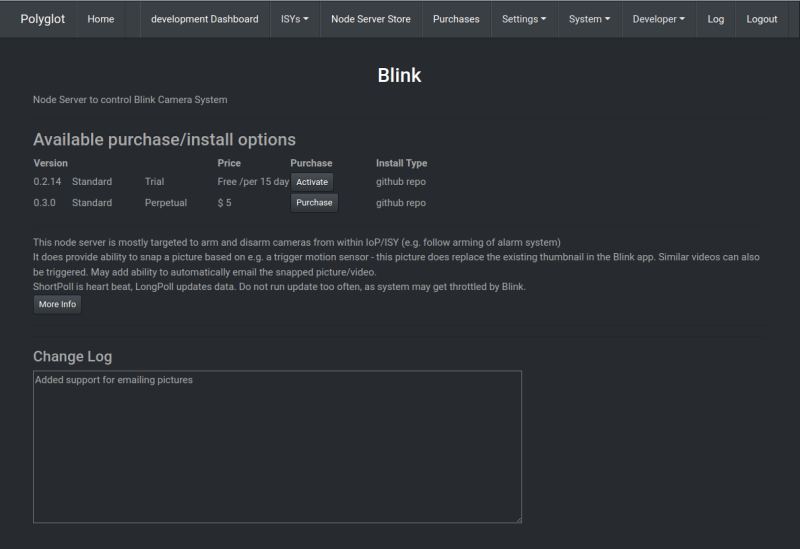
This is where all the available Plugins are listed. In order to install one of these Plugins into ISY/IoX:
- Click on the name of the Plugin you wish to purchase/install
- Additional information about the Plugin will be displayed, including the purchase/install options available.
There are 4 possible purchase options that may be available:
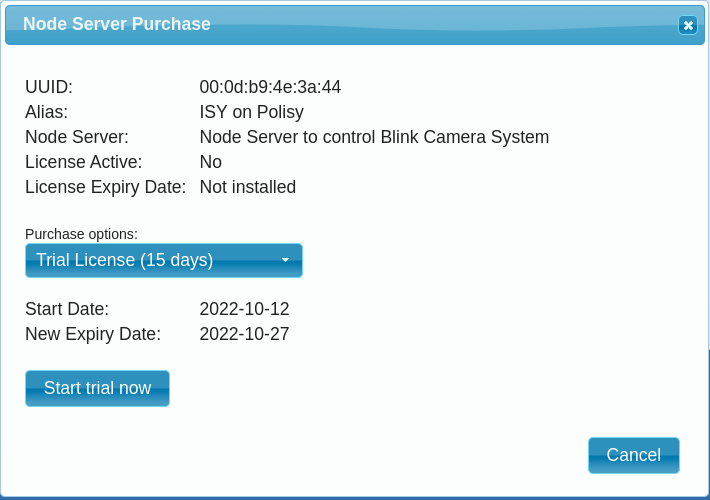
- Trial. Activating a trial license will make the Node Available for the trial period. When selected, the Activate button should change to an Install button.
- Free. Free Plugins will simply show an Install button and are available to be immediately installed.
- Purchase. Clicking the Purchase button will re-direct you to the Portal purchasing system where you can purchase an license for the Plugin (see steps below).
- Subscription. Click the Purchase button for a subscription will re-direct you to the Portal purchasing system where you can purchase a license for a specific time period.
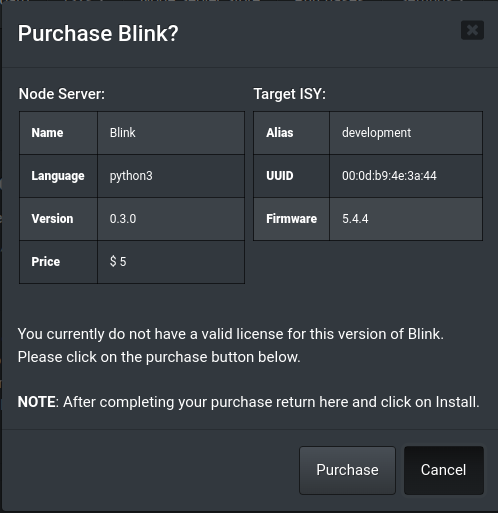
The Purchase Info displays basic info about the plugin and which ISY/IoX is currently being manages. Once you've confirmed this is what you wanted, click the Purchase button to re-direct to the Portal purchasing system. You may be asked to log-in to the Portal to complete the following steps.
The Portal purchasing system will give you the option to select the type of license you wish to purchase. Use the drop down box to select the license and then click the button to continue with the payment options.
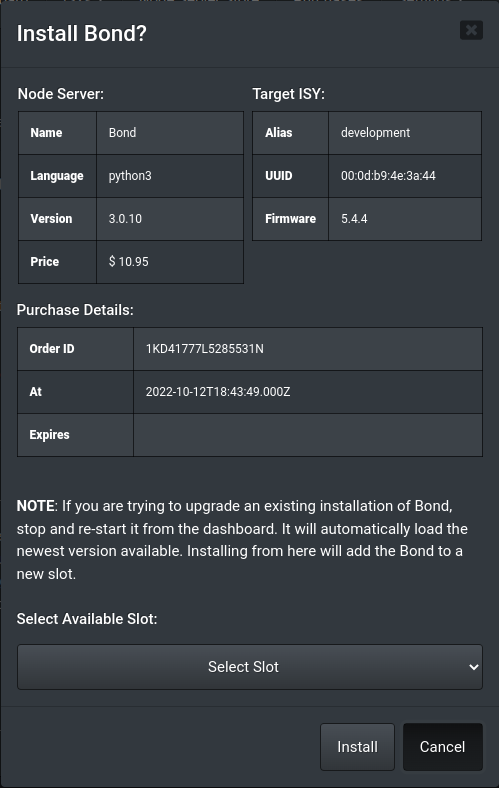
Once a plugin license has been purchased, you will be re-directed back to PG3. Navigate back to the plugin store and again select the plugin you just purchased. The plugin detail page will now show an Install button instead of a Purchase button. Clicking the Install button will display the plugin installation screen.
If this is the first time installing this plugin, you must select an empty slot before installing. If you have previously installed this plugin, you will be given the option to re-install it into the slot where it is currently installed.
Once installed, it should show up in the PG3 Dashboard.
Plugin Configuration
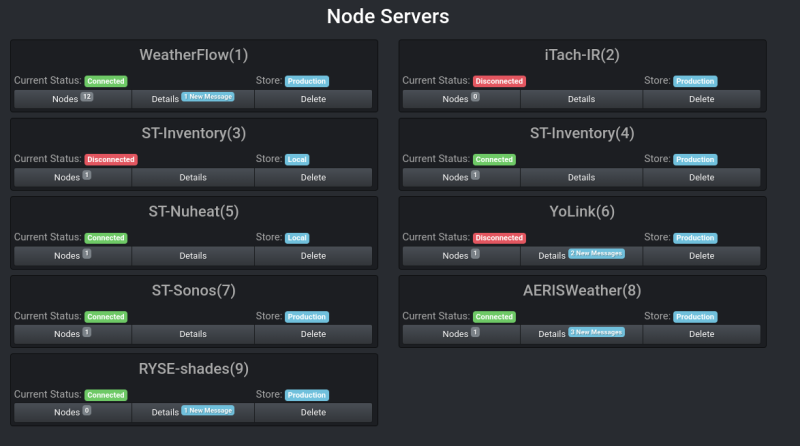
Once you've installed a node server it will show up on the Dashboard. The Dashboard will show a compact view of all installed node servers.
From the Dashboard, you can select an individual node server to configure and/or control by clicking on the 'Details' button. You can also remove node servers using the 'Delete' button.
The node server details page starts with the status of the node server. A node server status is one of:
- "Connected" which means the node server is running and is communicating with PG3(x).
- "Disconnected" which means the node server is not running or is not communicating with PG3(x).
- "Failed" which means the node server unexpectedly stopped communicating with PG3(x), possibly it has crashed.
You will also see the version of the node server and the store from which the node server was installed.
If the node server is running, you'll see the time/date it was started and how long it has been running.
Below that is a set of buttons.
- The "Start" button will start the node server running if it is currently in the "Disconnected" or "Failed" state.
- The "Stop" button will stop the node server if it is currently in the "Connected" state.
- The "Restart" button performs a stop and then start on the node server.
- The "Load Profile" button will send the node server's profile files (node definitions) to IoX device. Normally, the node server will do this automatically so this is rarely needed.
- The "Nodes" button will switch views to show details on the nodes created by the node server.
- The "Configuration" button will switch views to show the configuration options for the node server.
- The "Log" button will show the node server's log. Note Check the log if you are having problems. There's a lot of information here about what the node server is doing.
- The "Delete" button will delete/uninstall the node server.
- The "Discover" button is optional and will only be displayed if the node server has an option to discover devices.
To configure the node server, click on the "Configuration" button. This will switch views to the Configuration view.
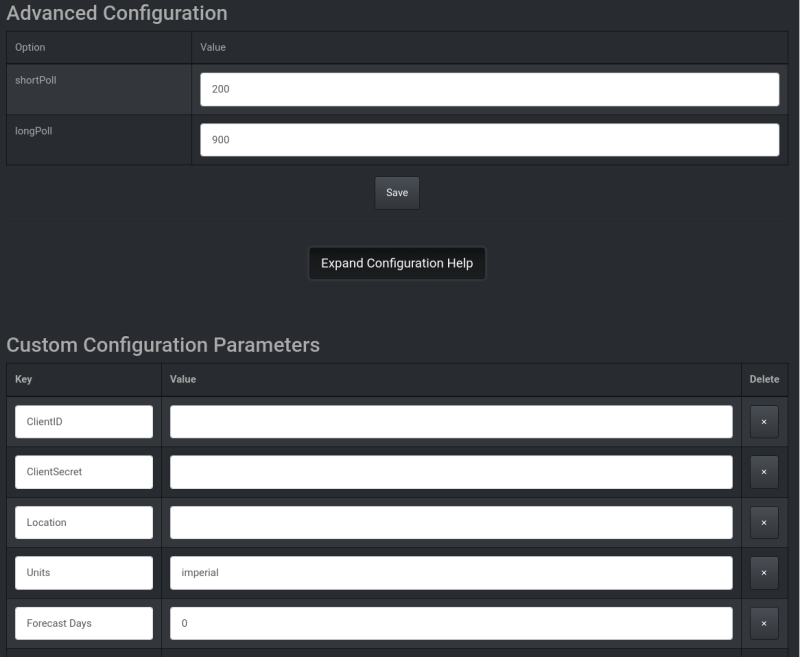
The first part of the configuration lets you adjust the Poll intervals. There are two poll intervals labeled as "Short Poll" and "Long Poll". How these are actually used is node server dependent. Many node servers will use the "Short Poll" interval to make queries for status updates. The interval is in seconds. I.E. a poll interval of 60 is 60 seconds or 1 minute. The node server's Configuration Help text should explain how the node server makes use of the poll values and what values are valid for the node server.
The second part of the configuration is the configuration help text. By default, it should be shown, but can be hidden using the "Collapse Configuration Help" button. This text should explain and possibly provide examples of how to configure the node server.
Following the help text are the main configuration parameters. These are key/value pairs. The node server should provide default values here, but some node server need information that is specific to your environment in which case you may be required to enter the both the key and the value. Once you have entered the required configuration use the "Save Changes" button to save your changes.
PG3(x) also gives the node server the ability to have custom templates for parameters. These will be listed below and will prompt you for the various parameters needed.
If the node server requires configuration before it can start, it will typically provide notices that prompt you to enter the required info. These will show up on the details view like this:
NOTE: Prior to installing or configuring Plugins (formerly Node Servers) please CLOSE IoX Admin Console. Any plugin installation nodes or updates are only read by the Admin Console upon loading the Admin Console. It is often suggested that you only have one system open/active at a time. Since PG3x (Plugin) feeds information to the ISY/IoX system and the Admin Console currently (prior to 2025) only refreshes Plugin nodes and/or data on loading it is best to close the Admin Console while altering any PG3x/Plugin configuration.
Purchases
This is where all your node server purchases show up. These node servers are tied to your eisy.
Multi Function Button
(#top)
eisy's power button acts as a multifunction button
Update and Upgrade All the Packages
As of Firmware 5.9.1 (os 14.1p6) [February 10, 2025] this option is no longer available. Please only use the Admin Console | Configuration tab | Upgrade Packages button to perform system updates.
Click the button one (1) time. Please consult supportbefore updating this route.
Recommended route for updating is through Admin Console -> Configuration Tab -> "Upgrade Packages" button.
NOTE: There is not a speaker on the eisy so there will not be any beeps on reboot. 
Go to WIFI Setup or Leave WIFI Setup mode
Click the button two (2) times.
Reset Credentials
Click the button three (3) times
This action resets the following passwords to the default (admin/admin):
- SSH
- ISY on eisy(IoX)
Be sure to change the passwords for these access methods after you log-in again.
Reset Networking
Click the button four (4) times
Reboot
Click the button five (5) times
Shutdown
Click the button six (6) times
Factory Reset
Click the button ten (10) times
Please wait 5-10 minutes after factory reset before attempting to reconnect to system. If System is not found by finder after the wait period please reboot system by clicking the button five (5) times and waiting two minutes for system to come online.
Using eisy In Desktop Computer Mode
(#top)
Yes, you can use eisy as a beautiful desktop running a lean version of XFCE on FreeBSD!
Attaching HDMI Ports
- Click the power button 6 times and wait for eisy to shutdown
- Attach your monitor(s) to the HDMI port(s)
- Click the power button to turn on eisy
- When you see the login prompt, login with your credentials (default = admin/admin)
- Type start.win at the prompt, accept the licenses, enter your credentials again and voila!
Installing Development Packages
Registered node server developers can do node server development on eisy. It has a full set of tools to allow you to compile C/C++, run Python and Node.js, and pretty much anything you can imagine. To install development packages
- sudo udxops.sh install.dev.pkgs
Enjoy!!!
Troubleshooting
(#top)
Can't Find eisy
First and foremost, all VPN software block discovery of eisy on your network. As such, if you have a VPN software running, please turn it off.
If you have a modern router, eisy advertises itself as eisy.local on your network. As such, and in most cases, you should be able to find eisy at https://eisy.local:8443/desc. What you need to do is:
- In IoX Launcher, click on the Add button
- Enter https://eisy.local:8443/desc into the dialog
- Click on the OK button
If you are still having a hard time finding your eisy, it's best to check your router's DHCP client list and look for a device that has the same MAC address as the one the label at the bottom of your eisy. eisy's MAC address starts with 00:21:b9.
Once you find the IP address for eisy, in this example, 192.168.1.122, then
- In IoX Launcher, click on the Add button
- Enter https://192.168.1.122:8443/desc into the dialog. Note 192.168.1.122 is an example. You should use the IP address for your eisy.
- Click on the OK button
Can't connect to ZMatter Z-Wave board / dongle
Sometimes the USB ports need to be reset within Eisy / Polisy. The simplest way to do that is to restart Eisy / Polisy (not just IoX). This will likely solve the connection problem.
If that doesn't solve it then the problem may be due to Z-Wave network traffic. Some Z-Wave networks with a high amount of constant network traffic can prevent IoX from detecting the port being used by the ZMatter Z-Wave+ board / dongle.
The port it is using will likely be either cuaU0 or cuaU1
You can override port detection by doing the following:
- Do this from a browser (if you use Help | About in Admin Console it will show your IP address e.g. something like 192.168.0.51)
- http://<your_polisy>:8080/rest/zmatter/zwave/port/name/override/set/cuaU1
- You should get this back (its important you see the 200)
- <RestResponse succeeded="true"><status>200</status></RestResponse>
- Restart IoX and it should connect to your ZMatter Z-Wave board / dongle
- If it does not connect, repeat the process but use a different port.
You can remove the override by doing the following:
- http://<your_polisy>:8080/rest/zmatter/zwave/port/name/override/clear
Monitor Goes Dark in Desktop Mode
This usually happens when eisy does not have the latest BIOS. To update the BIOS, please connect an HDMI monitor + keyboard to your eisy and reboot. Once you get the login prompt:
- Login
- Type the following command
sudo udxops.sh update.bios
- Wait for the monitor to go dark at which point you need to click on the F7 button many times till you get the boot menu
- From the boot menu, choose the 2nd row
- Wait for the update to complete. Please do NOT touch anything. The unit will reboot by itself
Upgrade Process - As of July 2022
Please see this important update (July 2022)
Unless explicitly requested by Universal Devices, the SSH method of updating the eisy should be avoided. Due to updates to the underlying operating system, unexpected consequences may be experienced when users force a full package upgrade and update using SSH.
You can simply click on the power button once and eisy will automatically try to upgrade itself. You will still need to reboot once completed.
Or, if you wish to use the Admin Console: use IoX Launcher to open the ISY Finder window.
Once logged in navigate to:
- Configuration tab
- System
Then click: “Upgrade Packages”
Allow ample time (5 minutes minimum, up to as much as 30 minutes) for update to process. Best to close admin console during this process. Re-launch admin console (should be prompted that system needs to reboot)
Navigate to:
- Configuration tab
- System
Then click "Reboot"
Admin console should close during this reboot. Allow time for system to reboot before attempting to load admin console or logging into PG3x dashboard.
This updating/upgrading process through Admin Console has been developed to handle downloading the proper packages from Universal Devices servers to update UD specific libraries and dependencies needed to keep the eisy operating efficiently and as designed.
(#top)
